
"2024 Approved Best Practices for Drone Cinematography"
Best Practices for Drone Cinematography
Tips on Filming with Drone


Max Wales
Mar 27, 2024• Proven solutions
Drones have power to create wonders in the film industry and we can observe their awesome performance with undergoing revolution in the filmmaking. Filmmakers are now able to create wonders with cinematic, jaw dropping results that were earlier just impossible in Hollywood productions. But if you are new to this world of drone then you must be searching for some information regarding how to shoot aerial videos using drone to get professional results. If so, then don’t worry! Because the article below will provide you complete information about impressive filming techniques with latest drones.
Let’s check a video tutorial first:
 PearlMountain Image Converter
Tips for Filming with Drone
Techniques
In order to get best results with your aerial shoot, try these professional techniques:
1. Go Slow
The very first recommendation to beginners from professionals is to move slowly. It leaves cinematic impression on viewers as your slow motion makes them think that you are shooting from a larger platform such as helicopter. No doubt, it will increase the production value and shots will appear perfectly crafted and well controlled.
Ensure that you operate RC control stick very smoothly. Take help from gradual movements so that undesired shakes in footage can be avoided and at the same time care about slow acceleration and deceleration to avoid distortion from end results.
It is good to pre-plan as well as visual most of your aerial shots. One should prefer to advance guard his filming location so that all pros and cons can be pre-observed and proper planning can be done to get rid of limitations of that area. If you know your requirements in advance and have an effective plan for the site then you will definitely be able to make most out of your limited battery life of drone. You will not feel happy if some shots are missed just because of mismanagement and drained drone battery.
2. Two Axis type Movement
There are few hidden tricks behind those breathtaking shots of big budget movies and it is good to implement them with care. Most of those professionals prefer to implement two axis type movements simultaneously. They often make some arrangements to fly backwards as well as downwards at the same time but note that such movements must be controlled at much smoother rate with stable adjustments.
3. Strafe
When you have to focus on attractive landscapes then the best idea is to use sideways movements or the strafing feature. It will help you to show landscapes with different prospective and results will naturally be more impressive. Usually, most of the shots over landscapes in Hollywood movies are recorded with aerial motions where drone keep on moving forward and backward, so if you try the strafing effect then it will definitely be a unique and awesome idea. This recording style will also help you to reveal various eye catching features of the landscape.
4. Orbit
If you want to achieve Orbit then you have to control your drone strafe movements towards left or right side while pulling that yaw stick to exactly opposite direction. Let me make it clear that yaw stick is a control stick that you will find on left side of your drone controller and it is there to control rotation action of drone. Note that, you need to have more practice on that yaw control because most of users, even professionals end up spinning much faster and results are too bad.
5. Fly Through Shots
Here is something more cinematic but it is going to be risky enough. You need to be more careful to capture this type of shots because it demands you complete attention on controller screen for drone navigation. If you believe on your piloting skills then you will definitely achieve success in this recording action. When these shots are captured perfectly, they have power to capture attention of viewers and they will soon become fan of your cinematography skills along with your risk management strategy.
Weather
When we talk about weather then it is something out of your control and you have just one option that is to pray mercy from Mother Nature. To capture some of the best shots you will often need to fly in a clean sky and you definitely don’t need that heavy fog and rain. This issue is more common in winter days, especially when you are working on high altitudes that get freeze due to cold.
What to do?
- The first most important trick is to avoid taking shots in windy day. Generally, most of the advanced drone units can bear the pressure of up to 25-35 mph wind but if it goes above this range then your footage will get spoiled. It is not a good idea to simply rely on post processing techniques like jello effect etc. However, few professionals are able to refine their shots with Wrap Stabilization Setting to get best results.
- Choose golden hours of the day to shoot your footage. The time of sunset and sunrise will help your footage to stand out as shadows are highly visible during this time and it will naturally create a natural impact. People rarely shoot scenes at sunrise time so you can try to implement this trick to prove yourself different from those common aerial shooters.

Camera
Some of the most common camera settings that demand your focus are flat image profile and shutter speed.
- **Flat Image Profile:**There is no doubt to say that your camera settings are going to leave great impact on your footage so use them effectively. Prefer to work on flattest camera profile as it will help you to get impressive dynamic range with aerial camera. This technique of shooting helps users to prevent clouds and sky and also helps users to retain details from darkest point on ground.
- Control Shutter Speed:
It is good to work with lower shutter speed and in order to avoid strobing effect one must prefer to shot by keeping camera close to ground. Keep it somewhere around 100th to 250th level of second, one can also work with ND filter to control shutter speed to desired lower level. In case if you work with 500th or 100th part of second then you will naturally obtain sharper frames with it leads to footage with heavy strobing.
 EmEditor Professional (Lifetime License, non-store app)
Editing
If you need to edit your shots to get customized results then it is most important to choose a professional and high quality software tool. One of the best professional recommendations is Wondershare Filmora due to its intuitive interface and ability to edit 4k video shoots. It can naturally lead to Hollywood style feeling with impressive adjustments of colours and other video effects.
 Download Mac Version ](https://tools.techidaily.com/wondershare/filmora/download/ )
Steps to edit videos using Wondershare Filmora:
Step 1 Import video files: First of all you need to import your files from computer folder to main interface of Wondershare Filmora. You can either prefer to use the “Import” option directly or work with drag and drop functions that can bring all desired files immediately to software timeline.

Step 2: Cut Videos:
Simply move the slider position to the specific point on your video from where you need to cut it down. In case if you want to remove any specific part permanently then split it using cut option and then use delete button from right menu or from toolbar to remove it. In case if you want to cut your video into multiple parts then simply repeat this process. But note that, you need to save those multiple sections of files one by one while deleting the unwanted portions.
Step 3: Scene Detection:
 PCDJ DEX 3 for Windows & MAC is the total entertainment DJ software solution, offering audio, video, and karaoke mixing ability. Automatic beat-sync, smart looping, 4 decks, DJ MIDI controller support, Karaoke Streaming and much more.
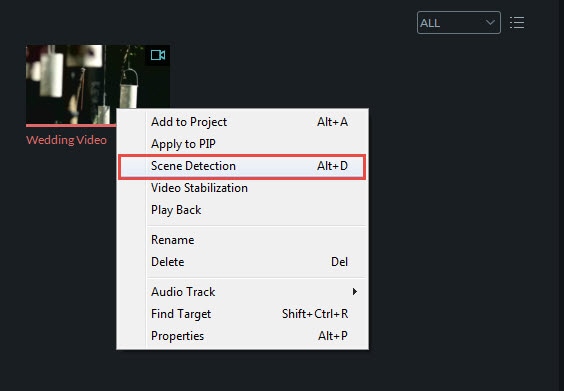
If you want to reach to certain segment of video quickly then use scene detection function. Just highlight your video on item tray and then right click, from the drop down menu, select “Scene Detection” option and now you can immediately separate your video into various parts as per need. It will help you to reach to specific part with ease.
Step 4: Apply Effects:

Wondershare Filmora provides wide range of features and editing options. One can easily add transitions, filters, overlays, titles, text and other useful elements with ease. The filmora library contains about 500 effects along with free royalty music option.
Step 5: Export:

Once you are done with the editing part and your video has reached to the satisfactory view then simply hit the create option to save your video. It is possible to export video to device with different file formats as per your need, for this you need to select the format option and then choose your desired type. In case if you wish to play your video on specific devices like iPod, iPad and iPhone etc then you need to click on Device option and then choose your device from available list. Videos can also be uploaded directly to social media platforms like YouTube etc and it can be burnt to DVD discs also so that you can enjoy them on TV screens with DVD player at home.
Download Mac Version ](https://tools.techidaily.com/wondershare/filmora/download/ )
Are you curious about which scenes in a film are shot by drones? Check this article to expand your interest.
Max Wales
Max Wales is a writer and a lover of all things video.
Follow @Max Wales
Max Wales
Mar 27, 2024• Proven solutions
Drones have power to create wonders in the film industry and we can observe their awesome performance with undergoing revolution in the filmmaking. Filmmakers are now able to create wonders with cinematic, jaw dropping results that were earlier just impossible in Hollywood productions. But if you are new to this world of drone then you must be searching for some information regarding how to shoot aerial videos using drone to get professional results. If so, then don’t worry! Because the article below will provide you complete information about impressive filming techniques with latest drones.
Let’s check a video tutorial first:
Tips for Filming with Drone
Techniques
In order to get best results with your aerial shoot, try these professional techniques:
1. Go Slow
The very first recommendation to beginners from professionals is to move slowly. It leaves cinematic impression on viewers as your slow motion makes them think that you are shooting from a larger platform such as helicopter. No doubt, it will increase the production value and shots will appear perfectly crafted and well controlled.
Ensure that you operate RC control stick very smoothly. Take help from gradual movements so that undesired shakes in footage can be avoided and at the same time care about slow acceleration and deceleration to avoid distortion from end results.
It is good to pre-plan as well as visual most of your aerial shots. One should prefer to advance guard his filming location so that all pros and cons can be pre-observed and proper planning can be done to get rid of limitations of that area. If you know your requirements in advance and have an effective plan for the site then you will definitely be able to make most out of your limited battery life of drone. You will not feel happy if some shots are missed just because of mismanagement and drained drone battery.
2. Two Axis type Movement
There are few hidden tricks behind those breathtaking shots of big budget movies and it is good to implement them with care. Most of those professionals prefer to implement two axis type movements simultaneously. They often make some arrangements to fly backwards as well as downwards at the same time but note that such movements must be controlled at much smoother rate with stable adjustments.
3. Strafe
When you have to focus on attractive landscapes then the best idea is to use sideways movements or the strafing feature. It will help you to show landscapes with different prospective and results will naturally be more impressive. Usually, most of the shots over landscapes in Hollywood movies are recorded with aerial motions where drone keep on moving forward and backward, so if you try the strafing effect then it will definitely be a unique and awesome idea. This recording style will also help you to reveal various eye catching features of the landscape.
4. Orbit
If you want to achieve Orbit then you have to control your drone strafe movements towards left or right side while pulling that yaw stick to exactly opposite direction. Let me make it clear that yaw stick is a control stick that you will find on left side of your drone controller and it is there to control rotation action of drone. Note that, you need to have more practice on that yaw control because most of users, even professionals end up spinning much faster and results are too bad.
5. Fly Through Shots
Here is something more cinematic but it is going to be risky enough. You need to be more careful to capture this type of shots because it demands you complete attention on controller screen for drone navigation. If you believe on your piloting skills then you will definitely achieve success in this recording action. When these shots are captured perfectly, they have power to capture attention of viewers and they will soon become fan of your cinematography skills along with your risk management strategy.
Weather
When we talk about weather then it is something out of your control and you have just one option that is to pray mercy from Mother Nature. To capture some of the best shots you will often need to fly in a clean sky and you definitely don’t need that heavy fog and rain. This issue is more common in winter days, especially when you are working on high altitudes that get freeze due to cold.
What to do?
- The first most important trick is to avoid taking shots in windy day. Generally, most of the advanced drone units can bear the pressure of up to 25-35 mph wind but if it goes above this range then your footage will get spoiled. It is not a good idea to simply rely on post processing techniques like jello effect etc. However, few professionals are able to refine their shots with Wrap Stabilization Setting to get best results.
- Choose golden hours of the day to shoot your footage. The time of sunset and sunrise will help your footage to stand out as shadows are highly visible during this time and it will naturally create a natural impact. People rarely shoot scenes at sunrise time so you can try to implement this trick to prove yourself different from those common aerial shooters.
Camera
Some of the most common camera settings that demand your focus are flat image profile and shutter speed.
- **Flat Image Profile:**There is no doubt to say that your camera settings are going to leave great impact on your footage so use them effectively. Prefer to work on flattest camera profile as it will help you to get impressive dynamic range with aerial camera. This technique of shooting helps users to prevent clouds and sky and also helps users to retain details from darkest point on ground.
- Control Shutter Speed:
It is good to work with lower shutter speed and in order to avoid strobing effect one must prefer to shot by keeping camera close to ground. Keep it somewhere around 100th to 250th level of second, one can also work with ND filter to control shutter speed to desired lower level. In case if you work with 500th or 100th part of second then you will naturally obtain sharper frames with it leads to footage with heavy strobing.
Editing
If you need to edit your shots to get customized results then it is most important to choose a professional and high quality software tool. One of the best professional recommendations is Wondershare Filmora due to its intuitive interface and ability to edit 4k video shoots. It can naturally lead to Hollywood style feeling with impressive adjustments of colours and other video effects.

Download Mac Version ](https://tools.techidaily.com/wondershare/filmora/download/ )
Steps to edit videos using Wondershare Filmora:
Step 1 Import video files: First of all you need to import your files from computer folder to main interface of Wondershare Filmora. You can either prefer to use the “Import” option directly or work with drag and drop functions that can bring all desired files immediately to software timeline.

Step 2: Cut Videos:
Simply move the slider position to the specific point on your video from where you need to cut it down. In case if you want to remove any specific part permanently then split it using cut option and then use delete button from right menu or from toolbar to remove it. In case if you want to cut your video into multiple parts then simply repeat this process. But note that, you need to save those multiple sections of files one by one while deleting the unwanted portions.
Step 3: Scene Detection:
If you want to reach to certain segment of video quickly then use scene detection function. Just highlight your video on item tray and then right click, from the drop down menu, select “Scene Detection” option and now you can immediately separate your video into various parts as per need. It will help you to reach to specific part with ease.
Step 4: Apply Effects:
Wondershare Filmora provides wide range of features and editing options. One can easily add transitions, filters, overlays, titles, text and other useful elements with ease. The filmora library contains about 500 effects along with free royalty music option.
Step 5: Export:
Once you are done with the editing part and your video has reached to the satisfactory view then simply hit the create option to save your video. It is possible to export video to device with different file formats as per your need, for this you need to select the format option and then choose your desired type. In case if you wish to play your video on specific devices like iPod, iPad and iPhone etc then you need to click on Device option and then choose your device from available list. Videos can also be uploaded directly to social media platforms like YouTube etc and it can be burnt to DVD discs also so that you can enjoy them on TV screens with DVD player at home.
Download Mac Version ](https://tools.techidaily.com/wondershare/filmora/download/ )
Are you curious about which scenes in a film are shot by drones? Check this article to expand your interest.
Max Wales
Max Wales is a writer and a lover of all things video.
Follow @Max Wales
Max Wales
Mar 27, 2024• Proven solutions
Drones have power to create wonders in the film industry and we can observe their awesome performance with undergoing revolution in the filmmaking. Filmmakers are now able to create wonders with cinematic, jaw dropping results that were earlier just impossible in Hollywood productions. But if you are new to this world of drone then you must be searching for some information regarding how to shoot aerial videos using drone to get professional results. If so, then don’t worry! Because the article below will provide you complete information about impressive filming techniques with latest drones.
Let’s check a video tutorial first:
Tips for Filming with Drone
Techniques
In order to get best results with your aerial shoot, try these professional techniques:
1. Go Slow
The very first recommendation to beginners from professionals is to move slowly. It leaves cinematic impression on viewers as your slow motion makes them think that you are shooting from a larger platform such as helicopter. No doubt, it will increase the production value and shots will appear perfectly crafted and well controlled.
Ensure that you operate RC control stick very smoothly. Take help from gradual movements so that undesired shakes in footage can be avoided and at the same time care about slow acceleration and deceleration to avoid distortion from end results.
It is good to pre-plan as well as visual most of your aerial shots. One should prefer to advance guard his filming location so that all pros and cons can be pre-observed and proper planning can be done to get rid of limitations of that area. If you know your requirements in advance and have an effective plan for the site then you will definitely be able to make most out of your limited battery life of drone. You will not feel happy if some shots are missed just because of mismanagement and drained drone battery.
2. Two Axis type Movement
There are few hidden tricks behind those breathtaking shots of big budget movies and it is good to implement them with care. Most of those professionals prefer to implement two axis type movements simultaneously. They often make some arrangements to fly backwards as well as downwards at the same time but note that such movements must be controlled at much smoother rate with stable adjustments.
3. Strafe
When you have to focus on attractive landscapes then the best idea is to use sideways movements or the strafing feature. It will help you to show landscapes with different prospective and results will naturally be more impressive. Usually, most of the shots over landscapes in Hollywood movies are recorded with aerial motions where drone keep on moving forward and backward, so if you try the strafing effect then it will definitely be a unique and awesome idea. This recording style will also help you to reveal various eye catching features of the landscape.
4. Orbit
If you want to achieve Orbit then you have to control your drone strafe movements towards left or right side while pulling that yaw stick to exactly opposite direction. Let me make it clear that yaw stick is a control stick that you will find on left side of your drone controller and it is there to control rotation action of drone. Note that, you need to have more practice on that yaw control because most of users, even professionals end up spinning much faster and results are too bad.
5. Fly Through Shots
Here is something more cinematic but it is going to be risky enough. You need to be more careful to capture this type of shots because it demands you complete attention on controller screen for drone navigation. If you believe on your piloting skills then you will definitely achieve success in this recording action. When these shots are captured perfectly, they have power to capture attention of viewers and they will soon become fan of your cinematography skills along with your risk management strategy.
Weather
When we talk about weather then it is something out of your control and you have just one option that is to pray mercy from Mother Nature. To capture some of the best shots you will often need to fly in a clean sky and you definitely don’t need that heavy fog and rain. This issue is more common in winter days, especially when you are working on high altitudes that get freeze due to cold.
What to do?
- The first most important trick is to avoid taking shots in windy day. Generally, most of the advanced drone units can bear the pressure of up to 25-35 mph wind but if it goes above this range then your footage will get spoiled. It is not a good idea to simply rely on post processing techniques like jello effect etc. However, few professionals are able to refine their shots with Wrap Stabilization Setting to get best results.
- Choose golden hours of the day to shoot your footage. The time of sunset and sunrise will help your footage to stand out as shadows are highly visible during this time and it will naturally create a natural impact. People rarely shoot scenes at sunrise time so you can try to implement this trick to prove yourself different from those common aerial shooters.
Camera
Some of the most common camera settings that demand your focus are flat image profile and shutter speed.
- **Flat Image Profile:**There is no doubt to say that your camera settings are going to leave great impact on your footage so use them effectively. Prefer to work on flattest camera profile as it will help you to get impressive dynamic range with aerial camera. This technique of shooting helps users to prevent clouds and sky and also helps users to retain details from darkest point on ground.
- Control Shutter Speed:
It is good to work with lower shutter speed and in order to avoid strobing effect one must prefer to shot by keeping camera close to ground. Keep it somewhere around 100th to 250th level of second, one can also work with ND filter to control shutter speed to desired lower level. In case if you work with 500th or 100th part of second then you will naturally obtain sharper frames with it leads to footage with heavy strobing.
Editing
If you need to edit your shots to get customized results then it is most important to choose a professional and high quality software tool. One of the best professional recommendations is Wondershare Filmora due to its intuitive interface and ability to edit 4k video shoots. It can naturally lead to Hollywood style feeling with impressive adjustments of colours and other video effects.
Download Mac Version ](https://tools.techidaily.com/wondershare/filmora/download/ )
Steps to edit videos using Wondershare Filmora:
Step 1 Import video files: First of all you need to import your files from computer folder to main interface of Wondershare Filmora. You can either prefer to use the “Import” option directly or work with drag and drop functions that can bring all desired files immediately to software timeline.
Step 2: Cut Videos:
Simply move the slider position to the specific point on your video from where you need to cut it down. In case if you want to remove any specific part permanently then split it using cut option and then use delete button from right menu or from toolbar to remove it. In case if you want to cut your video into multiple parts then simply repeat this process. But note that, you need to save those multiple sections of files one by one while deleting the unwanted portions.
Step 3: Scene Detection:
If you want to reach to certain segment of video quickly then use scene detection function. Just highlight your video on item tray and then right click, from the drop down menu, select “Scene Detection” option and now you can immediately separate your video into various parts as per need. It will help you to reach to specific part with ease.
Step 4: Apply Effects:
Wondershare Filmora provides wide range of features and editing options. One can easily add transitions, filters, overlays, titles, text and other useful elements with ease. The filmora library contains about 500 effects along with free royalty music option.
Step 5: Export:
Once you are done with the editing part and your video has reached to the satisfactory view then simply hit the create option to save your video. It is possible to export video to device with different file formats as per your need, for this you need to select the format option and then choose your desired type. In case if you wish to play your video on specific devices like iPod, iPad and iPhone etc then you need to click on Device option and then choose your device from available list. Videos can also be uploaded directly to social media platforms like YouTube etc and it can be burnt to DVD discs also so that you can enjoy them on TV screens with DVD player at home.
Download Mac Version ](https://tools.techidaily.com/wondershare/filmora/download/ )
Are you curious about which scenes in a film are shot by drones? Check this article to expand your interest.
Max Wales
Max Wales is a writer and a lover of all things video.
Follow @Max Wales
Max Wales
Mar 27, 2024• Proven solutions
Drones have power to create wonders in the film industry and we can observe their awesome performance with undergoing revolution in the filmmaking. Filmmakers are now able to create wonders with cinematic, jaw dropping results that were earlier just impossible in Hollywood productions. But if you are new to this world of drone then you must be searching for some information regarding how to shoot aerial videos using drone to get professional results. If so, then don’t worry! Because the article below will provide you complete information about impressive filming techniques with latest drones.
Let’s check a video tutorial first:
Tips for Filming with Drone
 PCDJ Karaoki is the complete professional karaoke software designed for KJs and karaoke venues. Karaoki includes an advanced automatic singer rotation list with singer history, key control, news ticker, next singers screen, a song book exporter and printer, a jukebox background music player and many other features designed so you can host karaoke shows faster and easier!
Techniques
In order to get best results with your aerial shoot, try these professional techniques:
1. Go Slow
The very first recommendation to beginners from professionals is to move slowly. It leaves cinematic impression on viewers as your slow motion makes them think that you are shooting from a larger platform such as helicopter. No doubt, it will increase the production value and shots will appear perfectly crafted and well controlled.
Ensure that you operate RC control stick very smoothly. Take help from gradual movements so that undesired shakes in footage can be avoided and at the same time care about slow acceleration and deceleration to avoid distortion from end results.
It is good to pre-plan as well as visual most of your aerial shots. One should prefer to advance guard his filming location so that all pros and cons can be pre-observed and proper planning can be done to get rid of limitations of that area. If you know your requirements in advance and have an effective plan for the site then you will definitely be able to make most out of your limited battery life of drone. You will not feel happy if some shots are missed just because of mismanagement and drained drone battery.
2. Two Axis type Movement
There are few hidden tricks behind those breathtaking shots of big budget movies and it is good to implement them with care. Most of those professionals prefer to implement two axis type movements simultaneously. They often make some arrangements to fly backwards as well as downwards at the same time but note that such movements must be controlled at much smoother rate with stable adjustments.
3. Strafe
When you have to focus on attractive landscapes then the best idea is to use sideways movements or the strafing feature. It will help you to show landscapes with different prospective and results will naturally be more impressive. Usually, most of the shots over landscapes in Hollywood movies are recorded with aerial motions where drone keep on moving forward and backward, so if you try the strafing effect then it will definitely be a unique and awesome idea. This recording style will also help you to reveal various eye catching features of the landscape.
4. Orbit
If you want to achieve Orbit then you have to control your drone strafe movements towards left or right side while pulling that yaw stick to exactly opposite direction. Let me make it clear that yaw stick is a control stick that you will find on left side of your drone controller and it is there to control rotation action of drone. Note that, you need to have more practice on that yaw control because most of users, even professionals end up spinning much faster and results are too bad.
5. Fly Through Shots
Here is something more cinematic but it is going to be risky enough. You need to be more careful to capture this type of shots because it demands you complete attention on controller screen for drone navigation. If you believe on your piloting skills then you will definitely achieve success in this recording action. When these shots are captured perfectly, they have power to capture attention of viewers and they will soon become fan of your cinematography skills along with your risk management strategy.
Weather
When we talk about weather then it is something out of your control and you have just one option that is to pray mercy from Mother Nature. To capture some of the best shots you will often need to fly in a clean sky and you definitely don’t need that heavy fog and rain. This issue is more common in winter days, especially when you are working on high altitudes that get freeze due to cold.
What to do?
- The first most important trick is to avoid taking shots in windy day. Generally, most of the advanced drone units can bear the pressure of up to 25-35 mph wind but if it goes above this range then your footage will get spoiled. It is not a good idea to simply rely on post processing techniques like jello effect etc. However, few professionals are able to refine their shots with Wrap Stabilization Setting to get best results.
- Choose golden hours of the day to shoot your footage. The time of sunset and sunrise will help your footage to stand out as shadows are highly visible during this time and it will naturally create a natural impact. People rarely shoot scenes at sunrise time so you can try to implement this trick to prove yourself different from those common aerial shooters.
Camera
Some of the most common camera settings that demand your focus are flat image profile and shutter speed.
- **Flat Image Profile:**There is no doubt to say that your camera settings are going to leave great impact on your footage so use them effectively. Prefer to work on flattest camera profile as it will help you to get impressive dynamic range with aerial camera. This technique of shooting helps users to prevent clouds and sky and also helps users to retain details from darkest point on ground.
- Control Shutter Speed:
It is good to work with lower shutter speed and in order to avoid strobing effect one must prefer to shot by keeping camera close to ground. Keep it somewhere around 100th to 250th level of second, one can also work with ND filter to control shutter speed to desired lower level. In case if you work with 500th or 100th part of second then you will naturally obtain sharper frames with it leads to footage with heavy strobing.

Editing
If you need to edit your shots to get customized results then it is most important to choose a professional and high quality software tool. One of the best professional recommendations is Wondershare Filmora due to its intuitive interface and ability to edit 4k video shoots. It can naturally lead to Hollywood style feeling with impressive adjustments of colours and other video effects.
Download Mac Version ](https://tools.techidaily.com/wondershare/filmora/download/ )
Steps to edit videos using Wondershare Filmora:
Step 1 Import video files: First of all you need to import your files from computer folder to main interface of Wondershare Filmora. You can either prefer to use the “Import” option directly or work with drag and drop functions that can bring all desired files immediately to software timeline.
Step 2: Cut Videos:
Simply move the slider position to the specific point on your video from where you need to cut it down. In case if you want to remove any specific part permanently then split it using cut option and then use delete button from right menu or from toolbar to remove it. In case if you want to cut your video into multiple parts then simply repeat this process. But note that, you need to save those multiple sections of files one by one while deleting the unwanted portions.
Step 3: Scene Detection:
If you want to reach to certain segment of video quickly then use scene detection function. Just highlight your video on item tray and then right click, from the drop down menu, select “Scene Detection” option and now you can immediately separate your video into various parts as per need. It will help you to reach to specific part with ease.
Step 4: Apply Effects:

Wondershare Filmora provides wide range of features and editing options. One can easily add transitions, filters, overlays, titles, text and other useful elements with ease. The filmora library contains about 500 effects along with free royalty music option.
Step 5: Export:
Once you are done with the editing part and your video has reached to the satisfactory view then simply hit the create option to save your video. It is possible to export video to device with different file formats as per your need, for this you need to select the format option and then choose your desired type. In case if you wish to play your video on specific devices like iPod, iPad and iPhone etc then you need to click on Device option and then choose your device from available list. Videos can also be uploaded directly to social media platforms like YouTube etc and it can be burnt to DVD discs also so that you can enjoy them on TV screens with DVD player at home.
Download Mac Version ](https://tools.techidaily.com/wondershare/filmora/download/ )
Are you curious about which scenes in a film are shot by drones? Check this article to expand your interest.
Max Wales
Max Wales is a writer and a lover of all things video.
Follow @Max Wales
- Title: 2024 Approved Best Practices for Drone Cinematography
- Author: Paul
- Created at : 2024-07-27 01:18:21
- Updated at : 2024-07-28 01:18:21
- Link: https://extra-information.techidaily.com/2024-approved-best-practices-for-drone-cinematography/
- License: This work is licensed under CC BY-NC-SA 4.0.