
Composing Prime Canon Temporal Vignettes
Composing Prime Canon Temporal Vignettes
There is always some magic in watching a lengthy video that plays for an extended period and accelerates to fit in a few seconds and minutes, known as time-lapse photography. It is a sequence of photos stitched together to create a movie or video where time seems to pass extremely fast. For instance, wilting and blooming for the flow only in a 10-second video. You might have seen numerous Canon time-lapses and always wanted to create one.
If you want to take the challenge and create something magical like this with your Canon camera, you have come to the right place. Here we will tell you everything from how to shoot to editing time-lapse videos. You will also get some tips for time-lapse recording video so let’s start with this article.

Part 1. What is Time-lapse Video?
Time-lapse video is considered a technique of cinematography where a photographer takes a series of images in the same frame at several intervals for a certain period and rapidly plays it for the entire time. For instance:- Separate shots of a flower blooming over time becomes a video of growing a flower from seedling to bloom.
So what’s the purpose of it? Here is the purpose of creating an illusion of extreme speed movement by manipulating the time. It seems like the object is rushing at a fast pace. This cinematography technique is mainly used for capturing prolonged processes that will become exciting and visible if it is watched with the human eye.
The time-lapse is even used to capture swift movement, showing it faster. This article will explore how time-lapse on canon 6d is made. In simple words, time-lapse is a process of shooting for an extended period and then editing in fast motion to make it enjoyable. Let’s see how it is done.
Part 2. How to Shoot Time-lapse Video with Canon Camera?
Let’s explore the time-lapse world in the comfort of your home or when you are chilling out with your family and friends. You can use your Canon 70d time-lapse to do it better. The time-lapse is an innovative technique that allows you to reveal a hidden world on the move, and it will produce some magical and surprising results. Let’s check out the steps of hooting time-lapse video with a Canon camera.
1:- Change your Canon camera settings to the Time-lapse movie by tapping on the menu and searching Timelapse Movie mode in your menu.
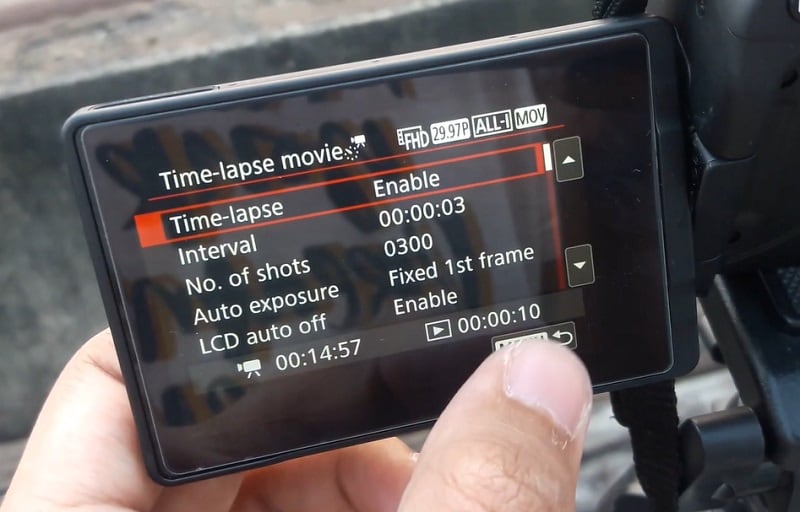
2:- Tap on the info button to access the setting for the interval time and the no. of shots.
3:- You can choose the interval number to determine your camera’s frequency, which means once every second or twice a minute. The interval time will depend on the subject. Recording a slow-moving object like blossoming flowers or drifting clouds will take more time between the shots and vice versa.
4:- Put the number of shots you want your camera to take. According to the interval and number of shots, your Canon 80d time-lapse will tell you the number of footage you have to take to end the video. There is a general thumb rule for recording time-lapse videos, and you will need around 24-25 images for each second of your video.
5:- Compose the shot and tap on the shutter button. While shooting the time-lapse video, it is recommended that you should place the camera on a tripod to maintain the composition of duration. Also, after you are happy with the composition and settings, you can tap the shutter button and allow your camera to show its magic.
Part 3. Canon Time Lapse Video Shooting Tips
Never forget to take test shots:- You must never start shooting straight away. Also, you can take some random test shots. This ensures you get the best composition and angle you are looking for.
Always take photos in JPG:- Set the Canon Camera to capture pictures in the best JPG quality, or else you can run out of space quickly.
Use manual mode:- It’s recommended to shoot in manual mode, and you must shoot with the manual white balance, exposure, aperture, and shutter speed. Moreover, it will help you to avoid auto-adjusting your camera.
Carry extra batteries:- If you want to create a time-lapse video outdoors, you must carry extra batteries. Also, it is good if the camera battery is changed before your camera gets shut down. If you are shooting time-lapse video indoors, it’s better to use the main charger. Also, it will help you avoid excess battery draining.
Carry Extra Memory cards:- You will never want to run out of space while making a time-lapse, and you will have to make the calculations according to your time-lapse. Also, make sure you carry the extra memory cards to be prepared.
Choose the best spot:- Set your tripod securely and in a place where it cannot be knocked or moved quickly.
Focus on the camera:- Always ensure that the equipment and camera are in sight while you are shooting and safe.
Part 4. Extra: How to Edit Timelapse Video on Computer
We all love time-lapse videos; be it sunset, busy traffic movement, or cloud movement, we always wonder how they are made. Also, it is an excellent technique mainly used to create highly fast-paced videos by creating a time illusion. Moreover, time-lapse videos are primarily used to capture highly slow-paced subjects. They take a lot of time to record, like flower blooming, sunset, or sunrise.
However, to make it presentable and exciting to the viewers, time-lapse is used. You can use Filmora to edit your time-lapse videos and make them more presentable for your social media. Also, you will be surprised that Filmora offers more than 100 free filters. Furthermore, you can add those filters to your video to create a new look.
Let’s see how to edit your time-lapse video on it.
Step 1 - Import the Video
You will have to import the clips to your library.

Free Download For Win 7 or later(64-bit)
Free Download For macOS 10.14 or later
Step 2 - Cut out the unnecessary part for time lapse editing
After importing the video, you must drag it to the video column. Choose a loaded video and tap on the “Play” button. When playing the video, you must drag a slide bar. Then, tap on the “Split” icon to cut the unnecessary parts.
 PCDJ DEX 3 for Windows & MAC is the total entertainment DJ software solution, offering audio, video, and karaoke mixing ability. Automatic beat-sync, smart looping, 4 decks, DJ MIDI controller support, Karaoke Streaming and much more.
Step 3 - Speed up creating a time-lapse video
You will have to right-click on your clip in the timeline to choose the duration and speed. After choosing all of this, a window will appear. You must adjust the speed and drag the slider to the right to increase the video speed. After that, you can click on “Ok.” Now, you can preview the video by tapping on the Play button. Also, you should know that Filmora supports up to 0.01x slow motion and 100x fast.

Step 4 - Export the video
If you have the necessary changes and previewed the video, then you can save the video. Also, now, you can export it to the output of video footage. Your Canon r5 time-lapse is ready.
Conclusion
Now, you are aware of how to shoot time-lapse with your Canon camera. After you have captured the clips, you can edit your clips in Filmora. Also, this is done to make the video more attractive and presentable for your social media or projects. Now, what are you waiting for? Grab your camera and shoot some magical moments.
Free Download For macOS 10.14 or later
Step 2 - Cut out the unnecessary part for time lapse editing
After importing the video, you must drag it to the video column. Choose a loaded video and tap on the “Play” button. When playing the video, you must drag a slide bar. Then, tap on the “Split” icon to cut the unnecessary parts.
Step 3 - Speed up creating a time-lapse video
You will have to right-click on your clip in the timeline to choose the duration and speed. After choosing all of this, a window will appear. You must adjust the speed and drag the slider to the right to increase the video speed. After that, you can click on “Ok.” Now, you can preview the video by tapping on the Play button. Also, you should know that Filmora supports up to 0.01x slow motion and 100x fast.
Step 4 - Export the video
If you have the necessary changes and previewed the video, then you can save the video. Also, now, you can export it to the output of video footage. Your Canon r5 time-lapse is ready.

Conclusion
Now, you are aware of how to shoot time-lapse with your Canon camera. After you have captured the clips, you can edit your clips in Filmora. Also, this is done to make the video more attractive and presentable for your social media or projects. Now, what are you waiting for? Grab your camera and shoot some magical moments.
- Title: Composing Prime Canon Temporal Vignettes
- Author: Paul
- Created at : 2024-07-27 03:28:59
- Updated at : 2024-07-28 03:28:59
- Link: https://extra-information.techidaily.com/composing-prime-canon-temporal-vignettes/
- License: This work is licensed under CC BY-NC-SA 4.0.