
"How to Manipulate iPhone Pics Flip, Tilt & More"
How to Manipulate iPhone Pics: Flip, Tilt & More
How to Rotate Your Upside Down and Sideway Photos on iPhone
 Any DRM Removal for Win:Remove DRM from Adobe, Kindle, Sony eReader, Kobo, etc, read your ebooks anywhere.
Ollie Mattison
Mar 27, 2024• Proven solutions
There’s nothing more annoying than when your iPhone accelerometer decides a photo should be taken the other way around. You’ve snapped a fabulous picture of your cat/dog/child, but on your screen, it’s sideways and impossible to look at. Turning the phone is no use either, as it just keeps spinning the photo to the wrong orientation. If you’re wondering how to rotate photos on iPhone, it’s simple; here’s how.
Check How to Fix Upside Down Videos? >>
How to rotate photos on iPhone
There are a couple of options available which will successfully reorient your image. You don’t even need an additional app, as all the functionality is already built in to your clever little handset. Here’s the method step by step:
1. Start your Photos app
The Photos app comes pre-installed on all iPhones and iPads, so no download needed.
2. Locate the squiffy photo
Scroll through your images until you find the one that doesn’t look quite right.
3. Tap the ‘edit’ button
It’s the button at the bottom which looks like three lines with circles on them.
4. Tap the ‘crop’ button

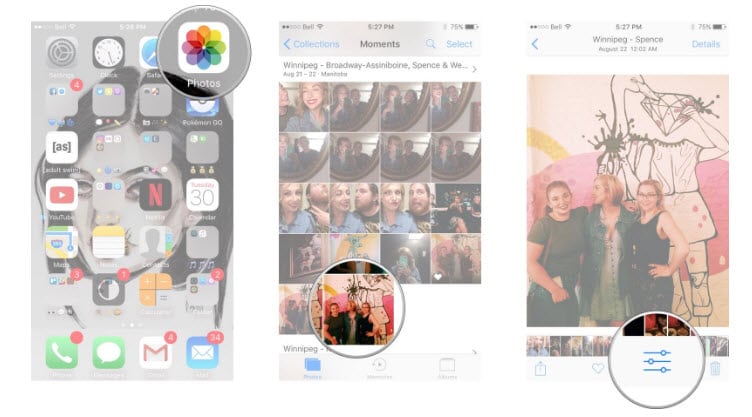
Image resource: imore.com
This button looks like a rectangle with arrows circling it and is found next to ‘cancel’.
5. Tap the ‘rotate’ button
This is a white square with one arrow, which you’ll find just above ‘cancel’.
6. Tap as many times as you need
One tap will rotate your image 90 degrees. One more will rotate it 180, and so on.
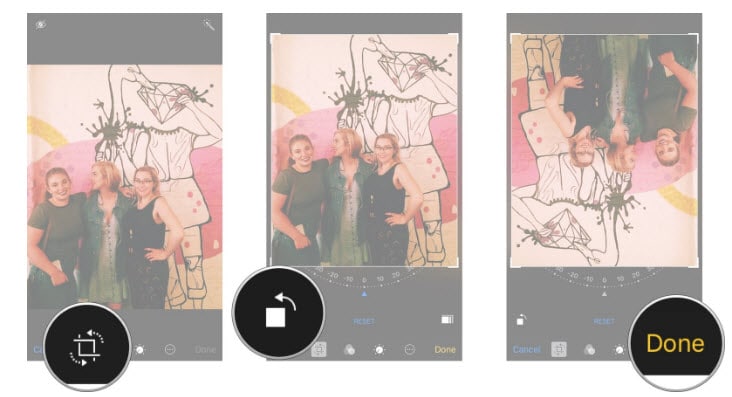
Image resource: imore.com
7. And you’re done
Once you’re completely happy with the rotation of the picture, tap the yellow ‘done’ button to save your changes.
It really is as simple as that. Unfortunately, Apple saw fit to hide the rotation function within the button used for cropping pictures, so many users overlook this functionality. But now, you don’t have to, as you know how to rotate photos on iPhone so that every image is perfect!
 /a>
/a>Stop taking upside down photos
When iOS 5 brought us the ability to take photos on iPhones with the volume buttons, iPhone users rejoiced. At last, there was an easier way to snap images quickly, and without needing a spare finger to tap the screen. However, with this intervention also came a new problem; upside down photos.
If you’re in the habit of taking photos using your volume buttons, it feels natural to have these buttons at the top of the phone when shooting in portrait mode. After all, the shutter buttons on our digital cameras are at the top, so it’s natural to want to put the volume buttons there too. But when you shoot like this, all your images will display upside down when you upload them to your social media or laptop, if you’re a Windows user. If you use a Mac, the PC will recognize the image is upside down and will change it, but if you send that picture to a client or friend on Windows, it will, once again, be the wrong way up.
Here’s an easy way to stop taking upside down photos with your iPhone:
1. Check where the lens is
Take a glance at the lens position on the back of the phone. Whether you’re taking a portrait or landscape picture, the lens should always be at the top.
2. Practice holding it the right way up
Image resource: imore.com
Having the volume buttons at the bottom might feel weird at first, but with a little practice, you’ll get used to it.
3. Check you’re not covering the lens
Because you’re using the volume buttons in their correct position, you might be tempted to splay your fingers across the back of the phone, covering the lens.
If you’re a habitual upside-down photo-taker, it may take a little while to break this bad habit. At least now, if you do take a photo upside-down, you know how to rotate photos on iPhone using the Photos app. With a bit of practice, however, it will soon feel natural to hold the camera in its proper orientation.
iPhones are wonderful devices for budding photographers of all shapes and sizes. No other smartphone can come close to the capabilities of Apple’s iPhone in terms of picture quality, functionality and scope. By getting to know some of the hidden tricks and tools to improve your images, you’ll be the envy of every Instagrammer on the planet!
Ollie Mattison
Ollie Mattison is a writer and a lover of all things video.
Follow @Ollie Mattison
Ollie Mattison
Mar 27, 2024• Proven solutions
There’s nothing more annoying than when your iPhone accelerometer decides a photo should be taken the other way around. You’ve snapped a fabulous picture of your cat/dog/child, but on your screen, it’s sideways and impossible to look at. Turning the phone is no use either, as it just keeps spinning the photo to the wrong orientation. If you’re wondering how to rotate photos on iPhone, it’s simple; here’s how.
Check How to Fix Upside Down Videos? >>
How to rotate photos on iPhone
There are a couple of options available which will successfully reorient your image. You don’t even need an additional app, as all the functionality is already built in to your clever little handset. Here’s the method step by step:
1. Start your Photos app
The Photos app comes pre-installed on all iPhones and iPads, so no download needed.
2. Locate the squiffy photo
Scroll through your images until you find the one that doesn’t look quite right.
3. Tap the ‘edit’ button
It’s the button at the bottom which looks like three lines with circles on them.
4. Tap the ‘crop’ button
Image resource: imore.com
This button looks like a rectangle with arrows circling it and is found next to ‘cancel’.
5. Tap the ‘rotate’ button
This is a white square with one arrow, which you’ll find just above ‘cancel’.
6. Tap as many times as you need
One tap will rotate your image 90 degrees. One more will rotate it 180, and so on.

Image resource: imore.com
7. And you’re done
Once you’re completely happy with the rotation of the picture, tap the yellow ‘done’ button to save your changes.
It really is as simple as that. Unfortunately, Apple saw fit to hide the rotation function within the button used for cropping pictures, so many users overlook this functionality. But now, you don’t have to, as you know how to rotate photos on iPhone so that every image is perfect!
Stop taking upside down photos
When iOS 5 brought us the ability to take photos on iPhones with the volume buttons, iPhone users rejoiced. At last, there was an easier way to snap images quickly, and without needing a spare finger to tap the screen. However, with this intervention also came a new problem; upside down photos.
If you’re in the habit of taking photos using your volume buttons, it feels natural to have these buttons at the top of the phone when shooting in portrait mode. After all, the shutter buttons on our digital cameras are at the top, so it’s natural to want to put the volume buttons there too. But when you shoot like this, all your images will display upside down when you upload them to your social media or laptop, if you’re a Windows user. If you use a Mac, the PC will recognize the image is upside down and will change it, but if you send that picture to a client or friend on Windows, it will, once again, be the wrong way up.
Here’s an easy way to stop taking upside down photos with your iPhone:
1. Check where the lens is
Take a glance at the lens position on the back of the phone. Whether you’re taking a portrait or landscape picture, the lens should always be at the top.
2. Practice holding it the right way up
 Allavsoft Batch Download Online Videos, Music Offline to MP4, MP3, MOV, etc format
Image resource: imore.com
Having the volume buttons at the bottom might feel weird at first, but with a little practice, you’ll get used to it.
3. Check you’re not covering the lens
Because you’re using the volume buttons in their correct position, you might be tempted to splay your fingers across the back of the phone, covering the lens.
If you’re a habitual upside-down photo-taker, it may take a little while to break this bad habit. At least now, if you do take a photo upside-down, you know how to rotate photos on iPhone using the Photos app. With a bit of practice, however, it will soon feel natural to hold the camera in its proper orientation.
iPhones are wonderful devices for budding photographers of all shapes and sizes. No other smartphone can come close to the capabilities of Apple’s iPhone in terms of picture quality, functionality and scope. By getting to know some of the hidden tricks and tools to improve your images, you’ll be the envy of every Instagrammer on the planet!
Ollie Mattison
Ollie Mattison is a writer and a lover of all things video.
Follow @Ollie Mattison
Ollie Mattison
Mar 27, 2024• Proven solutions
There’s nothing more annoying than when your iPhone accelerometer decides a photo should be taken the other way around. You’ve snapped a fabulous picture of your cat/dog/child, but on your screen, it’s sideways and impossible to look at. Turning the phone is no use either, as it just keeps spinning the photo to the wrong orientation. If you’re wondering how to rotate photos on iPhone, it’s simple; here’s how.
Check How to Fix Upside Down Videos? >>
 SwifDoo PDF 2-Year Plan
How to rotate photos on iPhone
There are a couple of options available which will successfully reorient your image. You don’t even need an additional app, as all the functionality is already built in to your clever little handset. Here’s the method step by step:
1. Start your Photos app
The Photos app comes pre-installed on all iPhones and iPads, so no download needed.
2. Locate the squiffy photo
Scroll through your images until you find the one that doesn’t look quite right.
3. Tap the ‘edit’ button
It’s the button at the bottom which looks like three lines with circles on them.
4. Tap the ‘crop’ button
Image resource: imore.com
This button looks like a rectangle with arrows circling it and is found next to ‘cancel’.
5. Tap the ‘rotate’ button
This is a white square with one arrow, which you’ll find just above ‘cancel’.
6. Tap as many times as you need
One tap will rotate your image 90 degrees. One more will rotate it 180, and so on.
 SwifDoo PDF Perpetual (1 PC) Free upgrade. No monthly fees ever.
Image resource: imore.com
7. And you’re done
Once you’re completely happy with the rotation of the picture, tap the yellow ‘done’ button to save your changes.
It really is as simple as that. Unfortunately, Apple saw fit to hide the rotation function within the button used for cropping pictures, so many users overlook this functionality. But now, you don’t have to, as you know how to rotate photos on iPhone so that every image is perfect!

Stop taking upside down photos
When iOS 5 brought us the ability to take photos on iPhones with the volume buttons, iPhone users rejoiced. At last, there was an easier way to snap images quickly, and without needing a spare finger to tap the screen. However, with this intervention also came a new problem; upside down photos.
If you’re in the habit of taking photos using your volume buttons, it feels natural to have these buttons at the top of the phone when shooting in portrait mode. After all, the shutter buttons on our digital cameras are at the top, so it’s natural to want to put the volume buttons there too. But when you shoot like this, all your images will display upside down when you upload them to your social media or laptop, if you’re a Windows user. If you use a Mac, the PC will recognize the image is upside down and will change it, but if you send that picture to a client or friend on Windows, it will, once again, be the wrong way up.
Here’s an easy way to stop taking upside down photos with your iPhone:
1. Check where the lens is
Take a glance at the lens position on the back of the phone. Whether you’re taking a portrait or landscape picture, the lens should always be at the top.
2. Practice holding it the right way up
Image resource: imore.com
Having the volume buttons at the bottom might feel weird at first, but with a little practice, you’ll get used to it.
3. Check you’re not covering the lens
Because you’re using the volume buttons in their correct position, you might be tempted to splay your fingers across the back of the phone, covering the lens.
If you’re a habitual upside-down photo-taker, it may take a little while to break this bad habit. At least now, if you do take a photo upside-down, you know how to rotate photos on iPhone using the Photos app. With a bit of practice, however, it will soon feel natural to hold the camera in its proper orientation.
iPhones are wonderful devices for budding photographers of all shapes and sizes. No other smartphone can come close to the capabilities of Apple’s iPhone in terms of picture quality, functionality and scope. By getting to know some of the hidden tricks and tools to improve your images, you’ll be the envy of every Instagrammer on the planet!
Ollie Mattison
Ollie Mattison is a writer and a lover of all things video.
Follow @Ollie Mattison
Ollie Mattison
Mar 27, 2024• Proven solutions
There’s nothing more annoying than when your iPhone accelerometer decides a photo should be taken the other way around. You’ve snapped a fabulous picture of your cat/dog/child, but on your screen, it’s sideways and impossible to look at. Turning the phone is no use either, as it just keeps spinning the photo to the wrong orientation. If you’re wondering how to rotate photos on iPhone, it’s simple; here’s how.
Check How to Fix Upside Down Videos? >>
 DEX 3 RE is Easy-To-Use DJ Mixing Software for MAC and Windows Designed for Today’s Versatile DJ.
Mix from your own library of music, iTunes or use the Pulselocker subsciprtion service for in-app access to over 44 million songs. Use with over 85 supported DJ controllers or mix with a keyboard and mouse.
DEX 3 RE is everything you need without the clutter - the perfect 2-deck mixing software solution for mobile DJs or hard-core hobbiests.
PCDJ DEX 3 RE (DJ Software for Win & MAC - Product Activation For 3 Machines)
How to rotate photos on iPhone
There are a couple of options available which will successfully reorient your image. You don’t even need an additional app, as all the functionality is already built in to your clever little handset. Here’s the method step by step:
1. Start your Photos app
The Photos app comes pre-installed on all iPhones and iPads, so no download needed.
2. Locate the squiffy photo
Scroll through your images until you find the one that doesn’t look quite right.
3. Tap the ‘edit’ button
It’s the button at the bottom which looks like three lines with circles on them.
4. Tap the ‘crop’ button

Image resource: imore.com
This button looks like a rectangle with arrows circling it and is found next to ‘cancel’.
5. Tap the ‘rotate’ button
This is a white square with one arrow, which you’ll find just above ‘cancel’.
6. Tap as many times as you need
One tap will rotate your image 90 degrees. One more will rotate it 180, and so on.
Image resource: imore.com
7. And you’re done
Once you’re completely happy with the rotation of the picture, tap the yellow ‘done’ button to save your changes.
It really is as simple as that. Unfortunately, Apple saw fit to hide the rotation function within the button used for cropping pictures, so many users overlook this functionality. But now, you don’t have to, as you know how to rotate photos on iPhone so that every image is perfect!
Stop taking upside down photos
When iOS 5 brought us the ability to take photos on iPhones with the volume buttons, iPhone users rejoiced. At last, there was an easier way to snap images quickly, and without needing a spare finger to tap the screen. However, with this intervention also came a new problem; upside down photos.
If you’re in the habit of taking photos using your volume buttons, it feels natural to have these buttons at the top of the phone when shooting in portrait mode. After all, the shutter buttons on our digital cameras are at the top, so it’s natural to want to put the volume buttons there too. But when you shoot like this, all your images will display upside down when you upload them to your social media or laptop, if you’re a Windows user. If you use a Mac, the PC will recognize the image is upside down and will change it, but if you send that picture to a client or friend on Windows, it will, once again, be the wrong way up.
Here’s an easy way to stop taking upside down photos with your iPhone:
1. Check where the lens is
Take a glance at the lens position on the back of the phone. Whether you’re taking a portrait or landscape picture, the lens should always be at the top.
2. Practice holding it the right way up

Image resource: imore.com
Having the volume buttons at the bottom might feel weird at first, but with a little practice, you’ll get used to it.
3. Check you’re not covering the lens
Because you’re using the volume buttons in their correct position, you might be tempted to splay your fingers across the back of the phone, covering the lens.
If you’re a habitual upside-down photo-taker, it may take a little while to break this bad habit. At least now, if you do take a photo upside-down, you know how to rotate photos on iPhone using the Photos app. With a bit of practice, however, it will soon feel natural to hold the camera in its proper orientation.
iPhones are wonderful devices for budding photographers of all shapes and sizes. No other smartphone can come close to the capabilities of Apple’s iPhone in terms of picture quality, functionality and scope. By getting to know some of the hidden tricks and tools to improve your images, you’ll be the envy of every Instagrammer on the planet!
 With Screensaver Wonder you can easily make a screensaver from your own pictures and video files. Create screensavers for your own computer or create standalone, self-installing screensavers for easy sharing with your friends. Together with its sister product Screensaver Factory, Screensaver Wonder is one of the most popular screensaver software products in the world, helping thousands of users decorate their computer screens quickly and easily.
Ollie Mattison
Ollie Mattison is a writer and a lover of all things video.
Follow @Ollie Mattison
- Title: How to Manipulate iPhone Pics Flip, Tilt & More
- Author: Paul
- Created at : 2024-07-27 01:40:35
- Updated at : 2024-07-28 01:40:35
- Link: https://extra-information.techidaily.com/how-to-manipulate-iphone-pics-flip-tilt-and-more/
- License: This work is licensed under CC BY-NC-SA 4.0.