
In 2024, A Comprehensive Walkthrough of YouTube Timestamping Techniques

A Comprehensive Walkthrough of YouTube Timestamping Techniques
A YouTube timestamp is a way to link to a specific moment in your video. When viewers find video content that is not what they are looking for, they frequently leave or bounce. By adding a timestamp, you can improve retention by directing users to the most relevant portion of your video from the outset. Here we introduce you to all the possible ways to add YouTube timestamp.
- Using Built-in function - copy video URL at current time (Most Recommended)
- Using the Video Sharing Button to Share Timestamps
- Link to a YouTube Timestamp Manually
- Using the YouTube app for Android or iPhone, link to a particular time slot
- Using link generator to add timestamp
Part 1. How to add a timestamp to YouTube video?
1. Using Built-in function - copy video URL at current time (Most Recommended)
- Visit YouTube and open the video of interest.
- Locate the time in video you want to share.
- Right-click the video and select “Copy video URL video at current time.”
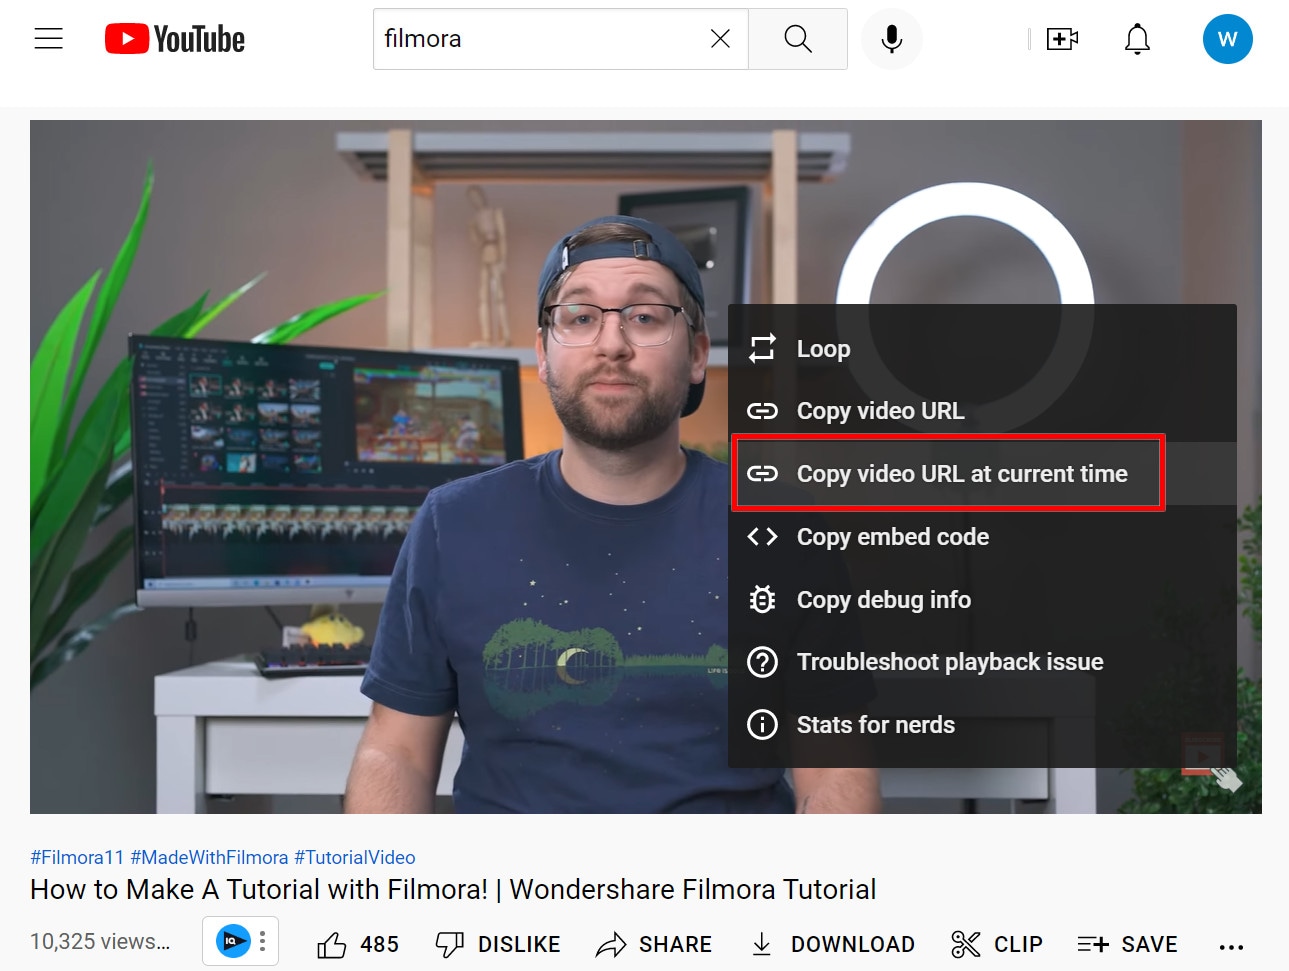
You can then share the link as you wish.
2. Using the Video Sharing Button to Share Timestamps
- Go to YouTube and find the video you’d like to share.
- Scroll through the video until you get to the section of interest.
- Click on the “Share” icon just below the video.
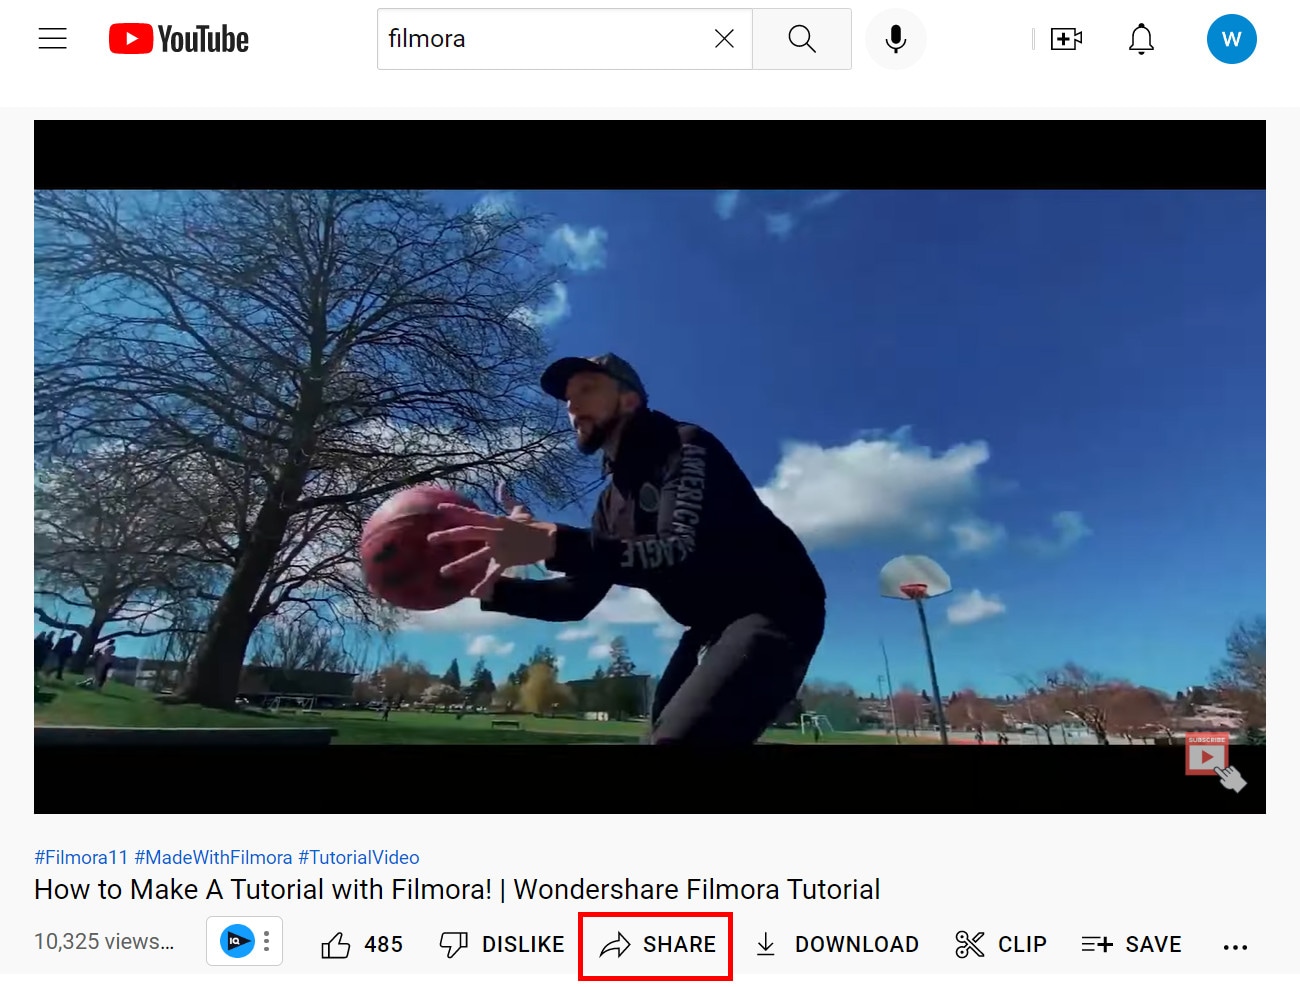
- Check the “Start at [time slot]” box in the popup menu that appears.
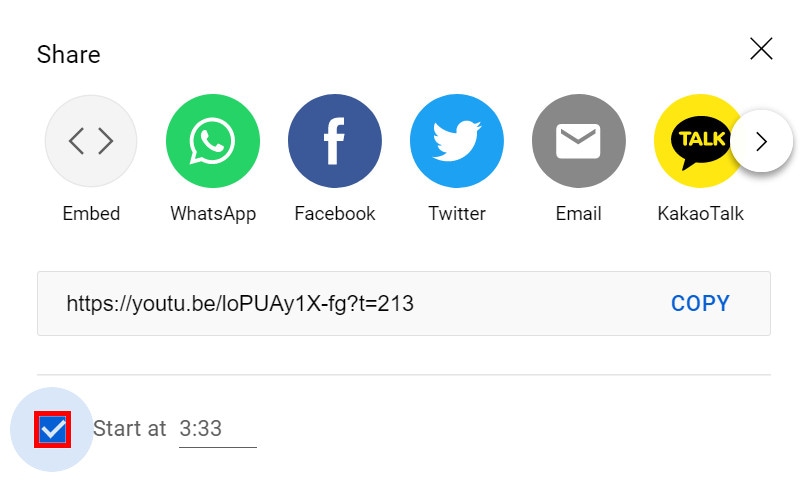
- If you need to adjust the time marker manually, tap the “time” and enter a new value.
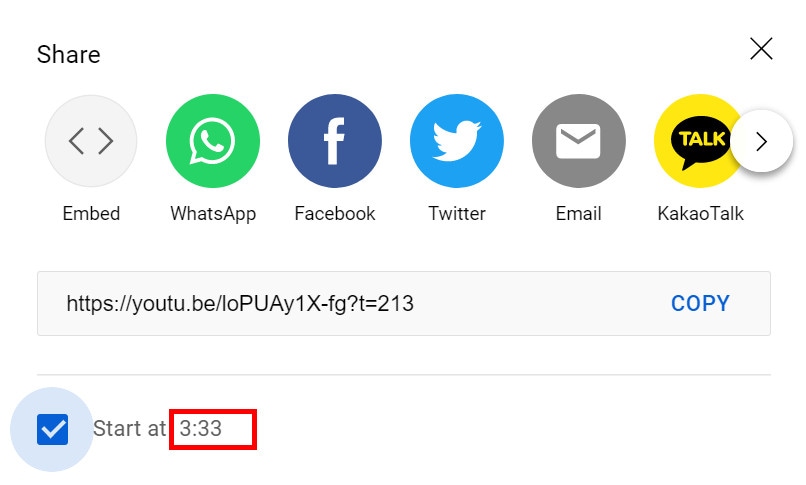
- Highlight the “URL,” then “Right-click” (Windows) or “two-finger tap” (Mac) and select “Copy.”
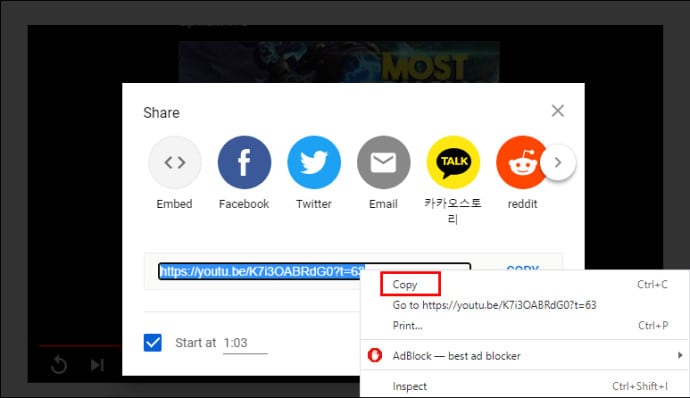
Viewers are taken immediately to the desired timestamp when they click the copied link. The video starts to play at that point.
3. Link to a YouTube Timestamp Manually
There are two types of URLs used for each YouTube video:
In the browser, the URL is “https://www.youtube.com/watch?v= “
When sharing (email, Facebook, Twitter, etc.), the URL is “https://youtu.be/ “
- To specify “seconds” on URLs that use “youtu.be/“, insert the format “?t=Xs”, where “t” represents time, “X” is the time slot number, and “s” in seconds, for example “?t=45s”.
- To specify “seconds” on URLs that use “youtube.com/“, put the format “&t=Xs” where “t” represents time, “X” is the time slot number, and “s” stands for seconds, for example, “&t=45s”.
- To specify “minutes and seconds” in both URLs, change the format from “Xs” to “XmYs” where “t” = time, “Xm” = # minutes and “Ys” = # seconds, for example “? t=5m30s” or “&t=5m30s.”
![]()
Note: When manually linking to a timestamp, always omit the zeros and include only whole numbers. For example, use 8 instead of 08.
It is also important to note that referring to a specific timestamp does not mean that one cannot watch earlier video segments. They can move the time slider in any direction.
4. Using the YouTube app for Android or iPhone, link to a particular time slot
- Launch the “YouTube App” and find the video you’d like to share where it starts playing at a specific timeslot.
- Pause the video to your starting point or pause and use the “Seek” option by holding down on the video and sliding right or left.
- Click on the “Share” button.
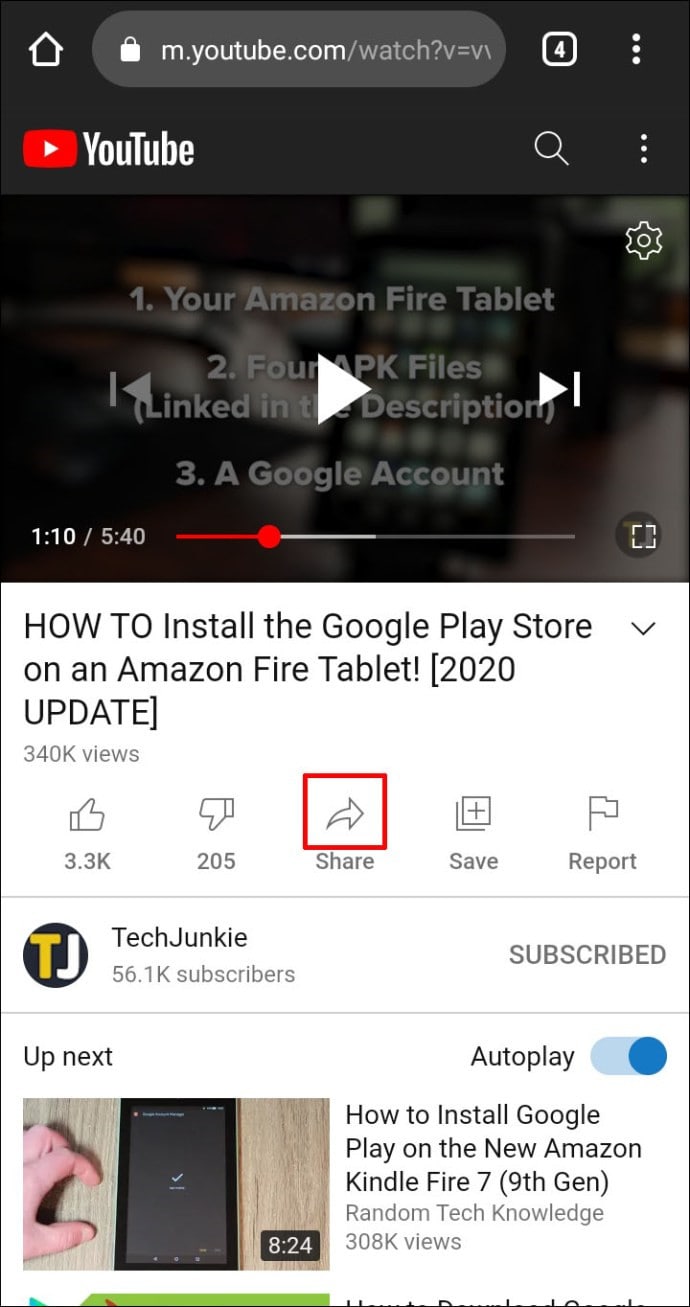
- To save the timeslot URL to use for multiple apps or for later use, select “Copy Link” and paste it where you can retrieve it as needed. You can edit the time period in the URL later.
- Edit the URL you saved in step 4. For short URLs (youtu.be) use “?t=Xs” where X=seconds or “?t=XmYs” where X=minutes and S= seconds. Replace “?” with “&” for long URLs (youtube.com/watch?v=). Adjust the “X” and “Y” values to your specified pause time.
- Save the edited URL in Notepad, post it in a social media app, or paste it into a mobile browser.
Finally, remember that the formula for a time period is t=Xs or t=XmYs. You modify X and Y to reflect your own time values. Short URLs starting with “youtu.be” use “?” first, while long URLs starting with “youtube.com/watch?v=” use “&” before the time data.
5. Using link generator to add timestamp
The methods above to add and submit a timestamped YouTube link are quick and easy but have a few limitations. If you need more control and sharing of YouTube video highlights without cutting the video, you need to use third-party link generators.
Link generators allow you to not only share specific parts of videos from YouTube but also on other platforms such as Vimeo and Twitch. With these tools, you can trim multiple video parts and share them with others.
- Go to Farotech timestamp link generator , paste the URL of the YouTube video you want to share, and edit the time.
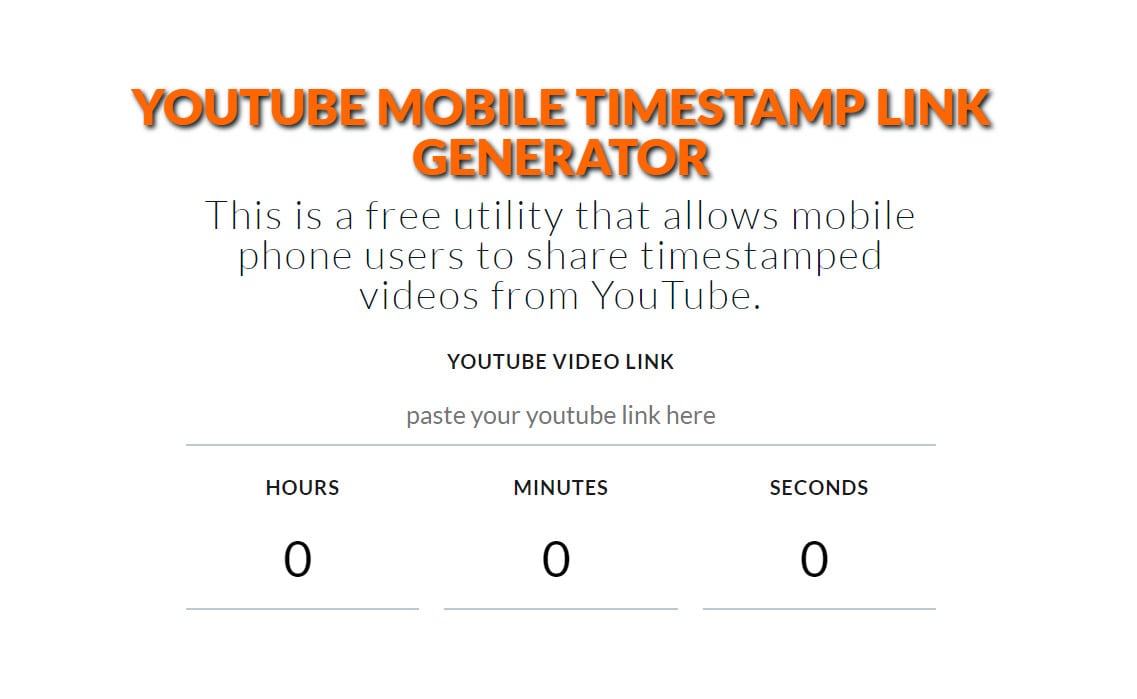
- To confirm whether the jump time is right, you can simply click on the generated link. If the verification is successful, you can then copy the address.
- You will get a dedicated link to your video with the option to embed it on your website or blog.
Part 2. How to add a timestamp in YouTube comments or description
If you are a Youtuber and your videos are informative, adding a jumpable timestamp in the comments or description will make it easier for viewers to understand your videos. The duration of your video will also grow if viewers keep returning to a certain piece of it.
Here’s the guide to adding a timestamp to a YouTube comment or description:
- Select the time you want to link to
- Pause the video and note the time
- Write the time in the comment
- Post your comment
The process is simple - just write the time you want to redirect viewers to in the comment. The timestamp format is hours:minutes:seconds (no spaces). Make sure the time format is correct, then a timestamp with a jump link will be generated automatically.
Conclusion
YouTubers want videos to be short and to the point. However, if the video needs to be longer, you can help users browse and find what’s important to them by adding a timestamp to the YouTube link or a timestamp to the YouTube descriptions. This can help your viewers go directly to the interesting part of the video instead of watching the entire video, saving them time, and improving the user experience. The most recommended way to the timestamp on YouTube is using a built-in function in YouTube.
Timestamps can help you share information with your audience without having to watch unimportant segments. If you’re only focusing on a certain part of the video, you can link directly to it to save time.
Free Download For Win 7 or later(64-bit)
Free Download For macOS 10.14 or later
Part 1. How to add a timestamp to YouTube video?
1. Using Built-in function - copy video URL at current time (Most Recommended)
- Visit YouTube and open the video of interest.
- Locate the time in video you want to share.
- Right-click the video and select “Copy video URL video at current time.”

You can then share the link as you wish.
2. Using the Video Sharing Button to Share Timestamps
- Go to YouTube and find the video you’d like to share.
- Scroll through the video until you get to the section of interest.
- Click on the “Share” icon just below the video.

- Check the “Start at [time slot]” box in the popup menu that appears.

- If you need to adjust the time marker manually, tap the “time” and enter a new value.

- Highlight the “URL,” then “Right-click” (Windows) or “two-finger tap” (Mac) and select “Copy.”

Viewers are taken immediately to the desired timestamp when they click the copied link. The video starts to play at that point.
3. Link to a YouTube Timestamp Manually
There are two types of URLs used for each YouTube video:
In the browser, the URL is “https://www.youtube.com/watch?v= “
When sharing (email, Facebook, Twitter, etc.), the URL is “https://youtu.be/ “
- To specify “seconds” on URLs that use “youtu.be/“, insert the format “?t=Xs”, where “t” represents time, “X” is the time slot number, and “s” in seconds, for example “?t=45s”.
- To specify “seconds” on URLs that use “youtube.com/“, put the format “&t=Xs” where “t” represents time, “X” is the time slot number, and “s” stands for seconds, for example, “&t=45s”.
- To specify “minutes and seconds” in both URLs, change the format from “Xs” to “XmYs” where “t” = time, “Xm” = # minutes and “Ys” = # seconds, for example “? t=5m30s” or “&t=5m30s.”
![]()
Note: When manually linking to a timestamp, always omit the zeros and include only whole numbers. For example, use 8 instead of 08.
It is also important to note that referring to a specific timestamp does not mean that one cannot watch earlier video segments. They can move the time slider in any direction.
4. Using the YouTube app for Android or iPhone, link to a particular time slot
- Launch the “YouTube App” and find the video you’d like to share where it starts playing at a specific timeslot.
- Pause the video to your starting point or pause and use the “Seek” option by holding down on the video and sliding right or left.
- Click on the “Share” button.

- To save the timeslot URL to use for multiple apps or for later use, select “Copy Link” and paste it where you can retrieve it as needed. You can edit the time period in the URL later.
- Edit the URL you saved in step 4. For short URLs (youtu.be) use “?t=Xs” where X=seconds or “?t=XmYs” where X=minutes and S= seconds. Replace “?” with “&” for long URLs (youtube.com/watch?v=). Adjust the “X” and “Y” values to your specified pause time.
- Save the edited URL in Notepad, post it in a social media app, or paste it into a mobile browser.
Finally, remember that the formula for a time period is t=Xs or t=XmYs. You modify X and Y to reflect your own time values. Short URLs starting with “youtu.be” use “?” first, while long URLs starting with “youtube.com/watch?v=” use “&” before the time data.
5. Using link generator to add timestamp
The methods above to add and submit a timestamped YouTube link are quick and easy but have a few limitations. If you need more control and sharing of YouTube video highlights without cutting the video, you need to use third-party link generators.
Link generators allow you to not only share specific parts of videos from YouTube but also on other platforms such as Vimeo and Twitch. With these tools, you can trim multiple video parts and share them with others.
- Go to Farotech timestamp link generator , paste the URL of the YouTube video you want to share, and edit the time.

- To confirm whether the jump time is right, you can simply click on the generated link. If the verification is successful, you can then copy the address.
- You will get a dedicated link to your video with the option to embed it on your website or blog.
Part 2. How to add a timestamp in YouTube comments or description
If you are a Youtuber and your videos are informative, adding a jumpable timestamp in the comments or description will make it easier for viewers to understand your videos. The duration of your video will also grow if viewers keep returning to a certain piece of it.
Here’s the guide to adding a timestamp to a YouTube comment or description:
- Select the time you want to link to
- Pause the video and note the time
- Write the time in the comment
- Post your comment
The process is simple - just write the time you want to redirect viewers to in the comment. The timestamp format is hours:minutes:seconds (no spaces). Make sure the time format is correct, then a timestamp with a jump link will be generated automatically.
Conclusion
YouTubers want videos to be short and to the point. However, if the video needs to be longer, you can help users browse and find what’s important to them by adding a timestamp to the YouTube link or a timestamp to the YouTube descriptions. This can help your viewers go directly to the interesting part of the video instead of watching the entire video, saving them time, and improving the user experience. The most recommended way to the timestamp on YouTube is using a built-in function in YouTube.
Timestamps can help you share information with your audience without having to watch unimportant segments. If you’re only focusing on a certain part of the video, you can link directly to it to save time.
Free Download For Win 7 or later(64-bit)
Free Download For macOS 10.14 or later
Also read:
- [New] Fast-Forward Freedom in Snapchat A Noob’s Handbook
- [New] What Makes Periscope Special? Understanding Features & Registration
- [Updated] 2024 Approved Precision Adjustments Correcting iPhone Video Washout in Premiere Pro
- [Updated] A Closer Look at the VivaVideo Interface
- 2024 Approved Android Gaming Elevated - In-Depth Look at the Breakthrough App, KineMaster
- 2024 Approved Apex Sporting Cameras for Extreme Enthusiasts
- All-Encompassing Expense Elucidation Beginning A Podcast
- Best Performers: Rechargeable Battery Chargers for the Modern Consumer
- Discover the Best iPhones' Selfie Upgrades - All for Free, Now
- How to use iSpoofer on Samsung Galaxy S21 FE 5G (2023)? | Dr.fone
- In 2024, Adjust Photos for Core-Outer Softness in Photoshop Suite
- In 2024, Complete Review & Guide to Techeligible FRP Bypass and More For Oppo Reno 11F 5G
- Innovative Image Caption Manipulation
- Melding Audio With Visuals Digitally for 2024
- The Ultimate iPhone Cheat Sheet for Insta Downloads
- Unlocking Premiere Pro Full-Screen Magic
- WebP to JPEG Conversion Tool - Effortless Format Switching with Movavi
- Title: In 2024, A Comprehensive Walkthrough of YouTube Timestamping Techniques
- Author: Paul
- Created at : 2024-11-25 16:47:27
- Updated at : 2024-11-30 11:31:48
- Link: https://extra-information.techidaily.com/in-2024-a-comprehensive-walkthrough-of-youtube-timestamping-techniques/
- License: This work is licensed under CC BY-NC-SA 4.0.