
In 2024, Bring Your Video to Life with Cropping, Adding, & Tweaking Audio in Canva
Bring Your Video to Life with Cropping, Adding, & Tweaking Audio in Canva
Versatile Video Editor - Wondershare Filmora
An easy yet powerful editor
Numerous effects to choose from
Detailed tutorials provided by the official channel
All individuals have a dream to become a recognizable personality in the world. Everyone wants to achieve a dream of getting popularity like a film star. Previously, it was possible only by contribution efforts on the TV or movie screens. But now, the conditions are completely different. All individuals have multiple options to achieve such an objective by using social media platforms.
These platforms allow users to showcase their talent by sharing different types of videos. When it comes to creating an impressive video, everyone needs to use a good video editor by which they can add multiple elements to the content. Canva is the first preference of numerous individuals. Some of these are eagerly want to know how to add music in Canva externally to create a fully-featured video. If you are one of these individuals, you should be focused on the upcoming paragraphs.


In this article
01 [Add Music To Canva Video](#Part 1)
02 [Crop Music You Added On Canva](#Part 2)
03 [Edit Your Music On Canva](#Part 3)
Part 1 Add Music To Canva Video
By using Canva, you can create a good video with ease. It can help you add multiple elements, effects, and factors to the video by which you can make things easier. It increases the effectiveness of the video and connects with the audience perfectly. Here, you will get the complete process to figure out how can make it possible.
Step-By-Step Guide To Add Music In Canva Video
Step 1: Create Design
Firstly, you should focus on creating a proper design or video that you want to share on your social accounts. In case you have already such a thing on your device or in the Canva library, you should open it in the editor’s interface. After that, you should work on adding audio files.
Step 2: Upload Audio

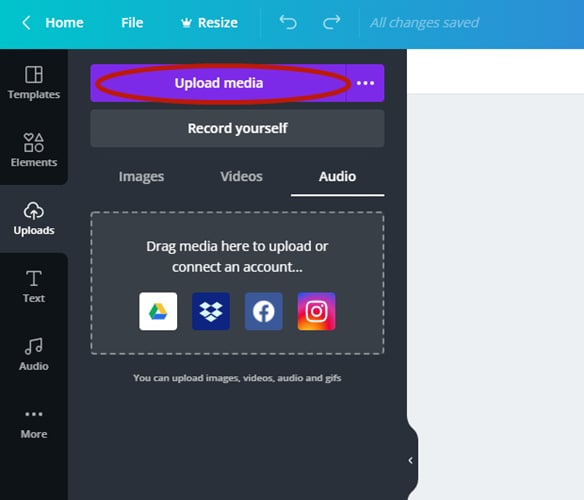
Secondly, you should proceed with a small procedure of uploading audio files to the Canva. Canva allows uploading any kind of file from external sources or devices. It can be useful in adding desired audio and sound effects to the video. For such a thing, you can see the UPLOAD tab in the menu. You should visit the tab and click the UPLOAD MEDIA button.
Step 3: Pick Audio File
When you click the button, it will lead to a device folder interface. By using this interface, you should locate the folder where your desired audio file and available and select it for uploading or adding in the Canva.
Step 4: Find Out Audio
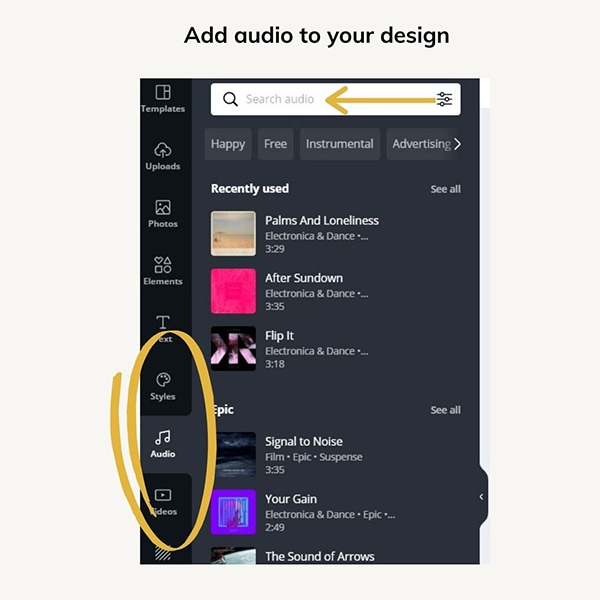
After uploading the file, you can easily use it for creating desired design or video. Here, you should visit the AUDIO tab from the side panel. In case you cannot see such an option, you will definitely get the MORE button, so, proceed by clicking it. After exploring more, you can easily see that particular button.
Step 5:Add Audio To Design
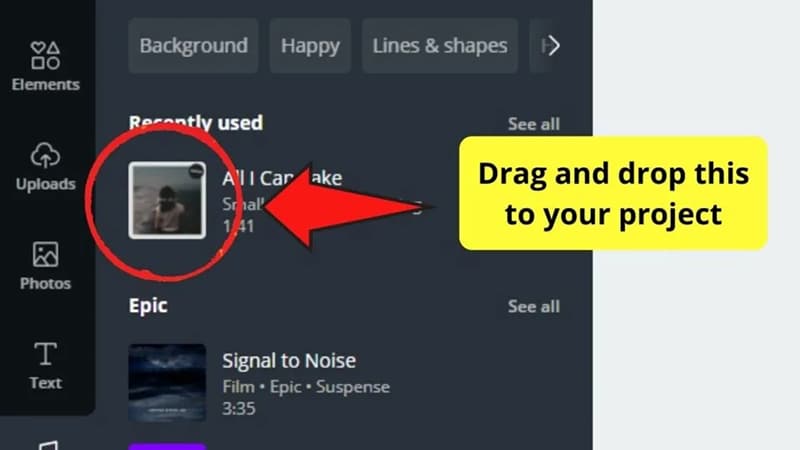In the audio tab, you can see the recently uploaded final. You should proceed by choosing this particular file. It will help you make lots of things easier and better.
It is the complete procedure that you can follow to add an audio file to the Canva. You can also find several audio files inside the Canva that can feature your design or video as well. But, it depends on your requirements and creative ideas and how you want to proceed.
Part 2 Crop Music You Added On Canva
When it comes to video or audio editing, the biggest thing is trimming. Trimming helps to reduce the content length or time duration by which you can share the video with appropriate time limits. With the following procedure, you can easily edit the audio file.
 The Tube Sites Submitter is a fast and efficient tool for anyone who needs to upload videos quickly, easily and automatically to hundreds of tube sites in mere minutes .
 Part 3 Edit Your Music On Canva
Step 1: Open My Media
In the navigation system or side panel, you can find out MY MEDIA section. It will help you get access to the available media files that are linked to your Canva account.
Step 2: Gray Pencil
Now, you should proceed by choosing the GRAY PENCIL ICON. You can find out this icon with the video. Generally, it is considered as an edit symbol that will allow you to access the complete edit panel without any problem.
Step 3: Launch Editor And Edit
You should click the edit icon and launch the respective interface. In case you want to trim the audio, you can use left and right brackets and drag them to the positions. The left bracket will help you decide the starting point and the right one help you pick the ending point. By using both, you can pick a section that you want to add to the video.
If you like to chop the audio, you should choose the section by using the scissors icon. The selected audio section will be removed and the remaining can be added to the video. As for the editor features, you can also apply fades to the audio. It will help you to mix different audios or create some low moments in the video.
Step 4: Preview
After making all these edits on video and audio, you should merge both files. Before proceeding to the final step, it will be good if you consider a preview. Preview will help you understand the video is created perfectly or not. In case there’s any kind of issue with the video, you will get it during preview and fix it immediately.
Step 5: Save & Download
In case you are satisfied with the preview results, you should click the SAVE or SAVE A COPY button. You can also download the file to get it on your device and share it on other platforms.
It is the complete procedure that will help you to edit an audio file on Canva with ease.
Important Tip: Try Filmora
In case you are interested in using a good video editor with a user-friendly interface and easy-to-use procedures, you should be focused on choosing Filmora. It is a great tool that can be accessed on both Windows and Mac devices. Along with it, you can get its version for mobile devices (Android and iOS) as well.
While accessing Filmora, you will get multiple options regarding features and functionalities. It also has a big library that allows you to get free access to different types of audio files, songs, music, and video effects.
Wondershare Filmora
Get started easily with Filmora’s powerful performance, intuitive interface, and countless effects Try It Free Try It Free Learn More about Filmora>

Final Words
All these details will help you understand how to add music on Canva without any hassle or problem. In case you are facing any kind of issues while using Canva, you can check out the guides or contact support. Along with it, you may find a lack of some important features too. Due to it, you may not get results as per your expectations and all. Here, you should be focused on alternatives as we discussed Filmora. It is one of the best video editors that has several features and a big music library. You will get accessibility to the music library and features for free. You should be smart and careful while making a final decision.
All individuals have a dream to become a recognizable personality in the world. Everyone wants to achieve a dream of getting popularity like a film star. Previously, it was possible only by contribution efforts on the TV or movie screens. But now, the conditions are completely different. All individuals have multiple options to achieve such an objective by using social media platforms.
These platforms allow users to showcase their talent by sharing different types of videos. When it comes to creating an impressive video, everyone needs to use a good video editor by which they can add multiple elements to the content. Canva is the first preference of numerous individuals. Some of these are eagerly want to know how to add music in Canva externally to create a fully-featured video. If you are one of these individuals, you should be focused on the upcoming paragraphs.
In this article
01 [Add Music To Canva Video](#Part 1)
02 [Crop Music You Added On Canva](#Part 2)
03 [Edit Your Music On Canva](#Part 3)
Part 1 Add Music To Canva Video
By using Canva, you can create a good video with ease. It can help you add multiple elements, effects, and factors to the video by which you can make things easier. It increases the effectiveness of the video and connects with the audience perfectly. Here, you will get the complete process to figure out how can make it possible.
Step-By-Step Guide To Add Music In Canva Video
Step 1: Create Design
Firstly, you should focus on creating a proper design or video that you want to share on your social accounts. In case you have already such a thing on your device or in the Canva library, you should open it in the editor’s interface. After that, you should work on adding audio files.
Step 2: Upload Audio
Secondly, you should proceed with a small procedure of uploading audio files to the Canva. Canva allows uploading any kind of file from external sources or devices. It can be useful in adding desired audio and sound effects to the video. For such a thing, you can see the UPLOAD tab in the menu. You should visit the tab and click the UPLOAD MEDIA button.
Step 3: Pick Audio File
When you click the button, it will lead to a device folder interface. By using this interface, you should locate the folder where your desired audio file and available and select it for uploading or adding in the Canva.
Step 4: Find Out Audio

After uploading the file, you can easily use it for creating desired design or video. Here, you should visit the AUDIO tab from the side panel. In case you cannot see such an option, you will definitely get the MORE button, so, proceed by clicking it. After exploring more, you can easily see that particular button.
Step 5:Add Audio To Design

In the audio tab, you can see the recently uploaded final. You should proceed by choosing this particular file. It will help you make lots of things easier and better.
It is the complete procedure that you can follow to add an audio file to the Canva. You can also find several audio files inside the Canva that can feature your design or video as well. But, it depends on your requirements and creative ideas and how you want to proceed.
Part 2 Crop Music You Added On Canva
When it comes to video or audio editing, the biggest thing is trimming. Trimming helps to reduce the content length or time duration by which you can share the video with appropriate time limits. With the following procedure, you can easily edit the audio file.
Part 3 Edit Your Music On Canva
Step 1: Open My Media
In the navigation system or side panel, you can find out MY MEDIA section. It will help you get access to the available media files that are linked to your Canva account.
Step 2: Gray Pencil
Now, you should proceed by choosing the GRAY PENCIL ICON. You can find out this icon with the video. Generally, it is considered as an edit symbol that will allow you to access the complete edit panel without any problem.
Step 3: Launch Editor And Edit
You should click the edit icon and launch the respective interface. In case you want to trim the audio, you can use left and right brackets and drag them to the positions. The left bracket will help you decide the starting point and the right one help you pick the ending point. By using both, you can pick a section that you want to add to the video.
If you like to chop the audio, you should choose the section by using the scissors icon. The selected audio section will be removed and the remaining can be added to the video. As for the editor features, you can also apply fades to the audio. It will help you to mix different audios or create some low moments in the video.
Step 4: Preview
After making all these edits on video and audio, you should merge both files. Before proceeding to the final step, it will be good if you consider a preview. Preview will help you understand the video is created perfectly or not. In case there’s any kind of issue with the video, you will get it during preview and fix it immediately.
Step 5: Save & Download
In case you are satisfied with the preview results, you should click the SAVE or SAVE A COPY button. You can also download the file to get it on your device and share it on other platforms.
It is the complete procedure that will help you to edit an audio file on Canva with ease.
Important Tip: Try Filmora
In case you are interested in using a good video editor with a user-friendly interface and easy-to-use procedures, you should be focused on choosing Filmora. It is a great tool that can be accessed on both Windows and Mac devices. Along with it, you can get its version for mobile devices (Android and iOS) as well.
While accessing Filmora, you will get multiple options regarding features and functionalities. It also has a big library that allows you to get free access to different types of audio files, songs, music, and video effects.
Wondershare Filmora
Get started easily with Filmora’s powerful performance, intuitive interface, and countless effects Try It Free Try It Free Learn More about Filmora>
Final Words
All these details will help you understand how to add music on Canva without any hassle or problem. In case you are facing any kind of issues while using Canva, you can check out the guides or contact support. Along with it, you may find a lack of some important features too. Due to it, you may not get results as per your expectations and all. Here, you should be focused on alternatives as we discussed Filmora. It is one of the best video editors that has several features and a big music library. You will get accessibility to the music library and features for free. You should be smart and careful while making a final decision.
All individuals have a dream to become a recognizable personality in the world. Everyone wants to achieve a dream of getting popularity like a film star. Previously, it was possible only by contribution efforts on the TV or movie screens. But now, the conditions are completely different. All individuals have multiple options to achieve such an objective by using social media platforms.
These platforms allow users to showcase their talent by sharing different types of videos. When it comes to creating an impressive video, everyone needs to use a good video editor by which they can add multiple elements to the content. Canva is the first preference of numerous individuals. Some of these are eagerly want to know how to add music in Canva externally to create a fully-featured video. If you are one of these individuals, you should be focused on the upcoming paragraphs.
In this article
01 [Add Music To Canva Video](#Part 1)
02 [Crop Music You Added On Canva](#Part 2)
03 [Edit Your Music On Canva](#Part 3)
Part 1 Add Music To Canva Video
By using Canva, you can create a good video with ease. It can help you add multiple elements, effects, and factors to the video by which you can make things easier. It increases the effectiveness of the video and connects with the audience perfectly. Here, you will get the complete process to figure out how can make it possible.
Step-By-Step Guide To Add Music In Canva Video
Step 1: Create Design
Firstly, you should focus on creating a proper design or video that you want to share on your social accounts. In case you have already such a thing on your device or in the Canva library, you should open it in the editor’s interface. After that, you should work on adding audio files.
Step 2: Upload Audio
Secondly, you should proceed with a small procedure of uploading audio files to the Canva. Canva allows uploading any kind of file from external sources or devices. It can be useful in adding desired audio and sound effects to the video. For such a thing, you can see the UPLOAD tab in the menu. You should visit the tab and click the UPLOAD MEDIA button.
Step 3: Pick Audio File
When you click the button, it will lead to a device folder interface. By using this interface, you should locate the folder where your desired audio file and available and select it for uploading or adding in the Canva.
Step 4: Find Out Audio
 PCDJ DEX 3 for Windows & MAC is the total entertainment DJ software solution, offering audio, video, and karaoke mixing ability. Automatic beat-sync, smart looping, 4 decks, DJ MIDI controller support, Karaoke Streaming and much more.
After uploading the file, you can easily use it for creating desired design or video. Here, you should visit the AUDIO tab from the side panel. In case you cannot see such an option, you will definitely get the MORE button, so, proceed by clicking it. After exploring more, you can easily see that particular button.
Step 5:Add Audio To Design
In the audio tab, you can see the recently uploaded final. You should proceed by choosing this particular file. It will help you make lots of things easier and better.
It is the complete procedure that you can follow to add an audio file to the Canva. You can also find several audio files inside the Canva that can feature your design or video as well. But, it depends on your requirements and creative ideas and how you want to proceed.
Part 2 Crop Music You Added On Canva
When it comes to video or audio editing, the biggest thing is trimming. Trimming helps to reduce the content length or time duration by which you can share the video with appropriate time limits. With the following procedure, you can easily edit the audio file.
Part 3 Edit Your Music On Canva
Step 1: Open My Media
In the navigation system or side panel, you can find out MY MEDIA section. It will help you get access to the available media files that are linked to your Canva account.
Step 2: Gray Pencil
Now, you should proceed by choosing the GRAY PENCIL ICON. You can find out this icon with the video. Generally, it is considered as an edit symbol that will allow you to access the complete edit panel without any problem.
Step 3: Launch Editor And Edit
You should click the edit icon and launch the respective interface. In case you want to trim the audio, you can use left and right brackets and drag them to the positions. The left bracket will help you decide the starting point and the right one help you pick the ending point. By using both, you can pick a section that you want to add to the video.
If you like to chop the audio, you should choose the section by using the scissors icon. The selected audio section will be removed and the remaining can be added to the video. As for the editor features, you can also apply fades to the audio. It will help you to mix different audios or create some low moments in the video.
Step 4: Preview
After making all these edits on video and audio, you should merge both files. Before proceeding to the final step, it will be good if you consider a preview. Preview will help you understand the video is created perfectly or not. In case there’s any kind of issue with the video, you will get it during preview and fix it immediately.
Step 5: Save & Download
In case you are satisfied with the preview results, you should click the SAVE or SAVE A COPY button. You can also download the file to get it on your device and share it on other platforms.
It is the complete procedure that will help you to edit an audio file on Canva with ease.
 vMix 4K - Software based live production. vMix 4K includes everything in vMix HD plus 4K support, PTZ control, External/Fullscreen output, 4 Virtual Outputs, 1 Replay, 4 vMix Call, and 2 Recorders.
Important Tip: Try Filmora
In case you are interested in using a good video editor with a user-friendly interface and easy-to-use procedures, you should be focused on choosing Filmora. It is a great tool that can be accessed on both Windows and Mac devices. Along with it, you can get its version for mobile devices (Android and iOS) as well.
While accessing Filmora, you will get multiple options regarding features and functionalities. It also has a big library that allows you to get free access to different types of audio files, songs, music, and video effects.
Wondershare Filmora
 Jet Profiler for MySQL, Enterprise Version: Jet Profiler for MySQL is real-time query performance and diagnostics tool for the MySQL database server. Its detailed query information, graphical interface and ease of use makes this a great tool for finding performance bottlenecks in your MySQL databases.
 Get started easily with Filmora’s powerful performance, intuitive interface, and countless effects Try It Free Try It Free Learn More about Filmora>
 Forex Robotron Gold Package
 PCDJ Karaoki is the complete professional karaoke software designed for KJs and karaoke venues. Karaoki includes an advanced automatic singer rotation list with singer history, key control, news ticker, next singers screen, a song book exporter and printer, a jukebox background music player and many other features designed so you can host karaoke shows faster and easier!
Final Words
All these details will help you understand how to add music on Canva without any hassle or problem. In case you are facing any kind of issues while using Canva, you can check out the guides or contact support. Along with it, you may find a lack of some important features too. Due to it, you may not get results as per your expectations and all. Here, you should be focused on alternatives as we discussed Filmora. It is one of the best video editors that has several features and a big music library. You will get accessibility to the music library and features for free. You should be smart and careful while making a final decision.
All individuals have a dream to become a recognizable personality in the world. Everyone wants to achieve a dream of getting popularity like a film star. Previously, it was possible only by contribution efforts on the TV or movie screens. But now, the conditions are completely different. All individuals have multiple options to achieve such an objective by using social media platforms.
These platforms allow users to showcase their talent by sharing different types of videos. When it comes to creating an impressive video, everyone needs to use a good video editor by which they can add multiple elements to the content. Canva is the first preference of numerous individuals. Some of these are eagerly want to know how to add music in Canva externally to create a fully-featured video. If you are one of these individuals, you should be focused on the upcoming paragraphs.
In this article
01 [Add Music To Canva Video](#Part 1)
02 [Crop Music You Added On Canva](#Part 2)
03 [Edit Your Music On Canva](#Part 3)
Part 1 Add Music To Canva Video
By using Canva, you can create a good video with ease. It can help you add multiple elements, effects, and factors to the video by which you can make things easier. It increases the effectiveness of the video and connects with the audience perfectly. Here, you will get the complete process to figure out how can make it possible.
Step-By-Step Guide To Add Music In Canva Video
Step 1: Create Design
Firstly, you should focus on creating a proper design or video that you want to share on your social accounts. In case you have already such a thing on your device or in the Canva library, you should open it in the editor’s interface. After that, you should work on adding audio files.
Step 2: Upload Audio
Secondly, you should proceed with a small procedure of uploading audio files to the Canva. Canva allows uploading any kind of file from external sources or devices. It can be useful in adding desired audio and sound effects to the video. For such a thing, you can see the UPLOAD tab in the menu. You should visit the tab and click the UPLOAD MEDIA button.
Step 3: Pick Audio File
When you click the button, it will lead to a device folder interface. By using this interface, you should locate the folder where your desired audio file and available and select it for uploading or adding in the Canva.
Step 4: Find Out Audio
After uploading the file, you can easily use it for creating desired design or video. Here, you should visit the AUDIO tab from the side panel. In case you cannot see such an option, you will definitely get the MORE button, so, proceed by clicking it. After exploring more, you can easily see that particular button.
Step 5:Add Audio To Design
In the audio tab, you can see the recently uploaded final. You should proceed by choosing this particular file. It will help you make lots of things easier and better.
It is the complete procedure that you can follow to add an audio file to the Canva. You can also find several audio files inside the Canva that can feature your design or video as well. But, it depends on your requirements and creative ideas and how you want to proceed.
Part 2 Crop Music You Added On Canva
When it comes to video or audio editing, the biggest thing is trimming. Trimming helps to reduce the content length or time duration by which you can share the video with appropriate time limits. With the following procedure, you can easily edit the audio file.

Part 3 Edit Your Music On Canva
Step 1: Open My Media
In the navigation system or side panel, you can find out MY MEDIA section. It will help you get access to the available media files that are linked to your Canva account.
Step 2: Gray Pencil
Now, you should proceed by choosing the GRAY PENCIL ICON. You can find out this icon with the video. Generally, it is considered as an edit symbol that will allow you to access the complete edit panel without any problem.
Step 3: Launch Editor And Edit
You should click the edit icon and launch the respective interface. In case you want to trim the audio, you can use left and right brackets and drag them to the positions. The left bracket will help you decide the starting point and the right one help you pick the ending point. By using both, you can pick a section that you want to add to the video.
If you like to chop the audio, you should choose the section by using the scissors icon. The selected audio section will be removed and the remaining can be added to the video. As for the editor features, you can also apply fades to the audio. It will help you to mix different audios or create some low moments in the video.
Step 4: Preview
After making all these edits on video and audio, you should merge both files. Before proceeding to the final step, it will be good if you consider a preview. Preview will help you understand the video is created perfectly or not. In case there’s any kind of issue with the video, you will get it during preview and fix it immediately.
Step 5: Save & Download
In case you are satisfied with the preview results, you should click the SAVE or SAVE A COPY button. You can also download the file to get it on your device and share it on other platforms.
It is the complete procedure that will help you to edit an audio file on Canva with ease.
Important Tip: Try Filmora
In case you are interested in using a good video editor with a user-friendly interface and easy-to-use procedures, you should be focused on choosing Filmora. It is a great tool that can be accessed on both Windows and Mac devices. Along with it, you can get its version for mobile devices (Android and iOS) as well.
While accessing Filmora, you will get multiple options regarding features and functionalities. It also has a big library that allows you to get free access to different types of audio files, songs, music, and video effects.
Wondershare Filmora
Get started easily with Filmora’s powerful performance, intuitive interface, and countless effects Try It Free Try It Free Learn More about Filmora>
.png) Kanto Player Professional
Kanto Player ProfessionalFinal Words
All these details will help you understand how to add music on Canva without any hassle or problem. In case you are facing any kind of issues while using Canva, you can check out the guides or contact support. Along with it, you may find a lack of some important features too. Due to it, you may not get results as per your expectations and all. Here, you should be focused on alternatives as we discussed Filmora. It is one of the best video editors that has several features and a big music library. You will get accessibility to the music library and features for free. You should be smart and careful while making a final decision.
- Title: In 2024, Bring Your Video to Life with Cropping, Adding, & Tweaking Audio in Canva
- Author: Paul
- Created at : 2024-07-27 01:33:26
- Updated at : 2024-07-28 01:33:26
- Link: https://extra-information.techidaily.com/in-2024-bring-your-video-to-life-with-cropping-adding-and-tweaking-audio-in-canva/
- License: This work is licensed under CC BY-NC-SA 4.0.