
Mastering Photo Distortion Techniques in PS
Mastering Photo Distortion Techniques in PS
Create High-Quality Video - Wondershare Filmora
An easy and powerful YouTube video editor
Numerous video and audio effects to choose from
Detailed tutorials are provided by the official channel
With over 10 million users, Photoshop is one of the most popular graphics editing software. The program has some cool photo effects you can use on your image collection, including creating distortion effects on images. There are also editing tips for Photoshop beginners to help them edit their photos. People use these effects because they have lots of benefits. With that in mind, let’s look at how you can apply Photoshop distortion effects on text and photos and how this can help.
In this article
01 How Distortion Effects Change Your Photo
02 How to Create Distortion Effects in Photoshop
How Distortion Effects Change Your Photo
Adding distortion effects to your photos can help them in numerous ways. These include:
1. Helps You Draw Attention to Your Work
All photography lovers want to improve and enhance their pictures after taking them. By adding distortion effects to your photo, you’ll make it stand out. In turn, this dramatic change will attract more viewers.
Not all photos that you take will be attractive. You can also use distortion effects to make them attractive so they can get more attention.
In addition to being more attractive, distortion effects make your photos more appealing. They enhance your photos to a higher level. We all know that a picture is considered a universal language with no boundaries, and it communicates well with everyone. As such, if it looks more appealing, it will be more effective.
2. Conceals Errors
If your photo has some mistakes you want to conceal, you can use Photoshop distortion effects. It will not only hide the errors but also make it look better.
3. Allows You to Emphasize Your Subject
You can use distortion effects to emphasize your subject in a photo. Once viewers look at your photo, they will immediately know what you want them to focus on.
4. Creates Interesting Photo Art Works
Many people consider taking photos as a hobby or a way to have a remembrance of memorable events in their lives. Because photography is regarded as an art, you can create great photos by taking a splendid shoot. And that’s why people love seeing photography exhibits due to the unique and genuine art they see through photographs. Essentially, using distortion effects can make it look more than art.
How to Create Distortion Effects in Photoshop
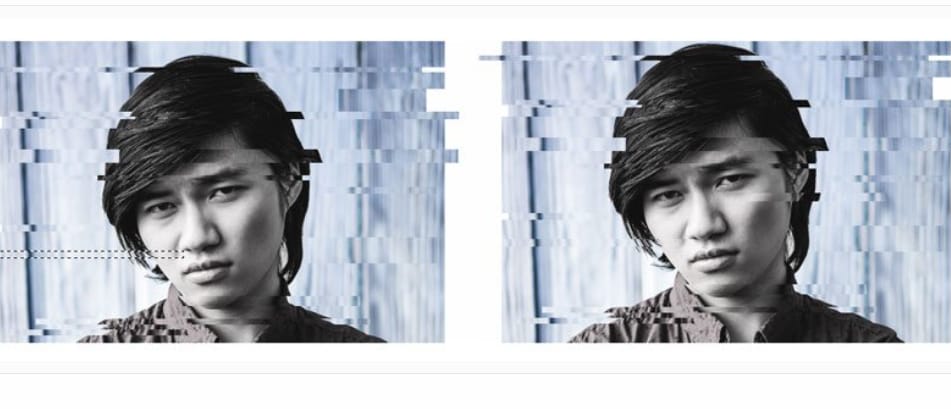
The glitch effect is a digital effect that randomly corrupts image data. You can use the glitch effect on both text and images; this is one of the coolest effects you can create in Photoshop.
How to Apply Glitch Effects in Photoshop
A glitch effect creates a visible result of being a little unusual in its look. It is one of the most common trends in digital craft, and making it is not as difficult as it seems. You can transform ordinary photos into stunning digital artwork with the appropriate effects and filters. This guide will teach you how to do it using Photoshop.
Step 1\
You will first need to import an image into Photoshop. Double-click on the Background layer and make it a New Layer.
Press Control-Shift-N to create a New Layer positioned below your reference. Then, set your Foreground Color to white, then use the Paint Bucket Tool to fill the layer with white.
Step 2\
Now, select the Magnetic Lasso Tool, as this will allow you to extract the reference by snapping to the sides of the model. Create an entire selection around the model using the Magnetic Lasso Tool.
Once you are done, Right-click and then select Layer through Copy; this will allow you to create a duplicate quickly.

Step 3\
Select your original stock, and press Control-T to use the Free Transform Tool to bring in the background sides to expose a bit of the white to the right and left.
If your photo does not have a background, you could also use the Rectangle Tool to add a rectangle.
Step 4\
You can desaturate your picture for a monochromatic color palette. Next, select the layer for the cutout of the model and head to Image > Adjustments, then choose the Hue & Saturation option. Remove the majority of the picture’s color by lowering the Saturation up to 95.
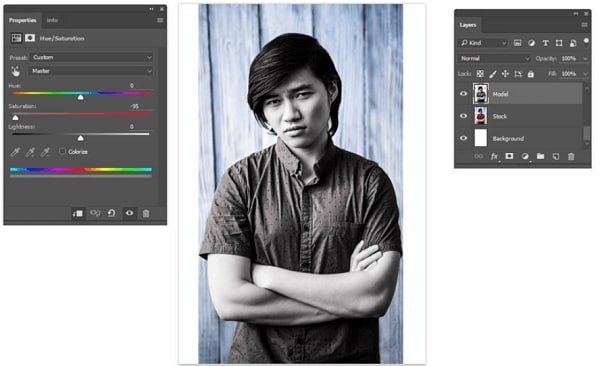
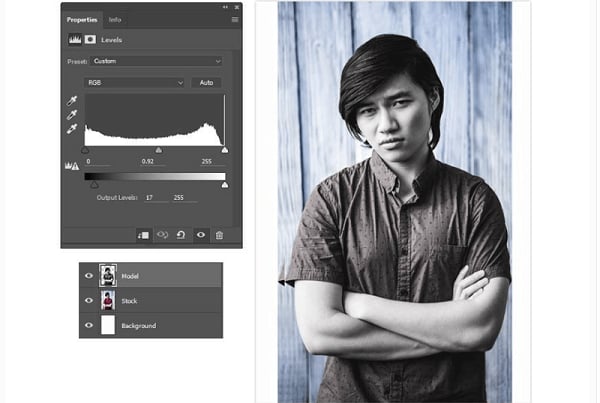
You can use Levels to adjust the main picture further. Select the extracted model’s layer and navigate to Image>Adjustments; then select Levels and make adjustments for the RGB Channel by inserting the following settings:
- Output Levels: 17, 255
- Highlight Input Level: 255
- Midtone Input Level: 0.92
- Midtone Input Level: 0.92
The result will be subtle, and it’ll slightly lighten the model.
Step 5\
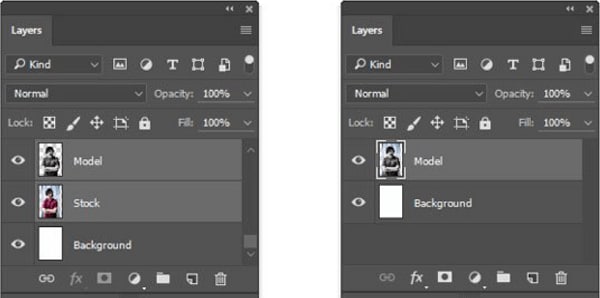
The next step of this glitch effect is recreating the jagged photo distortion to make the visuals look as if they are out of place. You can do this by selecting the model and stock layers and merging them.
Step 6\
Select the Rectangular Marquee Tool, and create two skinny selections on your photo layer. You can start by creating one selection at the bottom. Then, add another one at the top by holding the Shift key.
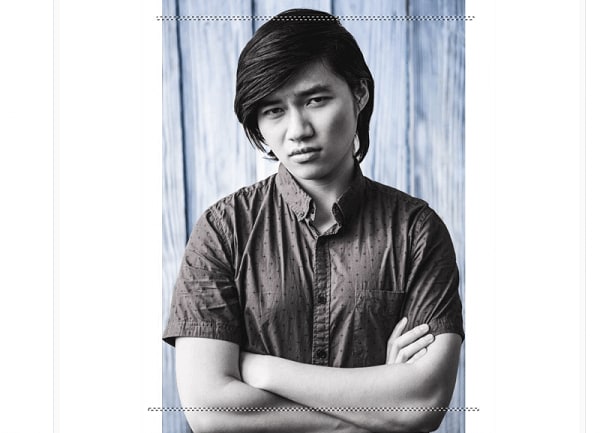
Change to the Move Tool by pressing the V key. Use the Arrow key on your keyboard to move selections to the left-hand side. Hold it down for some time or hit it several times to get the desired result.
Step 7\
You can continue the process on a single layer; however, you’ll eventually see open white spaces that do not look good. Therefore, to avoid this, you might want to Duplicate the Model Layer and then create the distortion using the copy.
Again, create more selections using the Rectangular Marquee Tool; use the Right and Left Arrow keys to move them in different directions.
Step 8\
Use the Move Tool to create even more Rectangular Selections and move the various sections out of place. Make the effect more natural by varying the size between thicker selections and skinny ones.
Do not distort the face too much; you can do each glitch separately to see what will work.
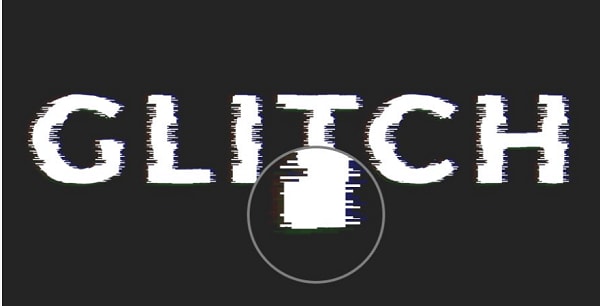
How to Apply Glitch Effects to Text in Photoshop
Photoshop allows you to add glitch effects in the text in your work and take it to the next level. Follow the steps below to learn how to apply glitch effects in your text in Photoshop:
Step 1\
Launch Photoshop, then create a New Document. Make sure this effect is a bit large to get all the details in.
Step 2
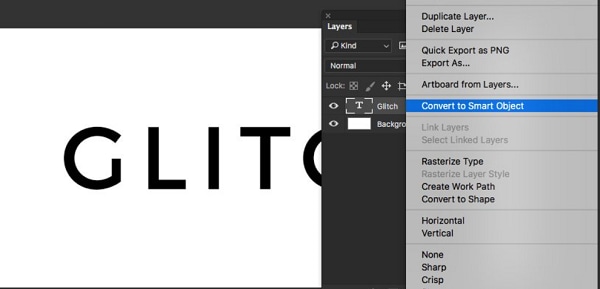
Enter the word Glitch using the Type tool. A simple sans-serif typeface will work well for this effect. For instance, you can use Montserrat at 480px and 140 letter spacing.
Step 3
Next, right-click the text layer and select Convert to Smart Object.
Step 4
Head to Filter, then Distort and select the Wave option. Now, enter the following settings:
- Scale Vert: 1% Horiz: 20%
- Amplitude Max: 52 Min: 1
- Wavelength Max: 756 Min: 178
- Number of Generators: 2
- Type: Square
Step 5
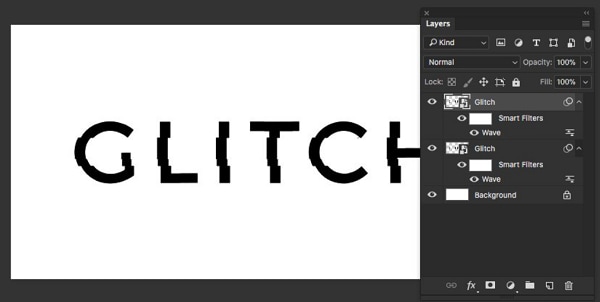
Press CTRL+J or CMD+J to duplicate the Smart Object and expand the fx dropdown.
Step 6
Edit the Wave filter by double-clicking on it, then modify the settings as follows:
- Scale Vert: 1% Horiz: 10%
- Amplitude Max: 283 Min: 1
- Wavelength Max: 372 Min: 97
- Number of Generators: 2
- Type: Square
Step 7
Press CTRL+J or CMD+J to duplicate the Smart Object again.
Step 8
Edit the Wave filter by double-clicking on it, then modify the settings as seen below:
- Scale Vert: 1% Horiz: 60%
- Amplitude Max: 33 Min: 4
- Wavelength Max: 33 Min: 1
- Number of Generators: 3
- Type: Square
These are typically the fuzzy distortion lines that complete the effect. Adjust the Horizontal Scale setting to achieve the amount of fuzziness you desire.
Step 9
Select all the three Smart Object layers, then group them. You can name the group Glitch before filling the background with #242424.

Step 10
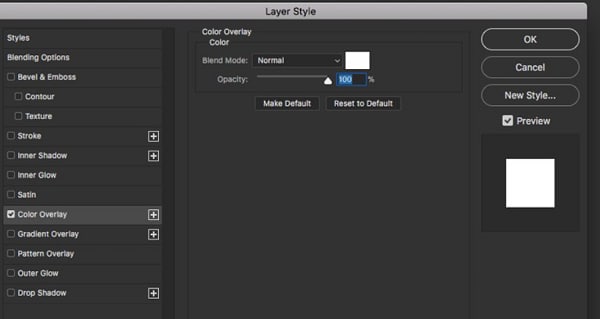
Double click on the smart object or group, then add a White Color Overlay. Duplicate the smart object or Glitch group thrice. That means you’ll now have four groups. On these bottom-three groups, label them Blue, Green, and Red, and set their Opacity to 25%.
Step 11
Next, double click the Red group, then make sure the Color Overlay is #ff2700. Then, double click the Green group and ensure the Color Overlay is set to #00fa00. Now, Double click the Blue group to change its Color Overlay and make sure it’s #1833ff.
Step 12
Nudge the Blue, Green, and Red groups using the arrow keys and move them randomly around 10-20 pixels each.
Step 13
Once you’re happy with the results, you can save your text in the desired location. And that’s all there is when creating a glitch effect in Photoshop.
Create Glitch Effects in Your Video with Filmora
If you want to add glitch effects to your videos, Filmora is here for you. No advanced video editing techniques are required. Check the below videos to find out more.
For Win 7 or later (64-bit)
For macOS 10.12 or later
Conclusion
● Photoshop distortion effects are essential as they do more than enhancement. They make your photos more attractive, and you can use them to emphasize your subject in photos. Follow the steps above to apply distortion effects in your text or photo using Photoshop.
With over 10 million users, Photoshop is one of the most popular graphics editing software. The program has some cool photo effects you can use on your image collection, including creating distortion effects on images. There are also editing tips for Photoshop beginners to help them edit their photos. People use these effects because they have lots of benefits. With that in mind, let’s look at how you can apply Photoshop distortion effects on text and photos and how this can help.
In this article
01 How Distortion Effects Change Your Photo
02 How to Create Distortion Effects in Photoshop
How Distortion Effects Change Your Photo
Adding distortion effects to your photos can help them in numerous ways. These include:
1. Helps You Draw Attention to Your Work
All photography lovers want to improve and enhance their pictures after taking them. By adding distortion effects to your photo, you’ll make it stand out. In turn, this dramatic change will attract more viewers.
Not all photos that you take will be attractive. You can also use distortion effects to make them attractive so they can get more attention.
In addition to being more attractive, distortion effects make your photos more appealing. They enhance your photos to a higher level. We all know that a picture is considered a universal language with no boundaries, and it communicates well with everyone. As such, if it looks more appealing, it will be more effective.
2. Conceals Errors
If your photo has some mistakes you want to conceal, you can use Photoshop distortion effects. It will not only hide the errors but also make it look better.
3. Allows You to Emphasize Your Subject
You can use distortion effects to emphasize your subject in a photo. Once viewers look at your photo, they will immediately know what you want them to focus on.
4. Creates Interesting Photo Art Works
Many people consider taking photos as a hobby or a way to have a remembrance of memorable events in their lives. Because photography is regarded as an art, you can create great photos by taking a splendid shoot. And that’s why people love seeing photography exhibits due to the unique and genuine art they see through photographs. Essentially, using distortion effects can make it look more than art.
How to Create Distortion Effects in Photoshop
The glitch effect is a digital effect that randomly corrupts image data. You can use the glitch effect on both text and images; this is one of the coolest effects you can create in Photoshop.
How to Apply Glitch Effects in Photoshop
A glitch effect creates a visible result of being a little unusual in its look. It is one of the most common trends in digital craft, and making it is not as difficult as it seems. You can transform ordinary photos into stunning digital artwork with the appropriate effects and filters. This guide will teach you how to do it using Photoshop.
Step 1\
You will first need to import an image into Photoshop. Double-click on the Background layer and make it a New Layer.
Press Control-Shift-N to create a New Layer positioned below your reference. Then, set your Foreground Color to white, then use the Paint Bucket Tool to fill the layer with white.
Step 2\
Now, select the Magnetic Lasso Tool, as this will allow you to extract the reference by snapping to the sides of the model. Create an entire selection around the model using the Magnetic Lasso Tool.
Once you are done, Right-click and then select Layer through Copy; this will allow you to create a duplicate quickly.
Step 3\
Select your original stock, and press Control-T to use the Free Transform Tool to bring in the background sides to expose a bit of the white to the right and left.
If your photo does not have a background, you could also use the Rectangle Tool to add a rectangle.
Step 4\
You can desaturate your picture for a monochromatic color palette. Next, select the layer for the cutout of the model and head to Image > Adjustments, then choose the Hue & Saturation option. Remove the majority of the picture’s color by lowering the Saturation up to 95.
You can use Levels to adjust the main picture further. Select the extracted model’s layer and navigate to Image>Adjustments; then select Levels and make adjustments for the RGB Channel by inserting the following settings:
- Output Levels: 17, 255
- Highlight Input Level: 255
- Midtone Input Level: 0.92
- Midtone Input Level: 0.92
The result will be subtle, and it’ll slightly lighten the model.
Step 5\
The next step of this glitch effect is recreating the jagged photo distortion to make the visuals look as if they are out of place. You can do this by selecting the model and stock layers and merging them.
Step 6\
Select the Rectangular Marquee Tool, and create two skinny selections on your photo layer. You can start by creating one selection at the bottom. Then, add another one at the top by holding the Shift key.
Change to the Move Tool by pressing the V key. Use the Arrow key on your keyboard to move selections to the left-hand side. Hold it down for some time or hit it several times to get the desired result.
Step 7\
You can continue the process on a single layer; however, you’ll eventually see open white spaces that do not look good. Therefore, to avoid this, you might want to Duplicate the Model Layer and then create the distortion using the copy.
Again, create more selections using the Rectangular Marquee Tool; use the Right and Left Arrow keys to move them in different directions.
Step 8\
Use the Move Tool to create even more Rectangular Selections and move the various sections out of place. Make the effect more natural by varying the size between thicker selections and skinny ones.
Do not distort the face too much; you can do each glitch separately to see what will work.
How to Apply Glitch Effects to Text in Photoshop
Photoshop allows you to add glitch effects in the text in your work and take it to the next level. Follow the steps below to learn how to apply glitch effects in your text in Photoshop:
Step 1\
Launch Photoshop, then create a New Document. Make sure this effect is a bit large to get all the details in.
Step 2
Enter the word Glitch using the Type tool. A simple sans-serif typeface will work well for this effect. For instance, you can use Montserrat at 480px and 140 letter spacing.
Step 3
Next, right-click the text layer and select Convert to Smart Object.
Step 4
Head to Filter, then Distort and select the Wave option. Now, enter the following settings:
- Scale Vert: 1% Horiz: 20%
- Amplitude Max: 52 Min: 1
- Wavelength Max: 756 Min: 178
- Number of Generators: 2
- Type: Square
Step 5
Press CTRL+J or CMD+J to duplicate the Smart Object and expand the fx dropdown.
Step 6
Edit the Wave filter by double-clicking on it, then modify the settings as follows:
- Scale Vert: 1% Horiz: 10%
- Amplitude Max: 283 Min: 1
- Wavelength Max: 372 Min: 97
- Number of Generators: 2
- Type: Square
Step 7
Press CTRL+J or CMD+J to duplicate the Smart Object again.
Step 8
Edit the Wave filter by double-clicking on it, then modify the settings as seen below:
- Scale Vert: 1% Horiz: 60%
- Amplitude Max: 33 Min: 4
- Wavelength Max: 33 Min: 1
- Number of Generators: 3
- Type: Square
These are typically the fuzzy distortion lines that complete the effect. Adjust the Horizontal Scale setting to achieve the amount of fuzziness you desire.
Step 9
Select all the three Smart Object layers, then group them. You can name the group Glitch before filling the background with #242424.
Step 10
Double click on the smart object or group, then add a White Color Overlay. Duplicate the smart object or Glitch group thrice. That means you’ll now have four groups. On these bottom-three groups, label them Blue, Green, and Red, and set their Opacity to 25%.
Step 11
Next, double click the Red group, then make sure the Color Overlay is #ff2700. Then, double click the Green group and ensure the Color Overlay is set to #00fa00. Now, Double click the Blue group to change its Color Overlay and make sure it’s #1833ff.
Step 12
Nudge the Blue, Green, and Red groups using the arrow keys and move them randomly around 10-20 pixels each.
Step 13
Once you’re happy with the results, you can save your text in the desired location. And that’s all there is when creating a glitch effect in Photoshop.
Create Glitch Effects in Your Video with Filmora
If you want to add glitch effects to your videos, Filmora is here for you. No advanced video editing techniques are required. Check the below videos to find out more.
For Win 7 or later (64-bit)
For macOS 10.12 or later
Conclusion
● Photoshop distortion effects are essential as they do more than enhancement. They make your photos more attractive, and you can use them to emphasize your subject in photos. Follow the steps above to apply distortion effects in your text or photo using Photoshop.
Also read:
- [New] 12 Essential Metaverse Prototypes Demystifying VR
- [New] In 2024, Unveiling the Key to Thriving in Online Communities Like Reddit
- [New] Leveraging Video Production Microsoft's Movie Maker for Windows 11
- [Updated] How to Make Your Periscope Stream Swifter
- [Updated] The Art of Profit From 20-Second Videography A Guide for Creators
- [Updated] Top-Rated 3D Tools for YouTube Video Startups
- Delete Kernel or Full Memory Dumps From Windows 11 Systematically
- Discover the World of Screen Capture with Apowersoft's Free Version for 2024
- Dive Into Computing with Tom's Gear Analysis and Reviews
- Encompassing Angle Video Systems
- Enhance Workflow The Essential List of 8 Scheduling Apps for 2024
- Humor Haven The Ultimate List of Event-Specific Jokes
- In 2024, Audacity Techniques for Smooth Sound Blending
- In 2024, Complete Kinetics Exploration
- In 2024, Create Powerful Biz Decks with No-Cost Templates
- In 2024, How to Lock Apps on Infinix Smart 8 to Protect Your Individual Information
- Ultimate High Definition Slow-Mo Cams
- Unlocking Potential Innovations in GIF Artistry
- Upgrading Zoom Video Fidelity A Comprehensive Guide
- Title: Mastering Photo Distortion Techniques in PS
- Author: Paul
- Created at : 2024-11-23 01:04:18
- Updated at : 2024-11-30 02:11:37
- Link: https://extra-information.techidaily.com/mastering-photo-distortion-techniques-in-ps/
- License: This work is licensed under CC BY-NC-SA 4.0.