
"Mastering Podcasts Incorporating Audio in PowerPoint Slides"
Mastering Podcasts: Incorporating Audio in PowerPoint Slides
Versatile Video Editor - Wondershare Filmora
We know that you’re looking for quick answers on how to add audio to PowerPoint. Your wait ends here! PowerPoint records audio slide-by-slide instead of one continuous file while assisting creators to easily re-record a slide if they need to change something later or make a mistake.
In this guide, we’ll specifically talk about the feature by which you can record PowerPoint with audio. Also, we’ll take a look at other prominent, fast, and professional solutions that offers you bit reliable solutions than knowing how to add voice to PowerPoint.
In this article
01 [Add audio to PowerPoint](#Part 1)
02 [Record audio on PowerPoint](#Part 2)
03 [Adjust audio on PowerPoint](#Part 3)
04 [How to play audio automatically in PowerPoint](#Part 4)
Part 1 Add audio to PowerPoint
Adding audio and recording audio are two different aspects yet taken synonymously. This section will explain how to add audio to PowerPoint with an easy step-by-step guide.
To your PowerPoint presentation, you can add audio, such as music, narration, or sound bites.
Steps to add audio to PowerPoint from PC
Step1 Select Insert > Audio
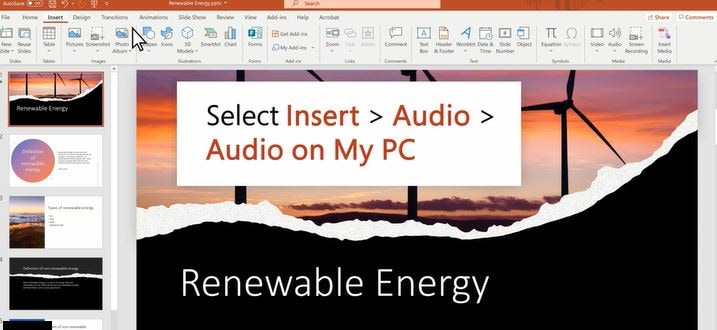
Step2 Select Audio on My PC
Step3 Select the audio file you want to add in the Insert Audio dialogue box
Step4 Select Insert
Part 2 Record audio on PowerPoint
We all know that PowerPoint is an excellent tool for creating amazing PPTs, provided you know everything creative about the device.
One of its creativity we’re going to unleash in the form of learning how to record audio on PowerPoint is as follows.
Your PC must have a microphone, sound card, and speakers to record and hear any audio.
Step1 Design your PowerPoint
TIP: Use images and limit text to engage viewers/listeners better.
Step2 Hit the Slide Show tab
NOTE: Do not include Audio under Insert and Record Audio since it doesn’t synchronize timings to automatically move the slides with the Audio.
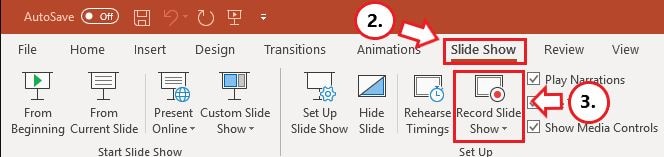
Step3 Hit the Record Slide Show
NOTE: Audio may begin getting recorded on its own if you are working on the older version of PowerPoint. It may still work, but this version offers reduced functionality.
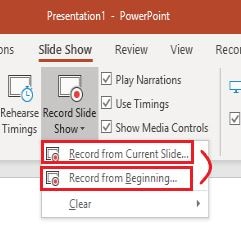
Step4 Choose Record from Beginning or REcord from Current Slide based upon your requirements
NOTE: You can re-record the PowerPoint slides by hitting the Record Slide Show and Selecting Record from the Current Slide.
Step5 Hit the Record tab to begin recording narration
NOTE: PowerPoint will offer a three-second countdown before it begins recording.
Step6 Record narration and avoid reading text on the slide-out loud to viewers. Hit the blue Replay tab to listen to the recorded Audio and make sure that it got properly recorded
Hit the Advance tab that reads Advance to the following animation or slides to record the narration for the next slide. However, you need to make sure to stop talking while doing this.
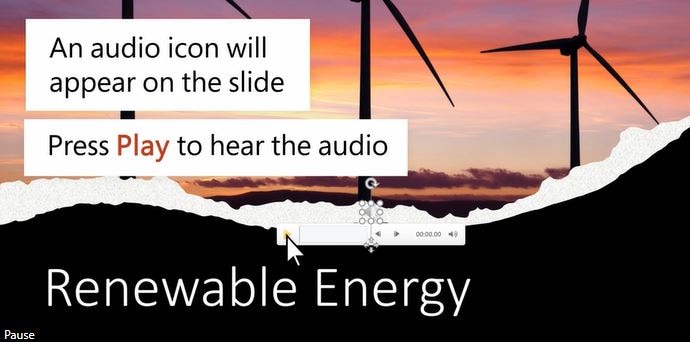
Step7 Hit the ‘X’ or the Escape button present in the top right panel after recording the Audio. You will notice a speaker icon on slides with Audio over it
Save the video by hitting the File tab.
Select Export to confirm.
Part 3 Adjust audio on PowerPoint
This section will look at editing the added Audio into PowerPoint. As we’ve already gathered steps on adding Audio to PowerPoint and recording Audio on PowerPoint, it’s time to move a step ahead into the editing panel as follows.
I. Trim audio in PowerPoint presentation
Let’s suppose we’ve added long audio to our presentation, and we just only need it a few seconds long. So, we need to trim its audio by hitting the specific tabs.
Step1 Click the audio icon you’ve just added to the presentation in previous steps
Step2 Click Playback> Trim Audio as shown below
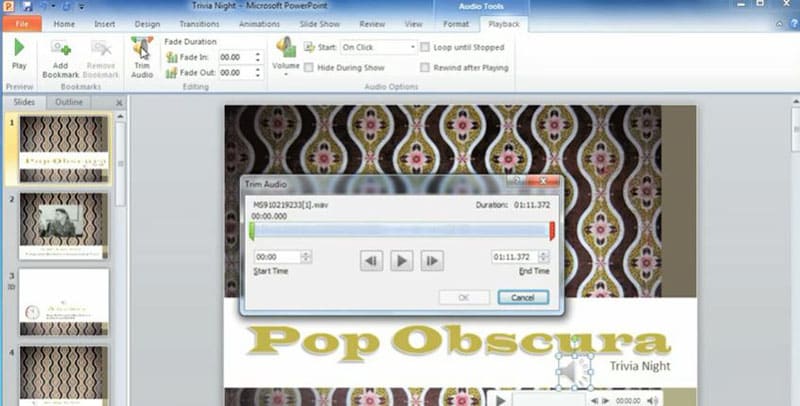
Step3 Within the pop-up window, you need to use the red and green markers to adjust the start and endpoint of the audio
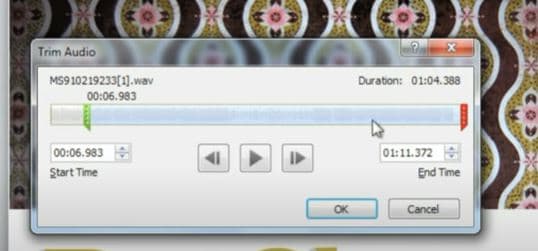
Hit the Play tab to preview the changes done.
II. Fade Audio Duration in PowerPoint presentation
On the same tab, you have a fade duration to adjust Fade In and Fade Out durations.
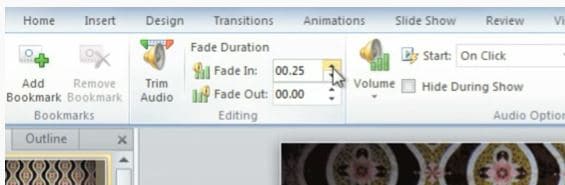
It wholly depends upon your preferences and requirements to fade in and fade out the audio.
III. Add Bookmark to the audio in PowerPoint presentation
If you want to switch to a specific point in the Audio, you can add a bookmark. Step 1: Click the place you wish to the Bookmark to be in the timeline below.

Step1 Click Add Bookmark after clicking the place

Part 4 How to play audio automatically in PowerPoint
After the above modifications, you can adjust the Audio Options. Thus, you can change how the audio plays in PPT as follows.
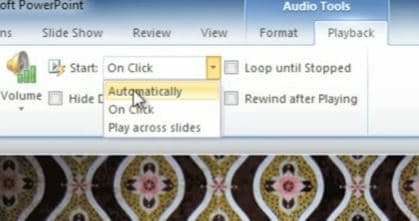
Then, there are options of Loop until Stopped and Rewind after Playing to adjust with.
So, these were a few simple steps to Insert Audio in PowerPoint and a detailed guide on how to record a PowerPoint presentation with Audio.
If you want to record PowerPoint with Audio and add Audio to PowerPoint in a relatively simplistic yet professional manner, we have an advice for you.
Go no far than using the powerful video editing tool Wondershare Filmora and unveil the creative yet quick loops of making your PPT more attractive.
Instead of doing extreme and lengthy steps, we can create a top-notch video with added Audio for PowerPoint presentation and then add afterward. It’s a professional approach than taking so long to complete an entire project on PowerPoint.
Let’s see how we can achieve this!
Steps to add audio to PowerPoint via Wondershare Filmora
Wondershare Filmora
Get started easily with Filmora’s powerful performance, intuitive interface, and countless effects!
Try It Free Try It Free Try It Free Learn More about Filmora>

Step1 Import audio
Launch the Wondershare Filmora as the necessary primary step. Then, click the Import button below the menu bar and select Import Media Files to add the Audio.
Note: You can also go for in-built music tracks to add music to your video by selecting the ‘MUSIC’ tab.

Step2 Add audio to timeline
Hover the mouse over the media you’ve imported for presentation and click the + sign to add audio to the project.

Step3 Edit audio
Double-tap the Audio on the timeline and adjust the Audio to fade-in, fade-out, volume, pitch, speed, etc.

Step4 Export audio
Click the Export tab and choose the format in which you want to export the Audio.
Steps to record audio to PowerPoint via Wondershare Filmora
We suppose that you’ve already launched Wondershare Filmora as your foremost task.
Step1 Plugin microphone
Connect the microphone to your PC.
Step2 Record Voiceover
Hit the New Project tab to create a new project and click Record a voiceover option in the Record tab.

Step3 Edit voiceover
Now, it’s time to edit the recorded voiceover and adjust different settings in the audio track, namely the Pitch, Volume, Speed, etc.

Step4 Export voiceover
Hit the Export button and choose the Device and Format you’d like to export it to.

We feel that this way to insert Audio into PowerPoint is pretty creative than using the PowerPoint itself with the lengthy steps. After doing all the adding and recording of Audio on Wondershare Filmora, you can export the project and add its whole presentation. Thus, there’s no need to add extra elements and editing tools in the PowerPoint presentation, which could be tricky for an amateur.
Conclusion
So, we’d like to conclude our tutorial here on how to add Audio to PowerPoint with the steps required for the purpose. However, we’ve also discussed all the loops in inserting PowerPoint presentations with Audio. The smartest are those who are quick, professional, and easy-going! Keeping this beautiful phrase in mind, we’ve recommended using Wondershare Filmora as a handy tool to create compelling PowerPoint presentations and stand better than your competitors.
We know that you’re looking for quick answers on how to add audio to PowerPoint. Your wait ends here! PowerPoint records audio slide-by-slide instead of one continuous file while assisting creators to easily re-record a slide if they need to change something later or make a mistake.
In this guide, we’ll specifically talk about the feature by which you can record PowerPoint with audio. Also, we’ll take a look at other prominent, fast, and professional solutions that offers you bit reliable solutions than knowing how to add voice to PowerPoint.
In this article
01 [Add audio to PowerPoint](#Part 1)
02 [Record audio on PowerPoint](#Part 2)
03 [Adjust audio on PowerPoint](#Part 3)
04 [How to play audio automatically in PowerPoint](#Part 4)
Part 1 Add audio to PowerPoint
Adding audio and recording audio are two different aspects yet taken synonymously. This section will explain how to add audio to PowerPoint with an easy step-by-step guide.
To your PowerPoint presentation, you can add audio, such as music, narration, or sound bites.
Steps to add audio to PowerPoint from PC
Step1 Select Insert > Audio
Step2 Select Audio on My PC
Step3 Select the audio file you want to add in the Insert Audio dialogue box
Step4 Select Insert
Part 2 Record audio on PowerPoint
We all know that PowerPoint is an excellent tool for creating amazing PPTs, provided you know everything creative about the device.
One of its creativity we’re going to unleash in the form of learning how to record audio on PowerPoint is as follows.
Your PC must have a microphone, sound card, and speakers to record and hear any audio.
Step1 Design your PowerPoint
TIP: Use images and limit text to engage viewers/listeners better.
Step2 Hit the Slide Show tab
NOTE: Do not include Audio under Insert and Record Audio since it doesn’t synchronize timings to automatically move the slides with the Audio.
Step3 Hit the Record Slide Show
NOTE: Audio may begin getting recorded on its own if you are working on the older version of PowerPoint. It may still work, but this version offers reduced functionality.
Step4 Choose Record from Beginning or REcord from Current Slide based upon your requirements
NOTE: You can re-record the PowerPoint slides by hitting the Record Slide Show and Selecting Record from the Current Slide.
Step5 Hit the Record tab to begin recording narration
NOTE: PowerPoint will offer a three-second countdown before it begins recording.
Step6 Record narration and avoid reading text on the slide-out loud to viewers. Hit the blue Replay tab to listen to the recorded Audio and make sure that it got properly recorded
Hit the Advance tab that reads Advance to the following animation or slides to record the narration for the next slide. However, you need to make sure to stop talking while doing this.
Step7 Hit the ‘X’ or the Escape button present in the top right panel after recording the Audio. You will notice a speaker icon on slides with Audio over it
Save the video by hitting the File tab.
Select Export to confirm.
Part 3 Adjust audio on PowerPoint
This section will look at editing the added Audio into PowerPoint. As we’ve already gathered steps on adding Audio to PowerPoint and recording Audio on PowerPoint, it’s time to move a step ahead into the editing panel as follows.
I. Trim audio in PowerPoint presentation
Let’s suppose we’ve added long audio to our presentation, and we just only need it a few seconds long. So, we need to trim its audio by hitting the specific tabs.
Step1 Click the audio icon you’ve just added to the presentation in previous steps
Step2 Click Playback> Trim Audio as shown below
Step3 Within the pop-up window, you need to use the red and green markers to adjust the start and endpoint of the audio
Hit the Play tab to preview the changes done.
II. Fade Audio Duration in PowerPoint presentation
On the same tab, you have a fade duration to adjust Fade In and Fade Out durations.
It wholly depends upon your preferences and requirements to fade in and fade out the audio.
III. Add Bookmark to the audio in PowerPoint presentation
If you want to switch to a specific point in the Audio, you can add a bookmark. Step 1: Click the place you wish to the Bookmark to be in the timeline below.
Step1 Click Add Bookmark after clicking the place
Part 4 How to play audio automatically in PowerPoint
After the above modifications, you can adjust the Audio Options. Thus, you can change how the audio plays in PPT as follows.
Then, there are options of Loop until Stopped and Rewind after Playing to adjust with.
So, these were a few simple steps to Insert Audio in PowerPoint and a detailed guide on how to record a PowerPoint presentation with Audio.
If you want to record PowerPoint with Audio and add Audio to PowerPoint in a relatively simplistic yet professional manner, we have an advice for you.
Go no far than using the powerful video editing tool Wondershare Filmora and unveil the creative yet quick loops of making your PPT more attractive.
Instead of doing extreme and lengthy steps, we can create a top-notch video with added Audio for PowerPoint presentation and then add afterward. It’s a professional approach than taking so long to complete an entire project on PowerPoint.
Let’s see how we can achieve this!
Steps to add audio to PowerPoint via Wondershare Filmora
Wondershare Filmora
Get started easily with Filmora’s powerful performance, intuitive interface, and countless effects!
Try It Free Try It Free Try It Free Learn More about Filmora>
Step1 Import audio
Launch the Wondershare Filmora as the necessary primary step. Then, click the Import button below the menu bar and select Import Media Files to add the Audio.
Note: You can also go for in-built music tracks to add music to your video by selecting the ‘MUSIC’ tab.
Step2 Add audio to timeline
Hover the mouse over the media you’ve imported for presentation and click the + sign to add audio to the project.
Step3 Edit audio
Double-tap the Audio on the timeline and adjust the Audio to fade-in, fade-out, volume, pitch, speed, etc.
Step4 Export audio
Click the Export tab and choose the format in which you want to export the Audio.
Steps to record audio to PowerPoint via Wondershare Filmora
We suppose that you’ve already launched Wondershare Filmora as your foremost task.
Step1 Plugin microphone
Connect the microphone to your PC.
Step2 Record Voiceover
Hit the New Project tab to create a new project and click Record a voiceover option in the Record tab.
Step3 Edit voiceover
Now, it’s time to edit the recorded voiceover and adjust different settings in the audio track, namely the Pitch, Volume, Speed, etc.
Step4 Export voiceover
Hit the Export button and choose the Device and Format you’d like to export it to.
We feel that this way to insert Audio into PowerPoint is pretty creative than using the PowerPoint itself with the lengthy steps. After doing all the adding and recording of Audio on Wondershare Filmora, you can export the project and add its whole presentation. Thus, there’s no need to add extra elements and editing tools in the PowerPoint presentation, which could be tricky for an amateur.
Conclusion
So, we’d like to conclude our tutorial here on how to add Audio to PowerPoint with the steps required for the purpose. However, we’ve also discussed all the loops in inserting PowerPoint presentations with Audio. The smartest are those who are quick, professional, and easy-going! Keeping this beautiful phrase in mind, we’ve recommended using Wondershare Filmora as a handy tool to create compelling PowerPoint presentations and stand better than your competitors.
Also read:
- [New] Elevate Your Posts Adding Animation to Text in Stories
- [New] Step-by-Step Setting Up Unique YouTube Shorts Thumbnails for 2024
- [Updated] 2024 Approved The GoPro Hero5 Black Journey Elevating Your Visual Storytelling
- 2024 Approved Navigate the Art of Film with XP's Easy Tools
- 2024 Approved The Seamless Tweet-to-Snap Transition Guide
- Affordable SkyBanking for Heavy Data Hoarding for 2024
- Evaluating Aurora HDR Worth the Investment?
- In 2024, Actors' Availability Downloadable Content Terms
- In 2024, Everything You Need to Know about Lock Screen Settings on your Lenovo
- In 2024, Music Transfer Essentials Keeping Your Playlist Alive
- Perfect Photos, Effortless Best 10 Screenshot-Sticker Enhancers for Smartphones
- Pixel's Melodic Matches and Personalization
- Smooth Integration: Update MF4770n Drivers on W11/W8/W7 OS
- Speedy Catalan Skills, Just 10 Mins
- Unlocking Audio Excellence in iOS Settings
- Title: Mastering Podcasts Incorporating Audio in PowerPoint Slides
- Author: Paul
- Created at : 2024-11-19 02:40:00
- Updated at : 2024-11-21 21:28:49
- Link: https://extra-information.techidaily.com/mastering-podcasts-incorporating-audio-in-powerpoint-slides/
- License: This work is licensed under CC BY-NC-SA 4.0.