
"Textual Transformations The Photographer's Guide to Image Edits"
Textual Transformations: The Photographer’s Guide to Image Edits
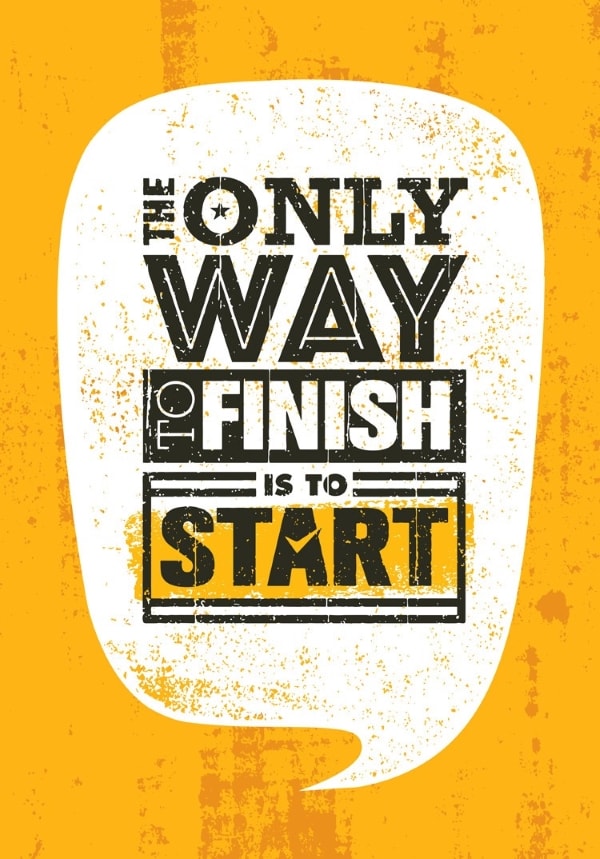
Typography in images impacts the viewers by explaining details and information in a systematic manner. When people add text to their images, it immediately engages the audience through psychological connection. Professionals make sure to use appropriate fonts and colors while adding typography.
If you also want to add text to images, this article will mention two reliable photo text editors for both online and smartphone users. Also, we will provide the complete steps to use these editors quickly.
In this article
01 How to Edit Text on Photo Online?
02 How to Edit Text on Photo on iPhone and Android Phone?
03 Basic Tips to Edit Text on Photo with Ease
Part 1: How to Edit Text on Photo Online?
Do you want to add and edit text on picture online? Use Wondershare PixStudio as an incredible photo text editor app to conveniently add text to your images. Individuals can design their images, YouTube thumbnails, and graphics by adding stylish and vibrant text to them. The user interface of PixStudio photo text editor online is simple and quick to use, and non-professionals can begin anytime to design their images.
You can use their templates that are available for separate categories such as invitations, posters, and social media posts. Afterward, you can select the font, color, style, and size of the text through the options and can easily make your image captivating. The elements on their pre-established templates are extremely eye-catchy and can give your image an artistic look with no effort.
Once done with making all the alterations, you can download the customized text image within seconds. To add text to images through Wondershare PixStudio, the steps are:
Step 1: Select the Design
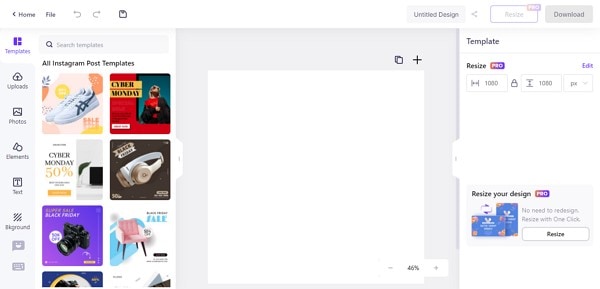
Navigate to the Wondershare PixStudio website and tap on “Start Design” after creating your account. From here, click on the “Create a Design” button to select a design template size such as a YouTube thumbnail, event poster, ticket, and Instagram post. To design an Instagram post, tap on its design template size.

Step 2: Explore the Templates
The pre-designed templates of the Instagram post will be displayed on your screen. There will be tons of options, so pick and choose your preferred style carefully by clicking on it. Click on the template and adjust and position the elements of the template manually.
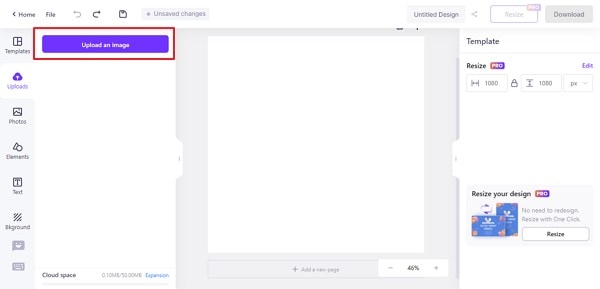
Step 3: Upload your Image (Optional)
You can also upload the photo on which you want to add the text to design it. Access the “Upload” tab from the left sidebar and click on “Upload an image,” and then add the image to the canvas.
Step 4: Add or Adjust the Text
Now, open the “Text” tab and select the desired font style and size from it. You can change the size, opacity, color, position, and font of the added text. You can edit the pre-added text of the templates as well.

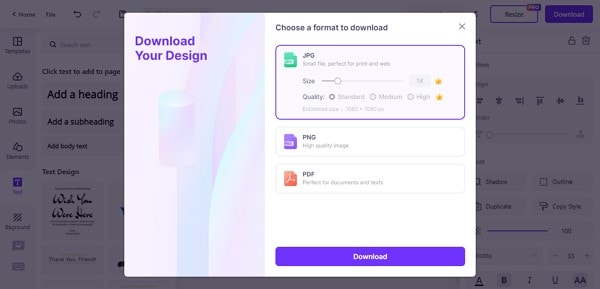
Step 5: Export the Edited Image
Once done with all the photo designing, click on “Download” and select the format to save the image on your device. The downloading process won’t take much time
Part 2: How to Edit Text on Photo on iPhone and Android Phone?
Do you want to make quick edits through the photo text editor app on your mobile phone? People need photo text editors specially designed for their smartphones to create and design attractive posts instantly. In this part, we will recommend a game-changer text editor that you can easily install on your mobile devices and can execute designing without any professional assistance.
This photo text editor has more than 400 style fonts, and also you have options to install other fonts as well. You don’t need to worry about ads and bugs as this app is constantly trying to improve itself. The important features of this tool include letter spacing, line spacing, text stroke color, and text background colors. Through their manual controls, you can precisely add text to their images with a few clicks.
Go and try Phonto text editor to design your images and posts on your phones easily. This editor app is highly compatible with iOS and Android users and has a quick responsive interface. To write text on photo through the Phonto editor, read the following instructions:
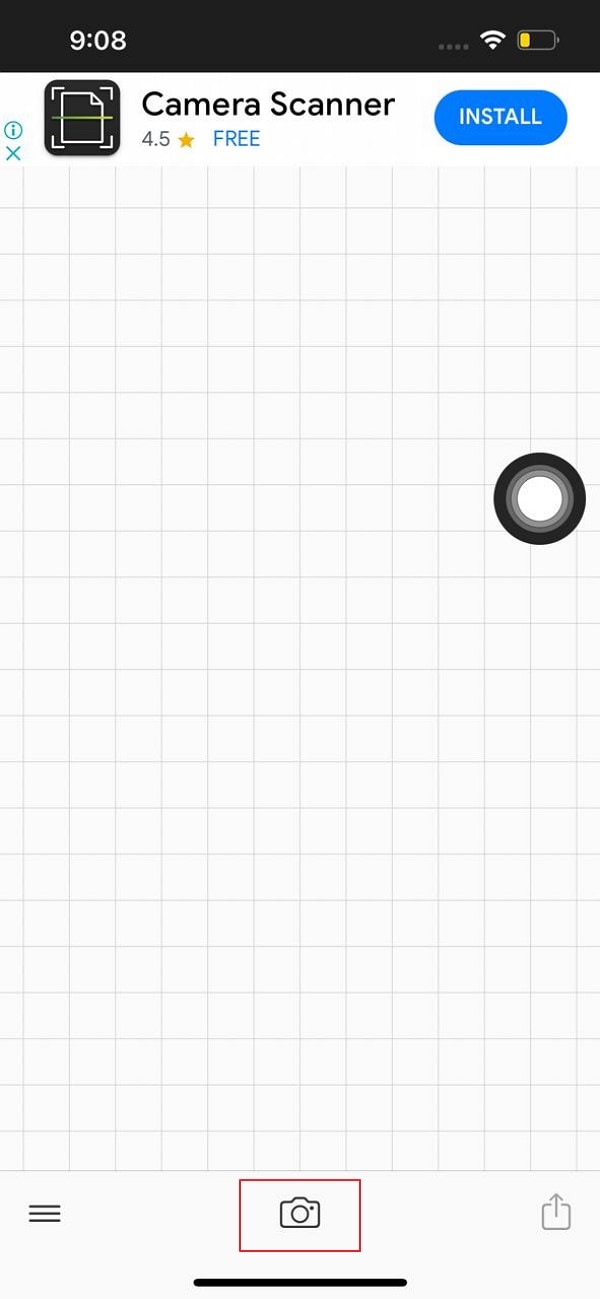
Step 1: Load the New Image
Begin with downloading the app on your phone and then tap on the “Camera” icon to upload the image from the phone or click a new picture. Select the image from the gallery, and it will be automatically uploaded to the tool.
Step 2: Click to Add Text
Click on anywhere on the photo to add the text to the photo. Type the text you want to enter on the pop-up menu and adjust it by selecting its position and font. Tap on “Done,” and then from the given options, tilt and move the text box according to your preference.
 Glarysoft File Recovery Pro Annually - Helps to recover your lost file/data, even permanently deleted data.
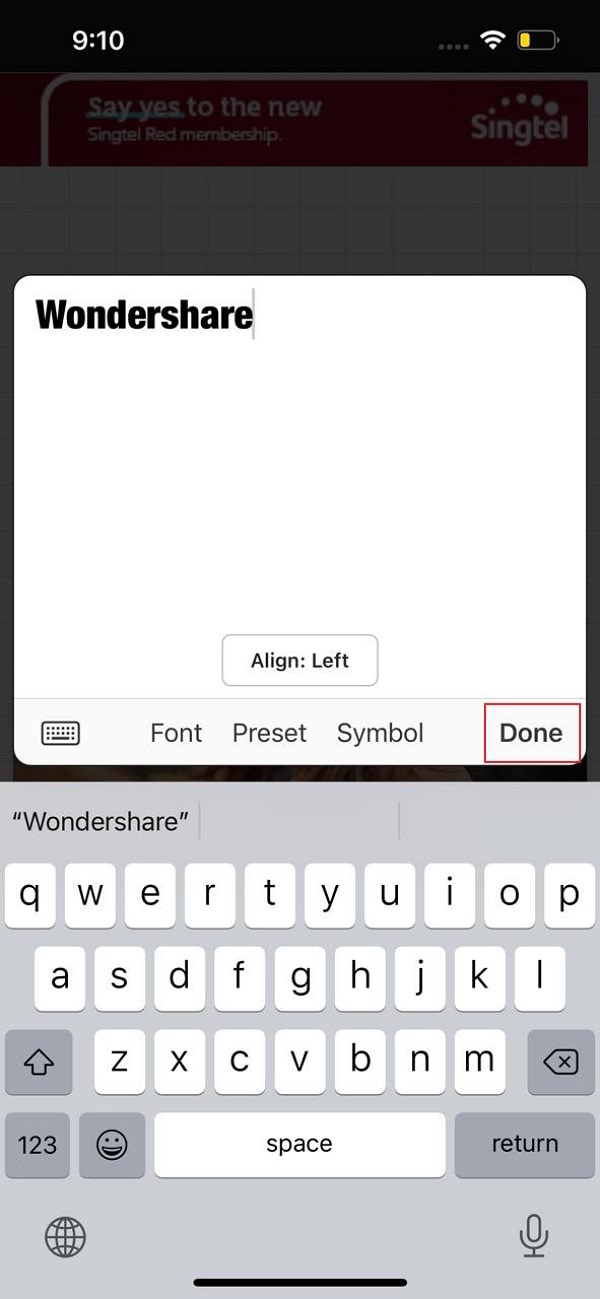
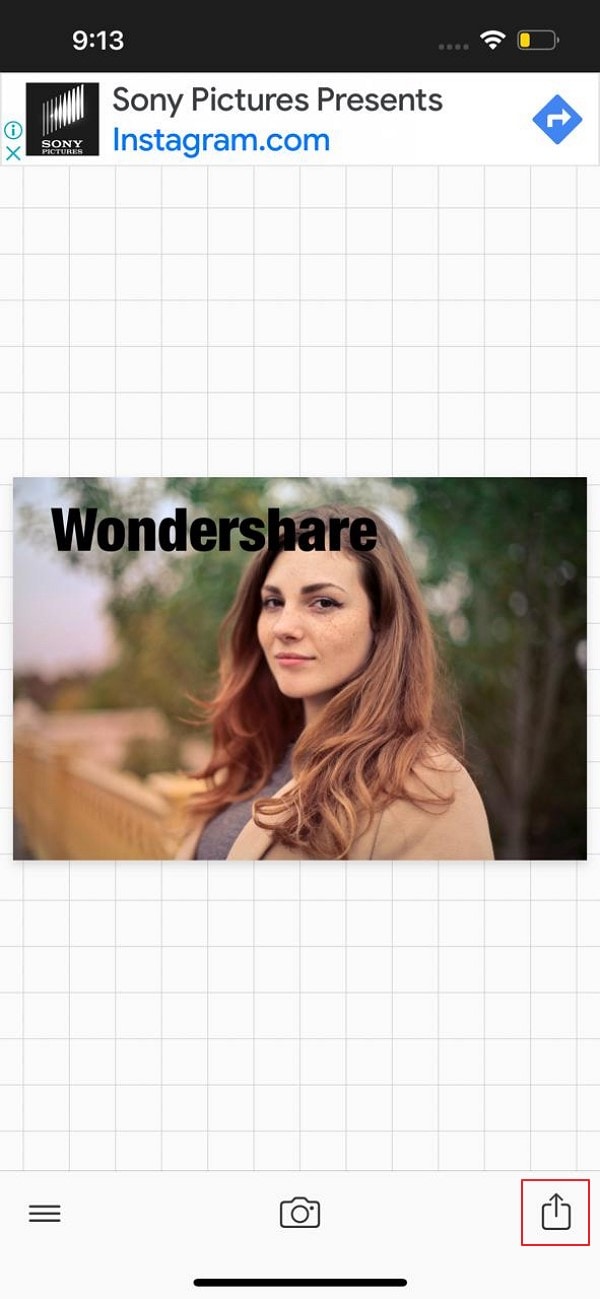
Step 3: Save the Text Image
After making all the changes, tap on the “Share” icon to save the image on your phone or share it on social media with your friends and family.

Part 3: Basic Tips to Edit Text on Photo with Ease
There are multiple tips that can be employed for a clear display of text across a photo. Being a photo text editor, you need to be careful about every element that is across the photo. Thus, to make your photos look perfect with the added text, you should be aware of the few tips that are featured below:

1. Understanding the Perspective
Adding text as a perspective is believed to be an inclusive way of providing viewers with the idea of the image and helping them understand it to the fullest. If you are looking forward to writing a text on photos,you can give your text a little angle and appearance according to the image shoot for a good illusion.
 EmEditor Professional (Lifetime License, non-store app)

2. Blending in with the Photo’s Properties
It is essential for you to figure out the right contrast of text that matches or immerses perfectly with the photo. This helps you ensure that the text of your photo stands out to the viewers with no affective disturbances. Not only will it look good, but it also won’t tamper with the quality of the photo that it holds across.

3. Look for Negative Space
When you consider adding text across a photo, it is highly advised that you should always go for an option that contains a general space for covering. Often referred to as negative space, utilizing that space for the text may be the perfect way that you can consider writing a text on photos. This puts no effect on the photo and helps the user display the whole idea with prominence.
4. Framing the Text
If you go for prominence, you should always use elements that are meant for bringing prominence. Text that is to be highlighted with purity across a photo should be framed rather than any other tactful technique. This helps you create a clear focal point while sustaining the quality of the image. Following this, it also keeps a good view across the photo as a subjective associate picture.

5. Control your Sizes and Styles
Make sure that you always select a font size or style that is relevant to the photo. The use of inappropriate sizes and styles in photos takes away the essence of the picture. A balance across these traits is essential for the user to bring. Capture the viewers’ attention without compromising the quality of the photo itself.

The Bottom Line
The best illustration of images is not possible without adding typography to them. People add text to the images to share social media posts or create poster events. Read this article to get a clear picture of how to write text on photos through powerful photo text editors.
02 How to Edit Text on Photo on iPhone and Android Phone?
03 Basic Tips to Edit Text on Photo with Ease
Part 1: How to Edit Text on Photo Online?
Do you want to add and edit text on picture online? Use Wondershare PixStudio as an incredible photo text editor app to conveniently add text to your images. Individuals can design their images, YouTube thumbnails, and graphics by adding stylish and vibrant text to them. The user interface of PixStudio photo text editor online is simple and quick to use, and non-professionals can begin anytime to design their images.
You can use their templates that are available for separate categories such as invitations, posters, and social media posts. Afterward, you can select the font, color, style, and size of the text through the options and can easily make your image captivating. The elements on their pre-established templates are extremely eye-catchy and can give your image an artistic look with no effort.
Once done with making all the alterations, you can download the customized text image within seconds. To add text to images through Wondershare PixStudio, the steps are:
Step 1: Select the Design
Navigate to the Wondershare PixStudio website and tap on “Start Design” after creating your account. From here, click on the “Create a Design” button to select a design template size such as a YouTube thumbnail, event poster, ticket, and Instagram post. To design an Instagram post, tap on its design template size.
 vMix Pro - Software based live production. vMix Pro includes everything in vMix 4K plus 8 channels of Replay and 8 vMix Call
Step 2: Explore the Templates
The pre-designed templates of the Instagram post will be displayed on your screen. There will be tons of options, so pick and choose your preferred style carefully by clicking on it. Click on the template and adjust and position the elements of the template manually.
Step 3: Upload your Image (Optional)
You can also upload the photo on which you want to add the text to design it. Access the “Upload” tab from the left sidebar and click on “Upload an image,” and then add the image to the canvas.
Step 4: Add or Adjust the Text
Now, open the “Text” tab and select the desired font style and size from it. You can change the size, opacity, color, position, and font of the added text. You can edit the pre-added text of the templates as well.
Step 5: Export the Edited Image
Once done with all the photo designing, click on “Download” and select the format to save the image on your device. The downloading process won’t take much time
 Screensaver Factory, Create stunning professional screensavers within minutes. Create screensavers for yourself, for marketing or unlimited royalty-free commercial distribution. Make screensavers from images, video and swf flash, add background music and smooth sprite and transition effects. Screensaver Factory is very easy to use, and it enables you to make self-installing screensaver files and CDs for easy setup and distribution. Screensaver Factory is the most advanced software of its kind.
Part 2: How to Edit Text on Photo on iPhone and Android Phone?
Do you want to make quick edits through the photo text editor app on your mobile phone? People need photo text editors specially designed for their smartphones to create and design attractive posts instantly. In this part, we will recommend a game-changer text editor that you can easily install on your mobile devices and can execute designing without any professional assistance.
This photo text editor has more than 400 style fonts, and also you have options to install other fonts as well. You don’t need to worry about ads and bugs as this app is constantly trying to improve itself. The important features of this tool include letter spacing, line spacing, text stroke color, and text background colors. Through their manual controls, you can precisely add text to their images with a few clicks.
Go and try Phonto text editor to design your images and posts on your phones easily. This editor app is highly compatible with iOS and Android users and has a quick responsive interface. To write text on photo through the Phonto editor, read the following instructions:
Step 1: Load the New Image
Begin with downloading the app on your phone and then tap on the “Camera” icon to upload the image from the phone or click a new picture. Select the image from the gallery, and it will be automatically uploaded to the tool.
Step 2: Click to Add Text
Click on anywhere on the photo to add the text to the photo. Type the text you want to enter on the pop-up menu and adjust it by selecting its position and font. Tap on “Done,” and then from the given options, tilt and move the text box according to your preference.
 Greeting Card Builder
Step 3: Save the Text Image
After making all the changes, tap on the “Share” icon to save the image on your phone or share it on social media with your friends and family.

Part 3: Basic Tips to Edit Text on Photo with Ease
There are multiple tips that can be employed for a clear display of text across a photo. Being a photo text editor, you need to be careful about every element that is across the photo. Thus, to make your photos look perfect with the added text, you should be aware of the few tips that are featured below:
 Epubor Audible Converter for Win: Download and convert Audible AAXC/AA/AAX to MP3 with 100% original quality preserved.
1. Understanding the Perspective
Adding text as a perspective is believed to be an inclusive way of providing viewers with the idea of the image and helping them understand it to the fullest. If you are looking forward to writing a text on photos,you can give your text a little angle and appearance according to the image shoot for a good illusion.
2. Blending in with the Photo’s Properties
It is essential for you to figure out the right contrast of text that matches or immerses perfectly with the photo. This helps you ensure that the text of your photo stands out to the viewers with no affective disturbances. Not only will it look good, but it also won’t tamper with the quality of the photo that it holds across.
 Project Manager - Asset Browser for 3Ds Max
3. Look for Negative Space
When you consider adding text across a photo, it is highly advised that you should always go for an option that contains a general space for covering. Often referred to as negative space, utilizing that space for the text may be the perfect way that you can consider writing a text on photos. This puts no effect on the photo and helps the user display the whole idea with prominence.
4. Framing the Text
If you go for prominence, you should always use elements that are meant for bringing prominence. Text that is to be highlighted with purity across a photo should be framed rather than any other tactful technique. This helps you create a clear focal point while sustaining the quality of the image. Following this, it also keeps a good view across the photo as a subjective associate picture.

Key features:
• Import from any devices and cams, including GoPro and drones. All formats supported. Сurrently the only free video editor that allows users to export in a new H265/HEVC codec, something essential for those working with 4K and HD.
• Everything for hassle-free basic editing: cut, crop and merge files, add titles and favorite music
• Visual effects, advanced color correction and trendy Instagram-like filters
• All multimedia processing done from one app: video editing capabilities reinforced by a video converter, a screen capture, a video capture, a disc burner and a YouTube uploader
• Non-linear editing: edit several files with simultaneously
• Easy export to social networks: special profiles for YouTube, Facebook, Vimeo, Twitter and Instagram
• High quality export – no conversion quality loss, double export speed even of HD files due to hardware acceleration
• Stabilization tool will turn shaky or jittery footage into a more stable video automatically.
• Essential toolset for professional video editing: blending modes, Mask tool, advanced multiple-color Chroma Key
5. Control your Sizes and Styles
Make sure that you always select a font size or style that is relevant to the photo. The use of inappropriate sizes and styles in photos takes away the essence of the picture. A balance across these traits is essential for the user to bring. Capture the viewers’ attention without compromising the quality of the photo itself.
 OtsAV TV Webcaster
The Bottom Line
The best illustration of images is not possible without adding typography to them. People add text to the images to share social media posts or create poster events. Read this article to get a clear picture of how to write text on photos through powerful photo text editors.
02 How to Edit Text on Photo on iPhone and Android Phone?
03 Basic Tips to Edit Text on Photo with Ease
Part 1: How to Edit Text on Photo Online?
Do you want to add and edit text on picture online? Use Wondershare PixStudio as an incredible photo text editor app to conveniently add text to your images. Individuals can design their images, YouTube thumbnails, and graphics by adding stylish and vibrant text to them. The user interface of PixStudio photo text editor online is simple and quick to use, and non-professionals can begin anytime to design their images.
You can use their templates that are available for separate categories such as invitations, posters, and social media posts. Afterward, you can select the font, color, style, and size of the text through the options and can easily make your image captivating. The elements on their pre-established templates are extremely eye-catchy and can give your image an artistic look with no effort.
Once done with making all the alterations, you can download the customized text image within seconds. To add text to images through Wondershare PixStudio, the steps are:
Step 1: Select the Design
Navigate to the Wondershare PixStudio website and tap on “Start Design” after creating your account. From here, click on the “Create a Design” button to select a design template size such as a YouTube thumbnail, event poster, ticket, and Instagram post. To design an Instagram post, tap on its design template size.
Step 2: Explore the Templates
The pre-designed templates of the Instagram post will be displayed on your screen. There will be tons of options, so pick and choose your preferred style carefully by clicking on it. Click on the template and adjust and position the elements of the template manually.
 SwifDoo PDF Perpetual (1 PC) Free upgrade. No monthly fees ever.
Step 3: Upload your Image (Optional)
You can also upload the photo on which you want to add the text to design it. Access the “Upload” tab from the left sidebar and click on “Upload an image,” and then add the image to the canvas.
Step 4: Add or Adjust the Text
Now, open the “Text” tab and select the desired font style and size from it. You can change the size, opacity, color, position, and font of the added text. You can edit the pre-added text of the templates as well.
Step 5: Export the Edited Image
Once done with all the photo designing, click on “Download” and select the format to save the image on your device. The downloading process won’t take much time
Part 2: How to Edit Text on Photo on iPhone and Android Phone?
Do you want to make quick edits through the photo text editor app on your mobile phone? People need photo text editors specially designed for their smartphones to create and design attractive posts instantly. In this part, we will recommend a game-changer text editor that you can easily install on your mobile devices and can execute designing without any professional assistance.
This photo text editor has more than 400 style fonts, and also you have options to install other fonts as well. You don’t need to worry about ads and bugs as this app is constantly trying to improve itself. The important features of this tool include letter spacing, line spacing, text stroke color, and text background colors. Through their manual controls, you can precisely add text to their images with a few clicks.
Go and try Phonto text editor to design your images and posts on your phones easily. This editor app is highly compatible with iOS and Android users and has a quick responsive interface. To write text on photo through the Phonto editor, read the following instructions:
Step 1: Load the New Image
Begin with downloading the app on your phone and then tap on the “Camera” icon to upload the image from the phone or click a new picture. Select the image from the gallery, and it will be automatically uploaded to the tool.
Step 2: Click to Add Text
Click on anywhere on the photo to add the text to the photo. Type the text you want to enter on the pop-up menu and adjust it by selecting its position and font. Tap on “Done,” and then from the given options, tilt and move the text box according to your preference.
Step 3: Save the Text Image
After making all the changes, tap on the “Share” icon to save the image on your phone or share it on social media with your friends and family.
 Forex Robotron Gold Package
Part 3: Basic Tips to Edit Text on Photo with Ease
There are multiple tips that can be employed for a clear display of text across a photo. Being a photo text editor, you need to be careful about every element that is across the photo. Thus, to make your photos look perfect with the added text, you should be aware of the few tips that are featured below:
1. Understanding the Perspective
Adding text as a perspective is believed to be an inclusive way of providing viewers with the idea of the image and helping them understand it to the fullest. If you are looking forward to writing a text on photos,you can give your text a little angle and appearance according to the image shoot for a good illusion.
2. Blending in with the Photo’s Properties
It is essential for you to figure out the right contrast of text that matches or immerses perfectly with the photo. This helps you ensure that the text of your photo stands out to the viewers with no affective disturbances. Not only will it look good, but it also won’t tamper with the quality of the photo that it holds across.
3. Look for Negative Space
When you consider adding text across a photo, it is highly advised that you should always go for an option that contains a general space for covering. Often referred to as negative space, utilizing that space for the text may be the perfect way that you can consider writing a text on photos. This puts no effect on the photo and helps the user display the whole idea with prominence.
 Any DRM Removal for Mac: Remove DRM from Adobe, Kindle, Sony eReader, Kobo, etc, read your ebooks anywhere.
 /a>
/a>4. Framing the Text
If you go for prominence, you should always use elements that are meant for bringing prominence. Text that is to be highlighted with purity across a photo should be framed rather than any other tactful technique. This helps you create a clear focal point while sustaining the quality of the image. Following this, it also keeps a good view across the photo as a subjective associate picture.

5. Control your Sizes and Styles
Make sure that you always select a font size or style that is relevant to the photo. The use of inappropriate sizes and styles in photos takes away the essence of the picture. A balance across these traits is essential for the user to bring. Capture the viewers’ attention without compromising the quality of the photo itself.
 Video Converter Factory Pro
The Bottom Line
The best illustration of images is not possible without adding typography to them. People add text to the images to share social media posts or create poster events. Read this article to get a clear picture of how to write text on photos through powerful photo text editors.
02 How to Edit Text on Photo on iPhone and Android Phone?
03 Basic Tips to Edit Text on Photo with Ease
Part 1: How to Edit Text on Photo Online?
Do you want to add and edit text on picture online? Use Wondershare PixStudio as an incredible photo text editor app to conveniently add text to your images. Individuals can design their images, YouTube thumbnails, and graphics by adding stylish and vibrant text to them. The user interface of PixStudio photo text editor online is simple and quick to use, and non-professionals can begin anytime to design their images.
You can use their templates that are available for separate categories such as invitations, posters, and social media posts. Afterward, you can select the font, color, style, and size of the text through the options and can easily make your image captivating. The elements on their pre-established templates are extremely eye-catchy and can give your image an artistic look with no effort.
Once done with making all the alterations, you can download the customized text image within seconds. To add text to images through Wondershare PixStudio, the steps are:
Step 1: Select the Design
Navigate to the Wondershare PixStudio website and tap on “Start Design” after creating your account. From here, click on the “Create a Design” button to select a design template size such as a YouTube thumbnail, event poster, ticket, and Instagram post. To design an Instagram post, tap on its design template size.
Step 2: Explore the Templates
The pre-designed templates of the Instagram post will be displayed on your screen. There will be tons of options, so pick and choose your preferred style carefully by clicking on it. Click on the template and adjust and position the elements of the template manually.
Step 3: Upload your Image (Optional)
You can also upload the photo on which you want to add the text to design it. Access the “Upload” tab from the left sidebar and click on “Upload an image,” and then add the image to the canvas.
Step 4: Add or Adjust the Text
Now, open the “Text” tab and select the desired font style and size from it. You can change the size, opacity, color, position, and font of the added text. You can edit the pre-added text of the templates as well.
Step 5: Export the Edited Image
Once done with all the photo designing, click on “Download” and select the format to save the image on your device. The downloading process won’t take much time
Part 2: How to Edit Text on Photo on iPhone and Android Phone?
Do you want to make quick edits through the photo text editor app on your mobile phone? People need photo text editors specially designed for their smartphones to create and design attractive posts instantly. In this part, we will recommend a game-changer text editor that you can easily install on your mobile devices and can execute designing without any professional assistance.
This photo text editor has more than 400 style fonts, and also you have options to install other fonts as well. You don’t need to worry about ads and bugs as this app is constantly trying to improve itself. The important features of this tool include letter spacing, line spacing, text stroke color, and text background colors. Through their manual controls, you can precisely add text to their images with a few clicks.
Go and try Phonto text editor to design your images and posts on your phones easily. This editor app is highly compatible with iOS and Android users and has a quick responsive interface. To write text on photo through the Phonto editor, read the following instructions:
Step 1: Load the New Image
Begin with downloading the app on your phone and then tap on the “Camera” icon to upload the image from the phone or click a new picture. Select the image from the gallery, and it will be automatically uploaded to the tool.
Step 2: Click to Add Text
Click on anywhere on the photo to add the text to the photo. Type the text you want to enter on the pop-up menu and adjust it by selecting its position and font. Tap on “Done,” and then from the given options, tilt and move the text box according to your preference.
Step 3: Save the Text Image
After making all the changes, tap on the “Share” icon to save the image on your phone or share it on social media with your friends and family.
Part 3: Basic Tips to Edit Text on Photo with Ease
There are multiple tips that can be employed for a clear display of text across a photo. Being a photo text editor, you need to be careful about every element that is across the photo. Thus, to make your photos look perfect with the added text, you should be aware of the few tips that are featured below:
1. Understanding the Perspective
Adding text as a perspective is believed to be an inclusive way of providing viewers with the idea of the image and helping them understand it to the fullest. If you are looking forward to writing a text on photos,you can give your text a little angle and appearance according to the image shoot for a good illusion.
2. Blending in with the Photo’s Properties
It is essential for you to figure out the right contrast of text that matches or immerses perfectly with the photo. This helps you ensure that the text of your photo stands out to the viewers with no affective disturbances. Not only will it look good, but it also won’t tamper with the quality of the photo that it holds across.
3. Look for Negative Space
When you consider adding text across a photo, it is highly advised that you should always go for an option that contains a general space for covering. Often referred to as negative space, utilizing that space for the text may be the perfect way that you can consider writing a text on photos. This puts no effect on the photo and helps the user display the whole idea with prominence.
4. Framing the Text
If you go for prominence, you should always use elements that are meant for bringing prominence. Text that is to be highlighted with purity across a photo should be framed rather than any other tactful technique. This helps you create a clear focal point while sustaining the quality of the image. Following this, it also keeps a good view across the photo as a subjective associate picture.

 DEX 3 RE is Easy-To-Use DJ Mixing Software for MAC and Windows Designed for Today’s Versatile DJ.
Mix from your own library of music, iTunes or use the Pulselocker subsciprtion service for in-app access to over 44 million songs. Use with over 85 supported DJ controllers or mix with a keyboard and mouse.
DEX 3 RE is everything you need without the clutter - the perfect 2-deck mixing software solution for mobile DJs or hard-core hobbiests.
PCDJ DEX 3 RE (DJ Software for Win & MAC - Product Activation For 3 Machines)
5. Control your Sizes and Styles
Make sure that you always select a font size or style that is relevant to the photo. The use of inappropriate sizes and styles in photos takes away the essence of the picture. A balance across these traits is essential for the user to bring. Capture the viewers’ attention without compromising the quality of the photo itself.
The Bottom Line
The best illustration of images is not possible without adding typography to them. People add text to the images to share social media posts or create poster events. Read this article to get a clear picture of how to write text on photos through powerful photo text editors.
- Title: Textual Transformations The Photographer's Guide to Image Edits
- Author: Paul
- Created at : 2024-07-27 02:15:46
- Updated at : 2024-07-28 02:15:46
- Link: https://extra-information.techidaily.com/textual-transformations-the-photographers-guide-to-image-edits/
- License: This work is licensed under CC BY-NC-SA 4.0.