
The Complete User's Manual for FCP Power Users
The Complete User’s Manual for FCP Power Users
When you search for the best video editor software, you will come across Final Cut Pro. Final Cut Pro is one of the most popular paid video editors that professional video creators recommend. Final Cut Pro is a paid software and you have to pay a hefty one-time fee for lifetime full access. Therefore, it is important that you know everything about Final Cut Pro before purchasing it.
We have done a complete review of Apple Final Cut Pro. We have stated the key features, pricing details as well as overall performance. Along with these parameters, we have highlighted the pros and cons of Final Cut Pro. Thereafter, you can check out our tutorial on how to edit a video on Final Cut Pro. Finally, we have provided a better alternative to Final Cut Pro if you are not satisfied with FCP.
## 1\. History of Final Cut ProThe journey of Final Cut Pro(FCP) began as an alternative to Adobe Premiere Pro. FCP was initially developed by Macromedia. The designer of FCP named Randy Ubillos used to work for Adobe Premiere previously. In 1998, Apple purchased the development team of Final Cut Pro. Hence, Macromedia FCP turned into Apple FCP.
The popularity of Final Cut Pro started to pick up in the early 2000s. A popular movie producer named Michael Bloom praised FCP to boost its popularity. The software did not crash even once during rendering a movie. Soon, the popular director Roger Avery became the spokesperson for Apple FCP. This encouraged video creators and producers to try out Final Cut Pro as a video editor.
The breakthrough came in 2002 when Final Cut Pro was awarded a Primetime Emmy Engineering Award. Final Cut Express was launched in 2003 at an affordable rate. But it was discontinued in 2011. This is because Apple launched Final Cut Pro X in April 2011.
Final Cut Pro X came with a new user interface and workflow. It was packed with loads of new features. Subsequently, new features such as effects, filters, color enhancement, and support for HDR and 360-degree video were introduced. This helped it to become one of the best video editors in the world.
2. Features of Final Cut Pro
Final Cut Pro is a feature-rich video editor. Starting from basic features for regular video editing to advanced tools for professional video editing, you get everything in one software. Here are the key features of Final Cut Pro by Apple that you should know.
Video Cut: You have to deal with multiple video clips for one video project. Naturally, you have to cut and trim video clips and edit them before joining them. Final Cut Pro comes with a state-of-the-art set of trimming tools. Starting from ripple edit and roll edit to slide and slip edit, you can use these techniques comfortably.
Title and Caption: Texts are an important part of every video. There is no doubt that a great text effect and a stunning text animation take video to the next level. Final Cut Pro has loads of text effects and presets that you can apply to enhance titles and captions. Starting from opening and ending crediting to lower-thirds and subtitles, there are presets for everything.
Transitions: Transitions are an integral part of video editing. Whenever there is a change of scenes, there has to be a transition effect. A transition prevents jump cuts and awkward scene shifting. Final Cut Pro has a wide range of transitions that will enhance your video content.
Video Effects: There are over 300 video effects in Final Cut Pro. The more the video effects, the more popular the video editor becomes. But there is no point in having loads of video effects unless they can impactful. Final Cut Pro stands out for its video effects and animations and you can customize them as per your requirements.
Chroma Key: You see the use of green screen background in movies and films. Final Cut Pro supports the Chroma key by which you can remove the green screen background. You can replace it with anything starting from static background to dynamic background. Besides, you can add effects and animations to make it dramatic and cinematic.
Audio Editing: Last but not least, the audio part of a video is extremely important. Starting from dialogs to background music, everything enhances the video content. Final Cut Pro has a dedicated audio editor where you can edit audio clips as good as video clips. You can also separate sound clips into different audio lanes.

3. Price Choices of FCP
Most premium video editors charge monthly, quarterly, or annual subscription fees. But Final Cut Pro does not have any subscription-based pricing model. It charges a one-time fee for lifetime full access. The one-time fee is $299.99 and there are no additional charges for future updates.
The one-time fee may seem massive but if you use FCP for a few years, it will become rather economical. For a professional video editor who prefers FCP over others, the one-time fee is the most economical price model. You can try out its free trial version for 90 days to understand if FCP is meant for you.

4. Performance
FCP is simply a powerful video editor when you compare it with other premium video editors. Every professional video producer rates Final Cut Pro in their top three in terms of performance. The performance happens to be stable and consistent. It takes the least amount of time for rendering among all premium video editors. Thanks to its magnetic timeline and enhanced workflow, video editing has become easy.
There are loads of features and tools available for advanced video editing. You can edit 4K, 8K 360-videos, HDR, and VR videos without crashing. Object tracking, color grading, and cinematic mode are quite unique and highly useful. Video previewing after applying effects and animations is smooth. The video quality stays consistent and you get what you see after exporting. Overall, the performance of FCP is solid and powerful.
5. Pros and Cons
Here are the strong and weak points of Final Cut Pro that you should be aware of.
Pros
- Edit 8K, HDR, and 360-degree videos.
- Multi-cam, 3D, and VR support.
- Wide range of effects and filters.
- Advanced color grading and object tracking.
- Superior audio editing platform.
- Scope for importing plug-ins.
- Faster rendering and exporting.
Cons
- One-time fee is high for many.
- Available only for macOS users.
- Learning curve is slightly steep.
6. How to Edit Video with Final Cut Pro
Now that we have reviewed Final Cut Pro thoroughly, it is time to illustrate how to use Final Cut Pro. The learning curve of Final Ct Pro is steep and the user interface is not highly intuitive. That is why you need to go through tutorials to get the steps correct for the video editor. Here are the steps on how to edit a video with Final Cut X.
Step 1: Download and install Final Cut Pro. Launch the application and you will be asked for certain permissions. Allow them to open Final Cut Pro for the first time.
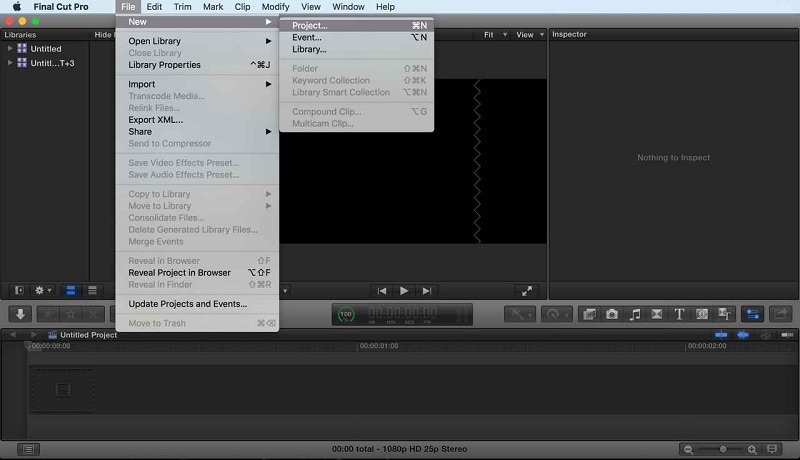
Step 2: Go to File> New> Project. Name your project and select Use Automatic Settings to get started. Go to File> Import> Media and bring in the video clips that you want to edit. You will see the thumbnails of the imported video clips under the Browser of FCP.
 HD Video Converter Factory Pro
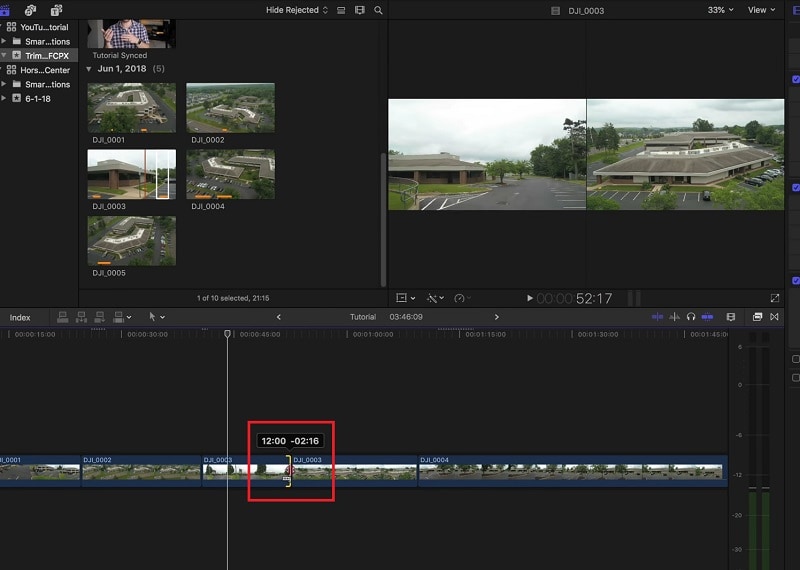
Step 3: Drag any video clip from the Browser to the Timeline. You can trim the video clips by placing the mouse cursor on the inside edge. You will see the Trim Tool icon appear and you can do the necessary trimming. If you have multiple video clips on the timeline, you can rearrange them easily.

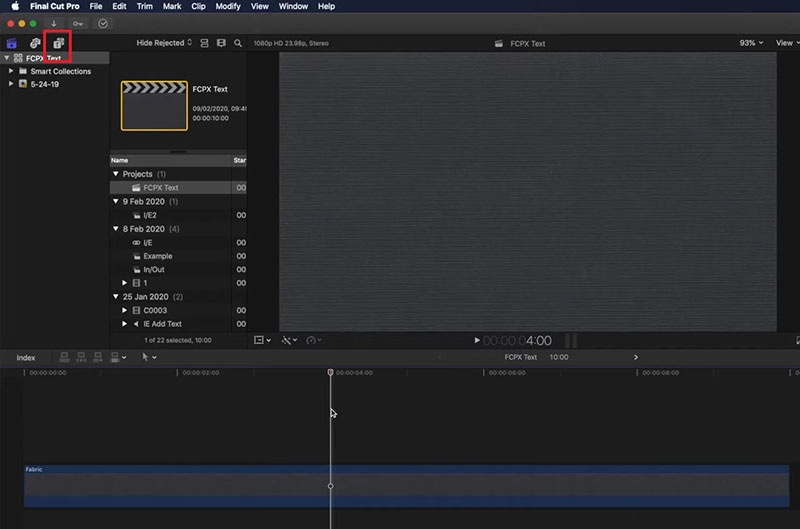
Step 4: Add texts and titles to your video by clicking on the Titles option from the toolbar located above Browser. You can go to the Transitions option above the timeline to add visual effects in between the video clips.

WPS Office Premium ( File Recovery, Photo Scanning, Convert PDF)–Yearly
Step 5: Go to Windows> Workspaces> Colors and Effects option for color correction. Finally, when you are done editing, go to File> Share> Export File option.

7. Best Alternative to Final Cut Pro
First of all, Final Cut Pro is not available for Windows users. Naturally, if you are a Windows user, you have to look for the best alternative video editing software to Final Cut Pro. We recommend Wondershare Filmora as the best alternative to Final Cut Pro. In terms of features and performance, Filmora is as good as Final Cut Pro.
Filmora has a wider collection of effects, transitions, and filters. It supports more video file formats for importing and exporting. Most importantly, the user interface is super intuitive for beginners. It comes with an affordable monthly subscription model so that everyone can purchase. Filmora is available for both Windows and macOS users. Here are the steps to edit a video in Filmora.
Step 1: Download and install Wondershare Filmora. Click on the New Project option on the welcome screen. You can also go to File> New Project to get started.
Parental Control Software
Free Download For Win 7 or later(64-bit)
Free Download For macOS 10.14 or later
Step 2: Go to File File> Import Media> Import Media Files to bring in your video clips. Otherwise, you can drag and drop your video clips directly under the Project Media folder. Thereafter, drop them onto the timeline.
Step 3: Select a video clip that you want to trim and click on Scissor or Cut icon. It is present on the toolbar above the timeline. The mouse pointer will change to a scissor. Click any part of the video clip to trim it and select the trimmed part and delete it.

Step 4: To add titles, go to the Titles option. From the left panel, go to any category of your choice. Drag and drop desired text effect or animation present on the timeline. Double-click on it to edit the default text and change the text texture.

Step 5: Go to the Transitions option from the top toolbar. From the left panel, select a category. Drag and drop any transition in between video clips on the timeline. Finally, click on the Export button to save the edited video.

The Bottom Line
Hopefully, it is quite clear to you now “What is Final Cut Pro”? You know the key features of Final Cut Pro that makes it stand out. Along with those, we have stated its powerful performance and economical pricing. Most importantly, you know the strengths and weaknesses of Final Cut Pro. Now that ball is in your court if you want to go with FCP or want to choose a better alternative.
6. How to Edit Video with Final Cut Pro
Now that we have reviewed Final Cut Pro thoroughly, it is time to illustrate how to use Final Cut Pro. The learning curve of Final Ct Pro is steep and the user interface is not highly intuitive. That is why you need to go through tutorials to get the steps correct for the video editor. Here are the steps on how to edit a video with Final Cut X.
Step 1: Download and install Final Cut Pro. Launch the application and you will be asked for certain permissions. Allow them to open Final Cut Pro for the first time.
Step 2: Go to File> New> Project. Name your project and select Use Automatic Settings to get started. Go to File> Import> Media and bring in the video clips that you want to edit. You will see the thumbnails of the imported video clips under the Browser of FCP.
Step 3: Drag any video clip from the Browser to the Timeline. You can trim the video clips by placing the mouse cursor on the inside edge. You will see the Trim Tool icon appear and you can do the necessary trimming. If you have multiple video clips on the timeline, you can rearrange them easily.
 Easy GIF Animator is a powerful animated GIF editor and the top tool for creating animated pictures, banners, buttons and GIF videos. You get extensive animation editing features, animation effects, unmatched image quality and optimization for the web. No other GIF animation software matches our features and ease of use, that’s why Easy GIF Animator is so popular.
Step 4: Add texts and titles to your video by clicking on the Titles option from the toolbar located above Browser. You can go to the Transitions option above the timeline to add visual effects in between the video clips.
Step 5: Go to Windows> Workspaces> Colors and Effects option for color correction. Finally, when you are done editing, go to File> Share> Export File option.
7. Best Alternative to Final Cut Pro
First of all, Final Cut Pro is not available for Windows users. Naturally, if you are a Windows user, you have to look for the best alternative video editing software to Final Cut Pro. We recommend Wondershare Filmora as the best alternative to Final Cut Pro. In terms of features and performance, Filmora is as good as Final Cut Pro.
Filmora has a wider collection of effects, transitions, and filters. It supports more video file formats for importing and exporting. Most importantly, the user interface is super intuitive for beginners. It comes with an affordable monthly subscription model so that everyone can purchase. Filmora is available for both Windows and macOS users. Here are the steps to edit a video in Filmora.
Step 1: Download and install Wondershare Filmora. Click on the New Project option on the welcome screen. You can also go to File> New Project to get started.

Free Download For Win 7 or later(64-bit)
Free Download For macOS 10.14 or later
Step 2: Go to File File> Import Media> Import Media Files to bring in your video clips. Otherwise, you can drag and drop your video clips directly under the Project Media folder. Thereafter, drop them onto the timeline.
Step 3: Select a video clip that you want to trim and click on Scissor or Cut icon. It is present on the toolbar above the timeline. The mouse pointer will change to a scissor. Click any part of the video clip to trim it and select the trimmed part and delete it.
Step 4: To add titles, go to the Titles option. From the left panel, go to any category of your choice. Drag and drop desired text effect or animation present on the timeline. Double-click on it to edit the default text and change the text texture.
Step 5: Go to the Transitions option from the top toolbar. From the left panel, select a category. Drag and drop any transition in between video clips on the timeline. Finally, click on the Export button to save the edited video.
The Bottom Line
Hopefully, it is quite clear to you now “What is Final Cut Pro”? You know the key features of Final Cut Pro that makes it stand out. Along with those, we have stated its powerful performance and economical pricing. Most importantly, you know the strengths and weaknesses of Final Cut Pro. Now that ball is in your court if you want to go with FCP or want to choose a better alternative.
6. How to Edit Video with Final Cut Pro
Now that we have reviewed Final Cut Pro thoroughly, it is time to illustrate how to use Final Cut Pro. The learning curve of Final Ct Pro is steep and the user interface is not highly intuitive. That is why you need to go through tutorials to get the steps correct for the video editor. Here are the steps on how to edit a video with Final Cut X.
Step 1: Download and install Final Cut Pro. Launch the application and you will be asked for certain permissions. Allow them to open Final Cut Pro for the first time.
Step 2: Go to File> New> Project. Name your project and select Use Automatic Settings to get started. Go to File> Import> Media and bring in the video clips that you want to edit. You will see the thumbnails of the imported video clips under the Browser of FCP.
Step 3: Drag any video clip from the Browser to the Timeline. You can trim the video clips by placing the mouse cursor on the inside edge. You will see the Trim Tool icon appear and you can do the necessary trimming. If you have multiple video clips on the timeline, you can rearrange them easily.
Step 4: Add texts and titles to your video by clicking on the Titles option from the toolbar located above Browser. You can go to the Transitions option above the timeline to add visual effects in between the video clips.
Step 5: Go to Windows> Workspaces> Colors and Effects option for color correction. Finally, when you are done editing, go to File> Share> Export File option.


7. Best Alternative to Final Cut Pro
First of all, Final Cut Pro is not available for Windows users. Naturally, if you are a Windows user, you have to look for the best alternative video editing software to Final Cut Pro. We recommend Wondershare Filmora as the best alternative to Final Cut Pro. In terms of features and performance, Filmora is as good as Final Cut Pro.
Filmora has a wider collection of effects, transitions, and filters. It supports more video file formats for importing and exporting. Most importantly, the user interface is super intuitive for beginners. It comes with an affordable monthly subscription model so that everyone can purchase. Filmora is available for both Windows and macOS users. Here are the steps to edit a video in Filmora.
Step 1: Download and install Wondershare Filmora. Click on the New Project option on the welcome screen. You can also go to File> New Project to get started.
Free Download For Win 7 or later(64-bit)
Free Download For macOS 10.14 or later
Step 2: Go to File File> Import Media> Import Media Files to bring in your video clips. Otherwise, you can drag and drop your video clips directly under the Project Media folder. Thereafter, drop them onto the timeline.
Step 3: Select a video clip that you want to trim and click on Scissor or Cut icon. It is present on the toolbar above the timeline. The mouse pointer will change to a scissor. Click any part of the video clip to trim it and select the trimmed part and delete it.
Step 4: To add titles, go to the Titles option. From the left panel, go to any category of your choice. Drag and drop desired text effect or animation present on the timeline. Double-click on it to edit the default text and change the text texture.

Step 5: Go to the Transitions option from the top toolbar. From the left panel, select a category. Drag and drop any transition in between video clips on the timeline. Finally, click on the Export button to save the edited video.

The Bottom Line
Hopefully, it is quite clear to you now “What is Final Cut Pro”? You know the key features of Final Cut Pro that makes it stand out. Along with those, we have stated its powerful performance and economical pricing. Most importantly, you know the strengths and weaknesses of Final Cut Pro. Now that ball is in your court if you want to go with FCP or want to choose a better alternative.
6. How to Edit Video with Final Cut Pro
Now that we have reviewed Final Cut Pro thoroughly, it is time to illustrate how to use Final Cut Pro. The learning curve of Final Ct Pro is steep and the user interface is not highly intuitive. That is why you need to go through tutorials to get the steps correct for the video editor. Here are the steps on how to edit a video with Final Cut X.
Step 1: Download and install Final Cut Pro. Launch the application and you will be asked for certain permissions. Allow them to open Final Cut Pro for the first time.
Step 2: Go to File> New> Project. Name your project and select Use Automatic Settings to get started. Go to File> Import> Media and bring in the video clips that you want to edit. You will see the thumbnails of the imported video clips under the Browser of FCP.
Step 3: Drag any video clip from the Browser to the Timeline. You can trim the video clips by placing the mouse cursor on the inside edge. You will see the Trim Tool icon appear and you can do the necessary trimming. If you have multiple video clips on the timeline, you can rearrange them easily.
Step 4: Add texts and titles to your video by clicking on the Titles option from the toolbar located above Browser. You can go to the Transitions option above the timeline to add visual effects in between the video clips.
Step 5: Go to Windows> Workspaces> Colors and Effects option for color correction. Finally, when you are done editing, go to File> Share> Export File option.
7. Best Alternative to Final Cut Pro
First of all, Final Cut Pro is not available for Windows users. Naturally, if you are a Windows user, you have to look for the best alternative video editing software to Final Cut Pro. We recommend Wondershare Filmora as the best alternative to Final Cut Pro. In terms of features and performance, Filmora is as good as Final Cut Pro.
Filmora has a wider collection of effects, transitions, and filters. It supports more video file formats for importing and exporting. Most importantly, the user interface is super intuitive for beginners. It comes with an affordable monthly subscription model so that everyone can purchase. Filmora is available for both Windows and macOS users. Here are the steps to edit a video in Filmora.
Step 1: Download and install Wondershare Filmora. Click on the New Project option on the welcome screen. You can also go to File> New Project to get started.
 OtsAV TV Webcaster
Free Download For Win 7 or later(64-bit)
Free Download For macOS 10.14 or later
Step 2: Go to File File> Import Media> Import Media Files to bring in your video clips. Otherwise, you can drag and drop your video clips directly under the Project Media folder. Thereafter, drop them onto the timeline.
Step 3: Select a video clip that you want to trim and click on Scissor or Cut icon. It is present on the toolbar above the timeline. The mouse pointer will change to a scissor. Click any part of the video clip to trim it and select the trimmed part and delete it.
Step 4: To add titles, go to the Titles option. From the left panel, go to any category of your choice. Drag and drop desired text effect or animation present on the timeline. Double-click on it to edit the default text and change the text texture.
Step 5: Go to the Transitions option from the top toolbar. From the left panel, select a category. Drag and drop any transition in between video clips on the timeline. Finally, click on the Export button to save the edited video.
The Bottom Line
Hopefully, it is quite clear to you now “What is Final Cut Pro”? You know the key features of Final Cut Pro that makes it stand out. Along with those, we have stated its powerful performance and economical pricing. Most importantly, you know the strengths and weaknesses of Final Cut Pro. Now that ball is in your court if you want to go with FCP or want to choose a better alternative.
- Title: The Complete User's Manual for FCP Power Users
- Author: Paul
- Created at : 2024-07-27 01:14:36
- Updated at : 2024-07-28 01:14:36
- Link: https://extra-information.techidaily.com/the-complete-users-manual-for-fcp-power-users/
- License: This work is licensed under CC BY-NC-SA 4.0.