The Ultimate Guide to Smoothing iPhone Pics (4 Methods)
The Ultimate Guide to Smoothing iPhone Pics (4 Methods)
While taking the images is merely the process of tapping the ‘Capture’ button, getting them from the correct angle and with proper lighting is an art. Because many smartphones nowadays offer the best picture quality when it comes to snapping photos using their camera, it is imperative to learn how to blur a picture on iPhone so the main subject grabs the limelight, hence making the other objects in the background get the least focus.
That said, when it is said how to blur photos on iPhone, it practically means that you are learning the process of blurring the background so the main subject (a person or an object) gets the most attention, and that’s what is explained in the following sections.
There are multiple ways to get this done. For instance, the background of the photos can be blurred while shooting even on the older iPhones. Likewise, if you already have an image, you can use the Photos app’s built-in effects, or download a third-party program to get the job done. Some of the common methods in this context are described below.
In this article
01 Blur the Photo Background with Portrait Mode on iPhone
02 Take a Photo with a Blurred Background
03 Add Vignette Effect to Photo to Blur the Background
04 Blur the Background of Photos on iPhone with Apps
Part 1: How to Blur the Photo Background with Portrait Mode on iPhone
Portrait mode in the Camera app is available on iPhone 7 Plus and above models. However, if you are using iPhone SE 2020 or iPhone XR, you can blur the background of the images only with the people as the main subject.
You can learn how to blur an image on iPhone using Portrait mode by following the instructions given below:
Step 1: Launch the Camera App
Grab your iPhone (iPhone 13 Pro Max is used here for illustration), and tab the Camera icon from the Home screen to launch the app.
Step 2: Get to the Portrait Mode and Adjust the Depth
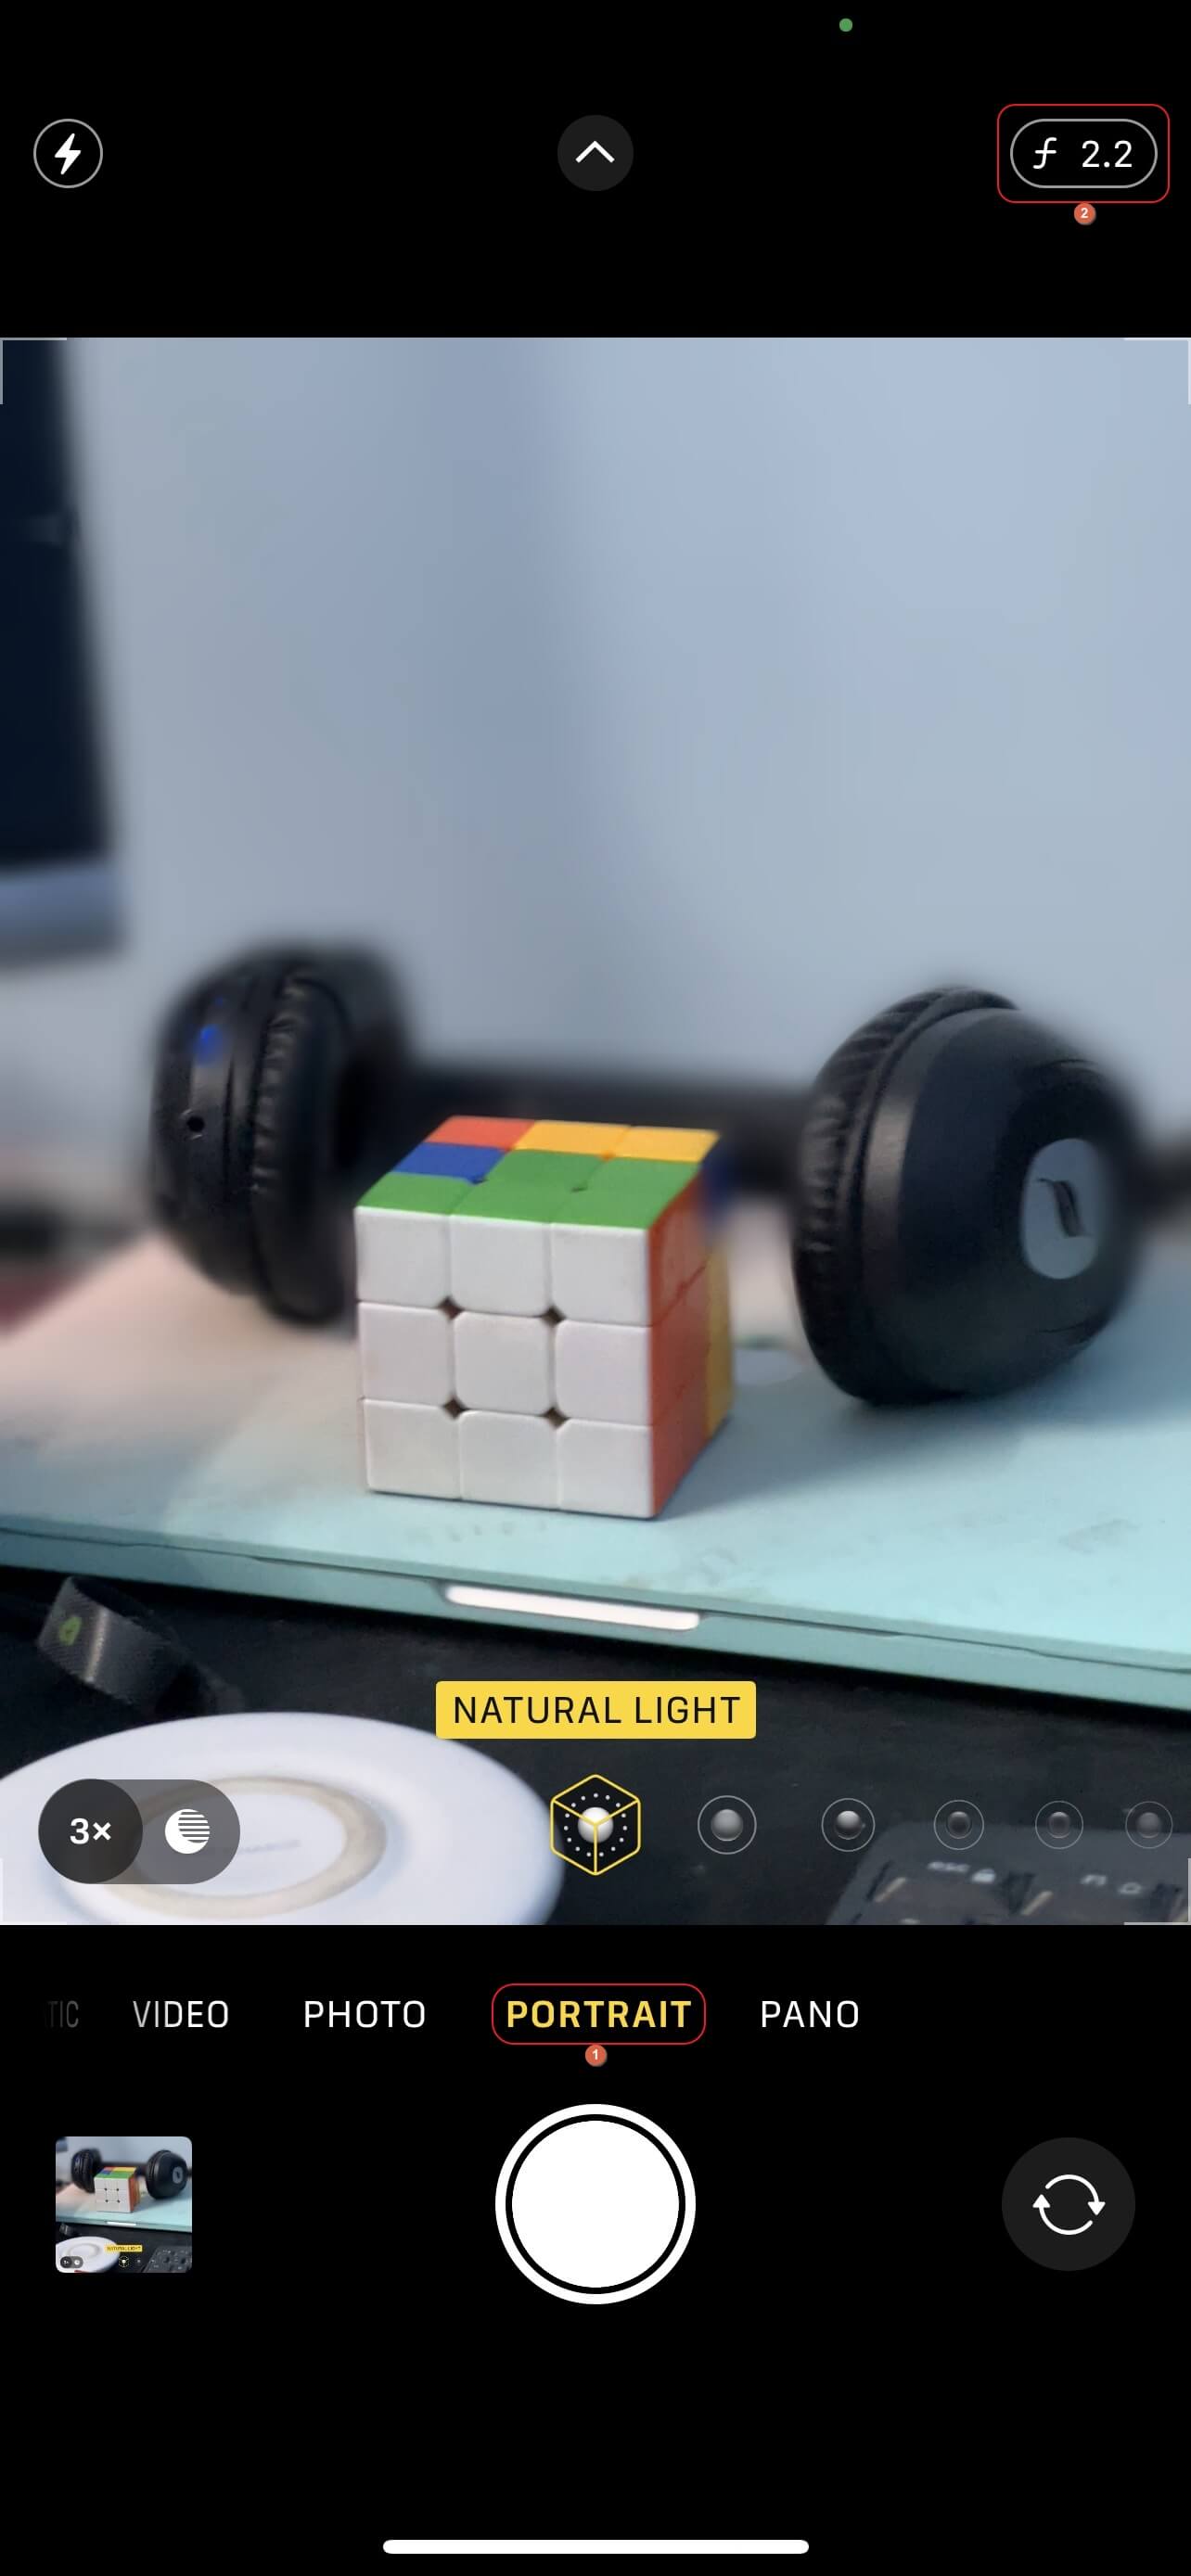
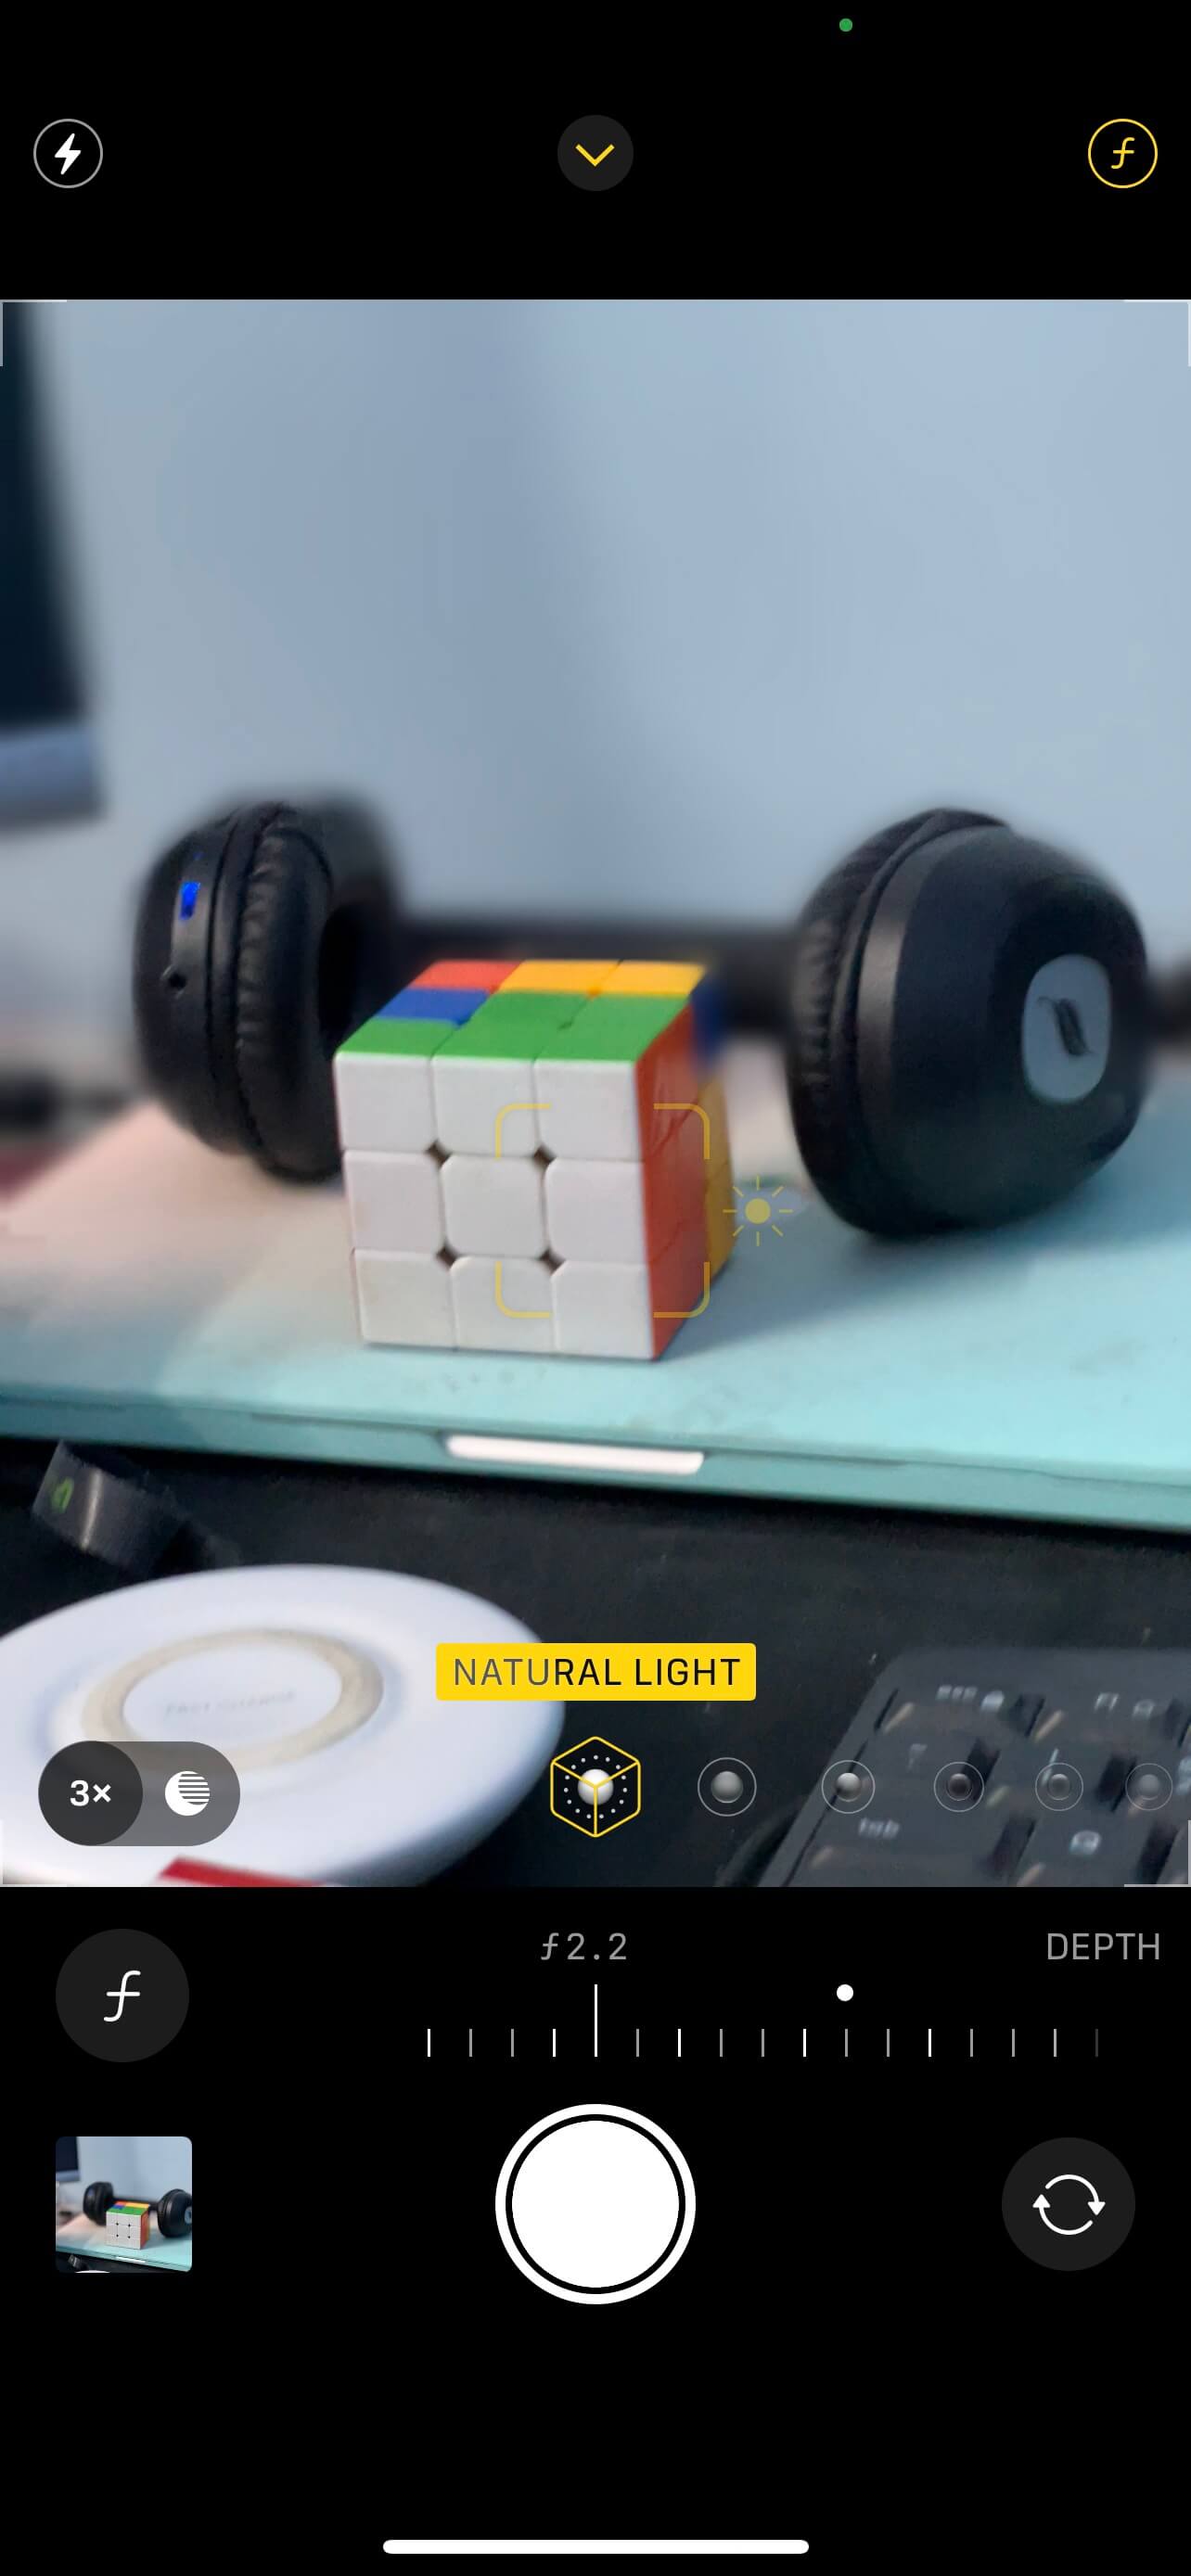
Swipe-drag the modes present above the Shutter button to switch to the PORTRAIT option, and tap the main subject on the screen that you want to capture the image of. Next, tap the f (Depth) icon from the top-right corner, and drag the Depth slider to the left to increase the intensity of the blur effect of the background.
Step 3: Capture and Access the Photo
Tap the Capture icon from the bottom-center to capture the image. To access, you can either tap the Preview icon from the bottom-left corner, or get to the Photos app from the Home screen, go to Albums, and access the captured photo from the Recents album.
Part 2: Take a Photo with a Blurred Background on Older iPhones by Getting Closer to the Subject
If you are using an older model of iPhone that doesn’t have ‘Portrait’ mode, you can still capture the images with the blurred background by getting closer to the subject, and enabling ‘Auto Focus’ before tapping the ‘Capture’ button. You can learn how to do this by following the steps given below:
Step 1: Get to the Camera App
Use the method explained above to launch the Camera app on your iPhone. Because it’s an old model that doesn’t have Portrait mode, you can stay in the PHOTO mode.
Step 2: Turn on Auto Focus
Tap and hold the main subject on the screen until the AE/AF Lock message shows up at the top to confirm that the Auto Focus feature has been turned on.

Step 3: Capture and Access the Image
Get closer to the subject. Ensure that the background around the main subject gets blurry and you move forward. Tap the Capture icon once you are close enough to get the desired level of blurriness in the background. Now, use the method explained above to access the captured photo.

Part 3: Adding Vignette Effect to Photo to Blur the Background on iPhone
The built-in Photos app comes with the Vignette effect that can be applied to the image at the time of editing. However, to get this done, it is recommended that the main subject should be at the center so the background looks unimportant. You can follow the steps given below to learn how to blur a picture on iPhone with the Vignette effect:
Step 1: Get to the Photo’s Edit Mode
Launch the Photos app on your iPhone, go to the album with the target photo, and tap to open the target photo. Next, make sure that the picture is not open in the full-screen mode, and tap Edit from the top-right corner to get to the Edit mode.
Step 2: Apply and Adjust the Vignette Effect
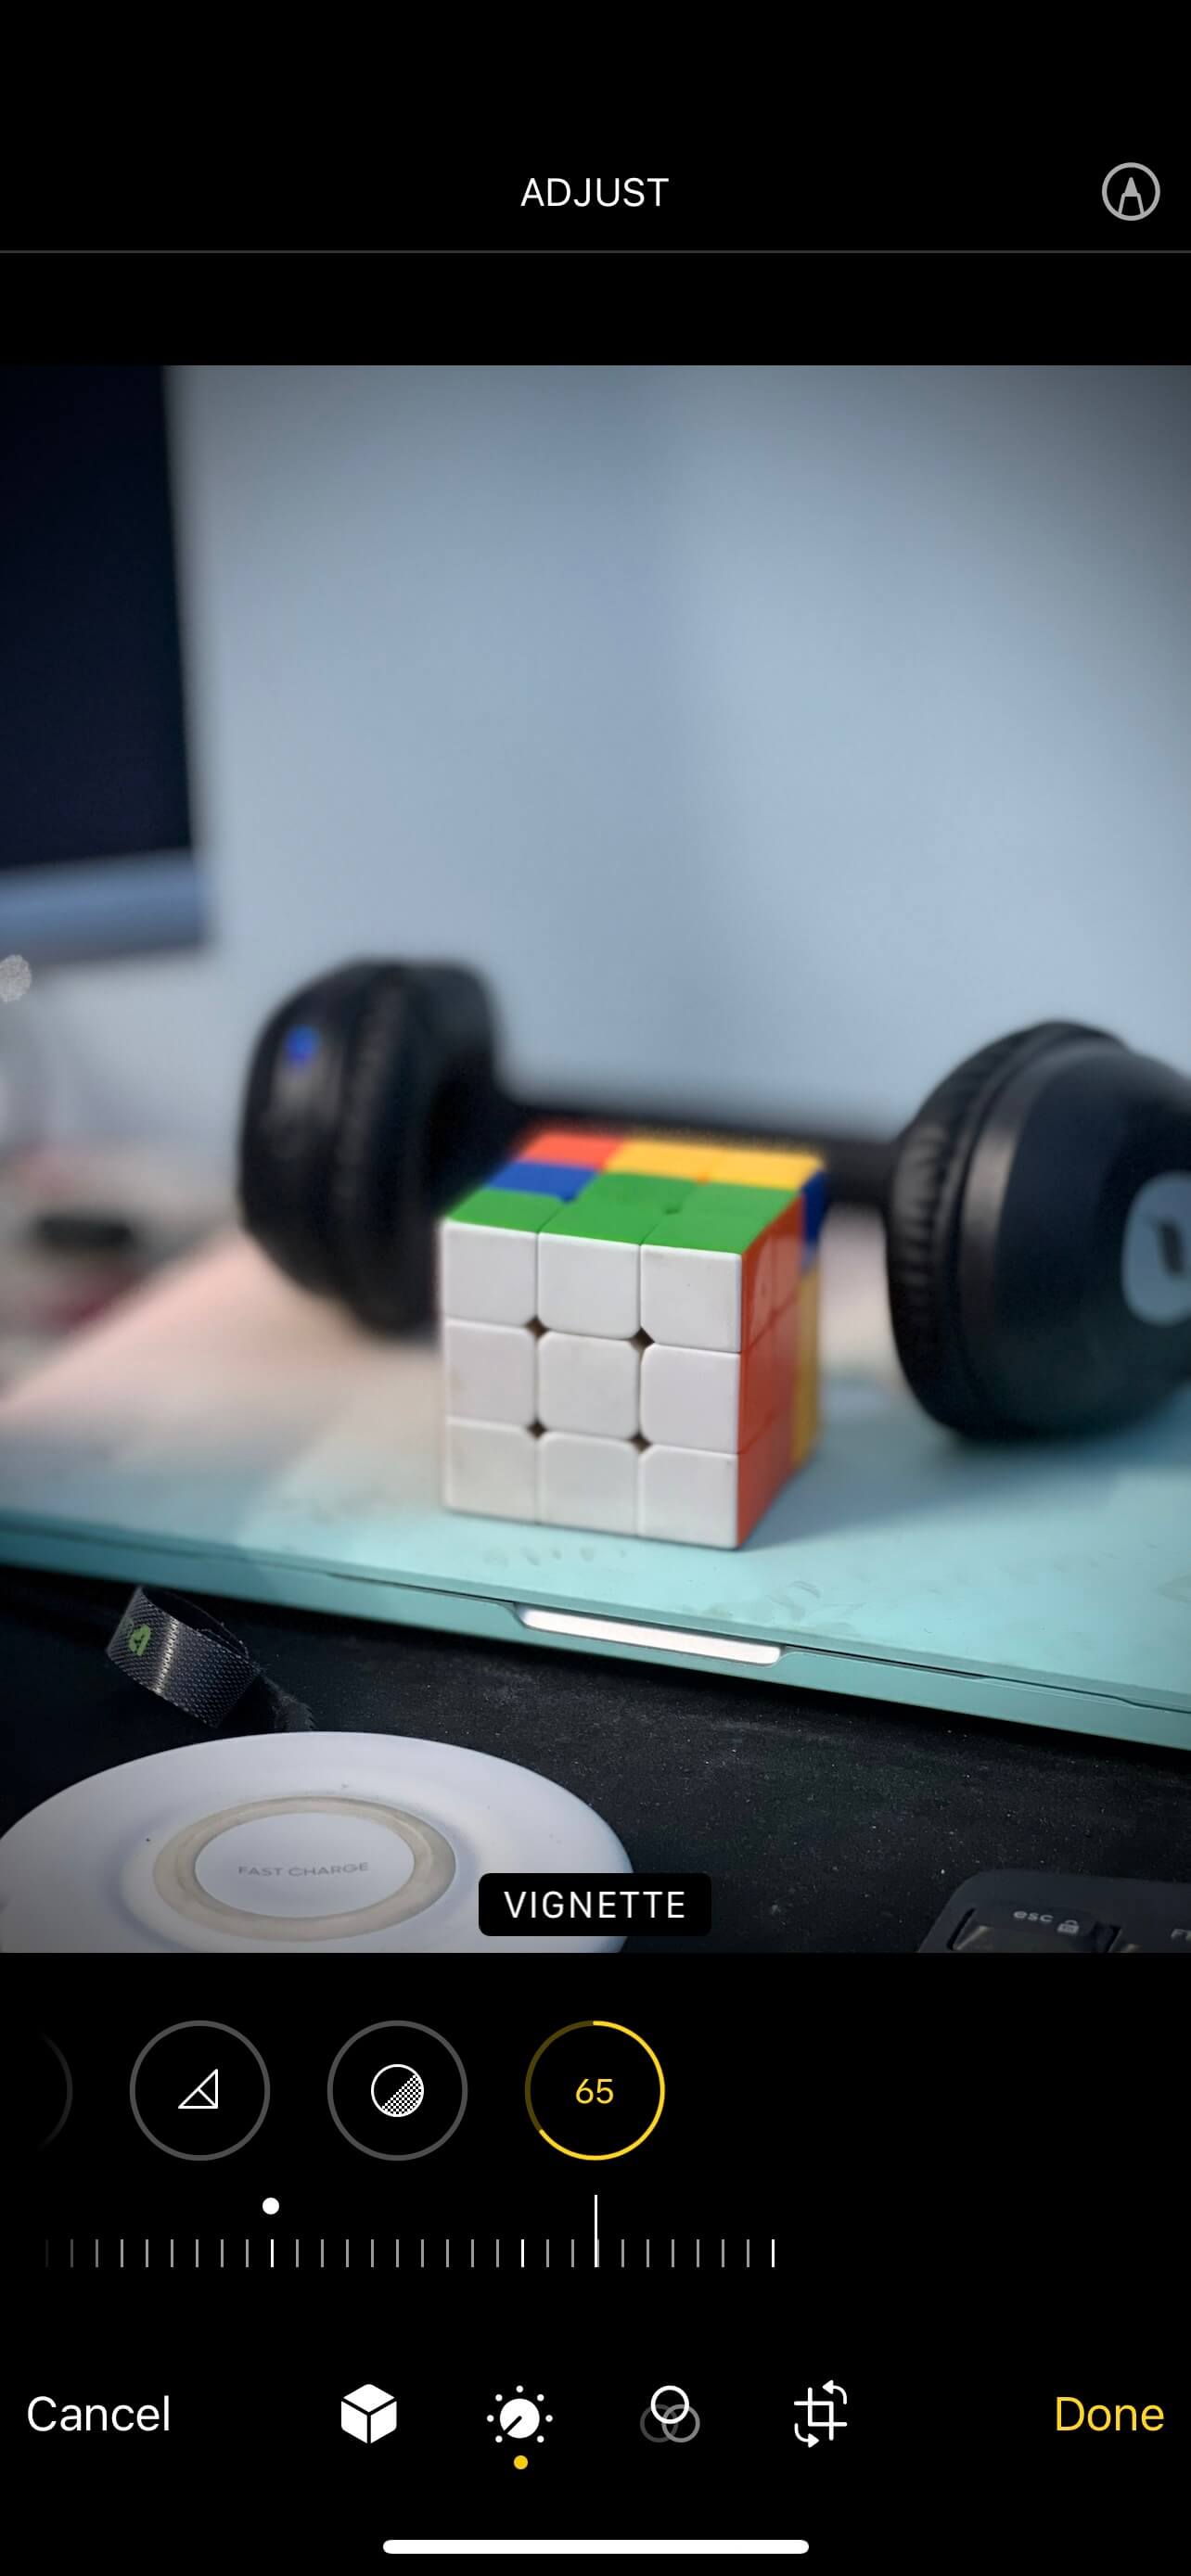
Tap the Effects icon from the bottom, swipe left to horizontally scroll through the available effects to get to VIGNETTE, and use the slider under it to manage the intensity to blur picture iPhone has.
Step 3: Save and Access the Photo
Tap Done from the bottom-right corner to save the changes and to exit the Edit mode. Continue using the image as and/or where needed.

Part 4: Blur the Background of Photos on iPhone with Apps
You may want to use a third-party app to apply effects to the photos because they offer several advanced features that the iPhone’s built-in Photos app doesn’t. Furthermore, since such programs are designed specifically for the purpose, they are quite intuitive and come with self-explanatory options and buttons.
There is a plethora of apps available on the App Store that can help you get the job done, and most of them come with their free tutorials to teach how to blur photos on iPhone. One such program is Snapseed that offers an easy way to pick the main subject in the image, and blur all the background objects behind it. The process of blurring the picture with Snapseed is given below:
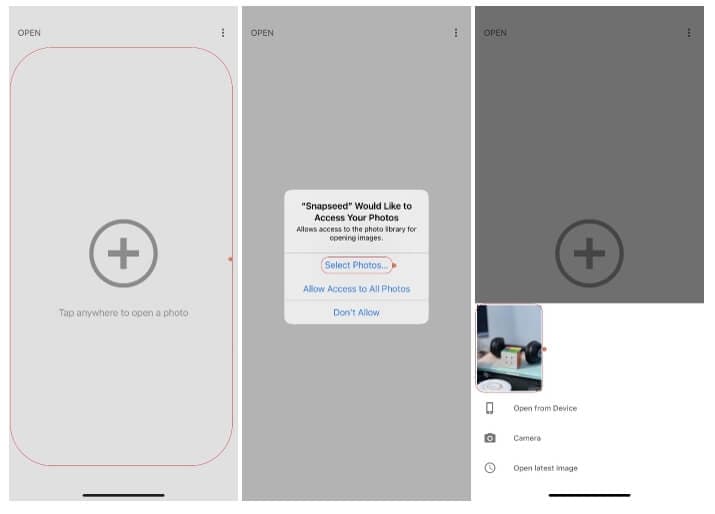
Step 1: Add the Target Photo to Snapseed
After installing Snapseed from the App Store , launch the program, and tap anywhere on the main screen. On the accessibility allowance box, tap Select Photos, tap to select the target photo from your iPhone, and tap Done from the top-right corner. Next, tap anywhere on the screen to import the selected picture to Snapseed.

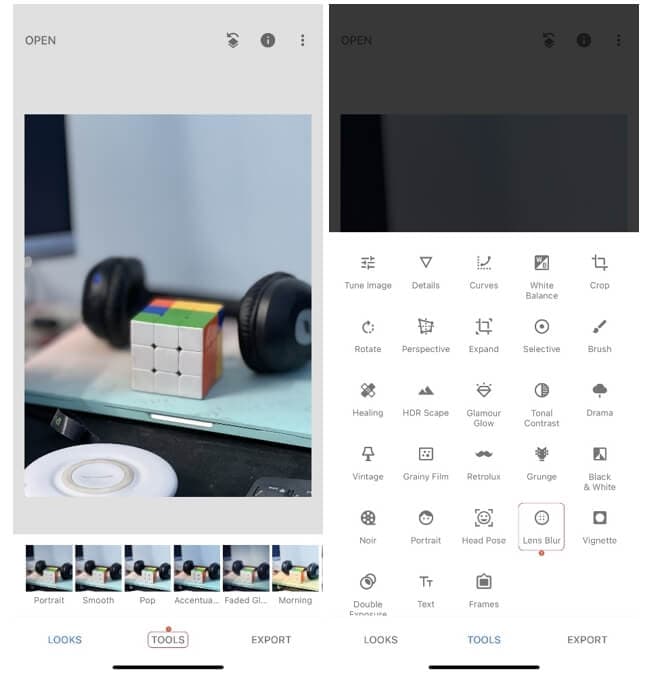
Step 2: Pick the Blur Tool
Tap TOOLS from the bottom of the interface, and from the options available in the box that pops up, tap Lens Blur.
Step 3: Adjust the Blur Shape and Size
Tap the Shape icon from the bottom to switch between the Linear and Elliptical blur shapes. Tap the Blue dot at the center of the image, and drag it to the main subject in the photo. Next, use two fingers to drag inwards or outwards on the screen to decrease or increase the effective area respectively.
Step 4: Blur the Photo and Export
From the top, ensure that the Blur Strength option is selected, tap anywhere on the screen, and drag to the right to increase the intensity of the blurriness. Optionally, you can tap the Effect Types icon from the bottom, and tap to choose Vignette Strength from the box that comes up.

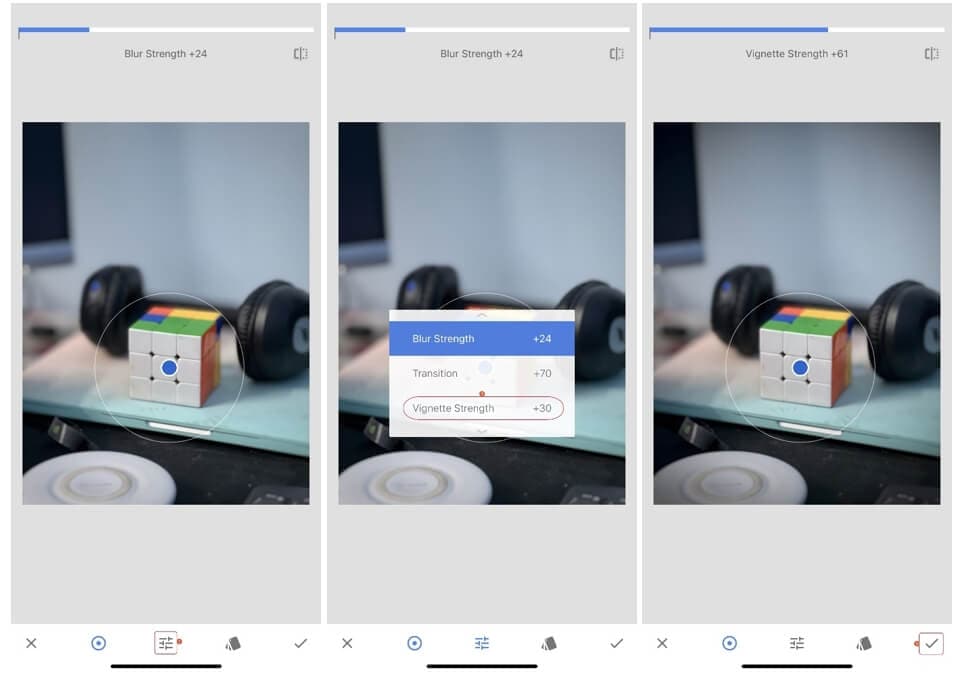
Then, as earlier, drag your finger to the right or left anywhere on the screen to increase or decrease the intensity of the effect respectively. Once done, tap the OK button (with the tick mark) from the bottom-right corner. Back on the main screen, tap EXPORT from the bottom-right, you tap your preferred option for exporting.

Conclusion
Blurring the background in a photo ensures that the main subject remains in the focus, and all the other unimportant objects don’t steal the limelight. If you are using iPhone 7 Plus or above models, the background of the photos can be blurred at the time of capturing. Furthermore, the built-in Photos app in iPhones also come with the Vignette effect that enables you to do the job with ease. However, if you want precision and more control over the images while blurring, you can use an efficient third-party tool like Snapseed that also has its own set of tutorials to teach how to blur a picture on iPhone.
02 Take a Photo with a Blurred Background
03 Add Vignette Effect to Photo to Blur the Background
04 Blur the Background of Photos on iPhone with Apps
Part 1: How to Blur the Photo Background with Portrait Mode on iPhone
Portrait mode in the Camera app is available on iPhone 7 Plus and above models. However, if you are using iPhone SE 2020 or iPhone XR, you can blur the background of the images only with the people as the main subject.
You can learn how to blur an image on iPhone using Portrait mode by following the instructions given below:
Step 1: Launch the Camera App
Grab your iPhone (iPhone 13 Pro Max is used here for illustration), and tab the Camera icon from the Home screen to launch the app.
Step 2: Get to the Portrait Mode and Adjust the Depth
Swipe-drag the modes present above the Shutter button to switch to the PORTRAIT option, and tap the main subject on the screen that you want to capture the image of. Next, tap the f (Depth) icon from the top-right corner, and drag the Depth slider to the left to increase the intensity of the blur effect of the background.
Step 3: Capture and Access the Photo
Tap the Capture icon from the bottom-center to capture the image. To access, you can either tap the Preview icon from the bottom-left corner, or get to the Photos app from the Home screen, go to Albums, and access the captured photo from the Recents album.

Part 2: Take a Photo with a Blurred Background on Older iPhones by Getting Closer to the Subject
If you are using an older model of iPhone that doesn’t have ‘Portrait’ mode, you can still capture the images with the blurred background by getting closer to the subject, and enabling ‘Auto Focus’ before tapping the ‘Capture’ button. You can learn how to do this by following the steps given below:
Step 1: Get to the Camera App
Use the method explained above to launch the Camera app on your iPhone. Because it’s an old model that doesn’t have Portrait mode, you can stay in the PHOTO mode.
Step 2: Turn on Auto Focus
Tap and hold the main subject on the screen until the AE/AF Lock message shows up at the top to confirm that the Auto Focus feature has been turned on.
Step 3: Capture and Access the Image
Get closer to the subject. Ensure that the background around the main subject gets blurry and you move forward. Tap the Capture icon once you are close enough to get the desired level of blurriness in the background. Now, use the method explained above to access the captured photo.
Part 3: Adding Vignette Effect to Photo to Blur the Background on iPhone
The built-in Photos app comes with the Vignette effect that can be applied to the image at the time of editing. However, to get this done, it is recommended that the main subject should be at the center so the background looks unimportant. You can follow the steps given below to learn how to blur a picture on iPhone with the Vignette effect:
Step 1: Get to the Photo’s Edit Mode
Launch the Photos app on your iPhone, go to the album with the target photo, and tap to open the target photo. Next, make sure that the picture is not open in the full-screen mode, and tap Edit from the top-right corner to get to the Edit mode.
Step 2: Apply and Adjust the Vignette Effect
Tap the Effects icon from the bottom, swipe left to horizontally scroll through the available effects to get to VIGNETTE, and use the slider under it to manage the intensity to blur picture iPhone has.
 PDF application, powered by AI-based OCR, for unified workflows with both digital and scanned documents.
Step 3: Save and Access the Photo
Tap Done from the bottom-right corner to save the changes and to exit the Edit mode. Continue using the image as and/or where needed.
Part 4: Blur the Background of Photos on iPhone with Apps
You may want to use a third-party app to apply effects to the photos because they offer several advanced features that the iPhone’s built-in Photos app doesn’t. Furthermore, since such programs are designed specifically for the purpose, they are quite intuitive and come with self-explanatory options and buttons.
There is a plethora of apps available on the App Store that can help you get the job done, and most of them come with their free tutorials to teach how to blur photos on iPhone. One such program is Snapseed that offers an easy way to pick the main subject in the image, and blur all the background objects behind it. The process of blurring the picture with Snapseed is given below:
Step 1: Add the Target Photo to Snapseed
After installing Snapseed from the App Store , launch the program, and tap anywhere on the main screen. On the accessibility allowance box, tap Select Photos, tap to select the target photo from your iPhone, and tap Done from the top-right corner. Next, tap anywhere on the screen to import the selected picture to Snapseed.
Step 2: Pick the Blur Tool
Tap TOOLS from the bottom of the interface, and from the options available in the box that pops up, tap Lens Blur.
 WonderFox DVD Ripper Pro
Step 3: Adjust the Blur Shape and Size
Tap the Shape icon from the bottom to switch between the Linear and Elliptical blur shapes. Tap the Blue dot at the center of the image, and drag it to the main subject in the photo. Next, use two fingers to drag inwards or outwards on the screen to decrease or increase the effective area respectively.
Step 4: Blur the Photo and Export
From the top, ensure that the Blur Strength option is selected, tap anywhere on the screen, and drag to the right to increase the intensity of the blurriness. Optionally, you can tap the Effect Types icon from the bottom, and tap to choose Vignette Strength from the box that comes up.
Then, as earlier, drag your finger to the right or left anywhere on the screen to increase or decrease the intensity of the effect respectively. Once done, tap the OK button (with the tick mark) from the bottom-right corner. Back on the main screen, tap EXPORT from the bottom-right, you tap your preferred option for exporting.


Conclusion
Blurring the background in a photo ensures that the main subject remains in the focus, and all the other unimportant objects don’t steal the limelight. If you are using iPhone 7 Plus or above models, the background of the photos can be blurred at the time of capturing. Furthermore, the built-in Photos app in iPhones also come with the Vignette effect that enables you to do the job with ease. However, if you want precision and more control over the images while blurring, you can use an efficient third-party tool like Snapseed that also has its own set of tutorials to teach how to blur a picture on iPhone.
02 Take a Photo with a Blurred Background
03 Add Vignette Effect to Photo to Blur the Background
04 Blur the Background of Photos on iPhone with Apps
Part 1: How to Blur the Photo Background with Portrait Mode on iPhone
Portrait mode in the Camera app is available on iPhone 7 Plus and above models. However, if you are using iPhone SE 2020 or iPhone XR, you can blur the background of the images only with the people as the main subject.
You can learn how to blur an image on iPhone using Portrait mode by following the instructions given below:
Step 1: Launch the Camera App
Grab your iPhone (iPhone 13 Pro Max is used here for illustration), and tab the Camera icon from the Home screen to launch the app.
Step 2: Get to the Portrait Mode and Adjust the Depth
Swipe-drag the modes present above the Shutter button to switch to the PORTRAIT option, and tap the main subject on the screen that you want to capture the image of. Next, tap the f (Depth) icon from the top-right corner, and drag the Depth slider to the left to increase the intensity of the blur effect of the background.
Step 3: Capture and Access the Photo
Tap the Capture icon from the bottom-center to capture the image. To access, you can either tap the Preview icon from the bottom-left corner, or get to the Photos app from the Home screen, go to Albums, and access the captured photo from the Recents album.
 /a>
/a>Part 2: Take a Photo with a Blurred Background on Older iPhones by Getting Closer to the Subject
If you are using an older model of iPhone that doesn’t have ‘Portrait’ mode, you can still capture the images with the blurred background by getting closer to the subject, and enabling ‘Auto Focus’ before tapping the ‘Capture’ button. You can learn how to do this by following the steps given below:
Step 1: Get to the Camera App
Use the method explained above to launch the Camera app on your iPhone. Because it’s an old model that doesn’t have Portrait mode, you can stay in the PHOTO mode.
Step 2: Turn on Auto Focus
Tap and hold the main subject on the screen until the AE/AF Lock message shows up at the top to confirm that the Auto Focus feature has been turned on.
Step 3: Capture and Access the Image
Get closer to the subject. Ensure that the background around the main subject gets blurry and you move forward. Tap the Capture icon once you are close enough to get the desired level of blurriness in the background. Now, use the method explained above to access the captured photo.
Part 3: Adding Vignette Effect to Photo to Blur the Background on iPhone
The built-in Photos app comes with the Vignette effect that can be applied to the image at the time of editing. However, to get this done, it is recommended that the main subject should be at the center so the background looks unimportant. You can follow the steps given below to learn how to blur a picture on iPhone with the Vignette effect:
Step 1: Get to the Photo’s Edit Mode
Launch the Photos app on your iPhone, go to the album with the target photo, and tap to open the target photo. Next, make sure that the picture is not open in the full-screen mode, and tap Edit from the top-right corner to get to the Edit mode.
Step 2: Apply and Adjust the Vignette Effect
Tap the Effects icon from the bottom, swipe left to horizontally scroll through the available effects to get to VIGNETTE, and use the slider under it to manage the intensity to blur picture iPhone has.
Step 3: Save and Access the Photo
Tap Done from the bottom-right corner to save the changes and to exit the Edit mode. Continue using the image as and/or where needed.
Part 4: Blur the Background of Photos on iPhone with Apps
You may want to use a third-party app to apply effects to the photos because they offer several advanced features that the iPhone’s built-in Photos app doesn’t. Furthermore, since such programs are designed specifically for the purpose, they are quite intuitive and come with self-explanatory options and buttons.
There is a plethora of apps available on the App Store that can help you get the job done, and most of them come with their free tutorials to teach how to blur photos on iPhone. One such program is Snapseed that offers an easy way to pick the main subject in the image, and blur all the background objects behind it. The process of blurring the picture with Snapseed is given below:
Step 1: Add the Target Photo to Snapseed
After installing Snapseed from the App Store , launch the program, and tap anywhere on the main screen. On the accessibility allowance box, tap Select Photos, tap to select the target photo from your iPhone, and tap Done from the top-right corner. Next, tap anywhere on the screen to import the selected picture to Snapseed.
Step 2: Pick the Blur Tool
Tap TOOLS from the bottom of the interface, and from the options available in the box that pops up, tap Lens Blur.
Step 3: Adjust the Blur Shape and Size
Tap the Shape icon from the bottom to switch between the Linear and Elliptical blur shapes. Tap the Blue dot at the center of the image, and drag it to the main subject in the photo. Next, use two fingers to drag inwards or outwards on the screen to decrease or increase the effective area respectively.
Step 4: Blur the Photo and Export
From the top, ensure that the Blur Strength option is selected, tap anywhere on the screen, and drag to the right to increase the intensity of the blurriness. Optionally, you can tap the Effect Types icon from the bottom, and tap to choose Vignette Strength from the box that comes up.

Then, as earlier, drag your finger to the right or left anywhere on the screen to increase or decrease the intensity of the effect respectively. Once done, tap the OK button (with the tick mark) from the bottom-right corner. Back on the main screen, tap EXPORT from the bottom-right, you tap your preferred option for exporting.
Conclusion
Blurring the background in a photo ensures that the main subject remains in the focus, and all the other unimportant objects don’t steal the limelight. If you are using iPhone 7 Plus or above models, the background of the photos can be blurred at the time of capturing. Furthermore, the built-in Photos app in iPhones also come with the Vignette effect that enables you to do the job with ease. However, if you want precision and more control over the images while blurring, you can use an efficient third-party tool like Snapseed that also has its own set of tutorials to teach how to blur a picture on iPhone.
02 Take a Photo with a Blurred Background
03 Add Vignette Effect to Photo to Blur the Background
04 Blur the Background of Photos on iPhone with Apps
Part 1: How to Blur the Photo Background with Portrait Mode on iPhone
Portrait mode in the Camera app is available on iPhone 7 Plus and above models. However, if you are using iPhone SE 2020 or iPhone XR, you can blur the background of the images only with the people as the main subject.
You can learn how to blur an image on iPhone using Portrait mode by following the instructions given below:
Step 1: Launch the Camera App
Grab your iPhone (iPhone 13 Pro Max is used here for illustration), and tab the Camera icon from the Home screen to launch the app.
Step 2: Get to the Portrait Mode and Adjust the Depth
Swipe-drag the modes present above the Shutter button to switch to the PORTRAIT option, and tap the main subject on the screen that you want to capture the image of. Next, tap the f (Depth) icon from the top-right corner, and drag the Depth slider to the left to increase the intensity of the blur effect of the background.
 SwifDoo PDF Perpetual (1 PC) Free upgrade. No monthly fees ever.
Step 3: Capture and Access the Photo
Tap the Capture icon from the bottom-center to capture the image. To access, you can either tap the Preview icon from the bottom-left corner, or get to the Photos app from the Home screen, go to Albums, and access the captured photo from the Recents album.
Part 2: Take a Photo with a Blurred Background on Older iPhones by Getting Closer to the Subject
If you are using an older model of iPhone that doesn’t have ‘Portrait’ mode, you can still capture the images with the blurred background by getting closer to the subject, and enabling ‘Auto Focus’ before tapping the ‘Capture’ button. You can learn how to do this by following the steps given below:
Step 1: Get to the Camera App
Use the method explained above to launch the Camera app on your iPhone. Because it’s an old model that doesn’t have Portrait mode, you can stay in the PHOTO mode.
Step 2: Turn on Auto Focus
Tap and hold the main subject on the screen until the AE/AF Lock message shows up at the top to confirm that the Auto Focus feature has been turned on.
Step 3: Capture and Access the Image
Get closer to the subject. Ensure that the background around the main subject gets blurry and you move forward. Tap the Capture icon once you are close enough to get the desired level of blurriness in the background. Now, use the method explained above to access the captured photo.

Key features:
• Import from any devices and cams, including GoPro and drones. All formats supported. Сurrently the only free video editor that allows users to export in a new H265/HEVC codec, something essential for those working with 4K and HD.
• Everything for hassle-free basic editing: cut, crop and merge files, add titles and favorite music
• Visual effects, advanced color correction and trendy Instagram-like filters
• All multimedia processing done from one app: video editing capabilities reinforced by a video converter, a screen capture, a video capture, a disc burner and a YouTube uploader
• Non-linear editing: edit several files with simultaneously
• Easy export to social networks: special profiles for YouTube, Facebook, Vimeo, Twitter and Instagram
• High quality export – no conversion quality loss, double export speed even of HD files due to hardware acceleration
• Stabilization tool will turn shaky or jittery footage into a more stable video automatically.
• Essential toolset for professional video editing: blending modes, Mask tool, advanced multiple-color Chroma Key
Part 3: Adding Vignette Effect to Photo to Blur the Background on iPhone
The built-in Photos app comes with the Vignette effect that can be applied to the image at the time of editing. However, to get this done, it is recommended that the main subject should be at the center so the background looks unimportant. You can follow the steps given below to learn how to blur a picture on iPhone with the Vignette effect:
Step 1: Get to the Photo’s Edit Mode
Launch the Photos app on your iPhone, go to the album with the target photo, and tap to open the target photo. Next, make sure that the picture is not open in the full-screen mode, and tap Edit from the top-right corner to get to the Edit mode.
Step 2: Apply and Adjust the Vignette Effect
Tap the Effects icon from the bottom, swipe left to horizontally scroll through the available effects to get to VIGNETTE, and use the slider under it to manage the intensity to blur picture iPhone has.
Step 3: Save and Access the Photo
Tap Done from the bottom-right corner to save the changes and to exit the Edit mode. Continue using the image as and/or where needed.
Part 4: Blur the Background of Photos on iPhone with Apps
You may want to use a third-party app to apply effects to the photos because they offer several advanced features that the iPhone’s built-in Photos app doesn’t. Furthermore, since such programs are designed specifically for the purpose, they are quite intuitive and come with self-explanatory options and buttons.
There is a plethora of apps available on the App Store that can help you get the job done, and most of them come with their free tutorials to teach how to blur photos on iPhone. One such program is Snapseed that offers an easy way to pick the main subject in the image, and blur all the background objects behind it. The process of blurring the picture with Snapseed is given below:
Step 1: Add the Target Photo to Snapseed
After installing Snapseed from the App Store , launch the program, and tap anywhere on the main screen. On the accessibility allowance box, tap Select Photos, tap to select the target photo from your iPhone, and tap Done from the top-right corner. Next, tap anywhere on the screen to import the selected picture to Snapseed.
Step 2: Pick the Blur Tool
Tap TOOLS from the bottom of the interface, and from the options available in the box that pops up, tap Lens Blur.

Step 3: Adjust the Blur Shape and Size
Tap the Shape icon from the bottom to switch between the Linear and Elliptical blur shapes. Tap the Blue dot at the center of the image, and drag it to the main subject in the photo. Next, use two fingers to drag inwards or outwards on the screen to decrease or increase the effective area respectively.
Step 4: Blur the Photo and Export
From the top, ensure that the Blur Strength option is selected, tap anywhere on the screen, and drag to the right to increase the intensity of the blurriness. Optionally, you can tap the Effect Types icon from the bottom, and tap to choose Vignette Strength from the box that comes up.
Then, as earlier, drag your finger to the right or left anywhere on the screen to increase or decrease the intensity of the effect respectively. Once done, tap the OK button (with the tick mark) from the bottom-right corner. Back on the main screen, tap EXPORT from the bottom-right, you tap your preferred option for exporting.
Conclusion
Blurring the background in a photo ensures that the main subject remains in the focus, and all the other unimportant objects don’t steal the limelight. If you are using iPhone 7 Plus or above models, the background of the photos can be blurred at the time of capturing. Furthermore, the built-in Photos app in iPhones also come with the Vignette effect that enables you to do the job with ease. However, if you want precision and more control over the images while blurring, you can use an efficient third-party tool like Snapseed that also has its own set of tutorials to teach how to blur a picture on iPhone.
- Title: The Ultimate Guide to Smoothing iPhone Pics (4 Methods)
- Author: Paul
- Created at : 2024-07-27 03:41:38
- Updated at : 2024-07-28 03:41:38
- Link: https://extra-information.techidaily.com/the-ultimate-guide-to-smoothing-iphone-pics-4-methods/
- License: This work is licensed under CC BY-NC-SA 4.0.