![[Updated] Adobe Tactics for Dynamic 3D Text Design](https://www.lifewire.com/thmb/-x-v6gsRkfRE46H9CcSeGMAZDZk=/540x405/filters:no_upscale():max_bytes(150000):strip_icc()/how-to-fix-it-when-the-specified-network-name-is-no-longer-available-5207184-1-e56d1f6c2f864e1ea9b53db560536b50.jpg)
[Updated] Adobe Tactics for Dynamic 3D Text Design
Adobe Tactics for Dynamic 3D Text Design
It takes 10 minutes. Even if you’ve never used Adobe Illustrator before, you will still need about 10 minutes to create a 3D text effect in Adobe Illustrator. Whatever your reason for creating this effect, you can customize it thoroughly and get a result that completely meets your requirements.
This guide will show you the step-by-step process of creating a 3D text effect in Adobe Illustrator. So, if you’re ready, let’s begin.
What You Need to Create a 3D Text Effect in Adobe Illustrator
All you need are ten minutes of your time and the Adobe Illustrator application. Oh yes, and you need a little bit of imagination as well. That’s all there is to it.
After you get the program, install it and follow the step-by-step instructions you’ll see below.
Also, there are plenty of different ways to create 3D text effects in Adobe Illustrator. This tutorial will focus on explaining the easiest and quickest one. Just know that this doesn’t mean the result will be wrong. Most methods yield the same results.
How to Create 3D Text Effects in Adobe Illustrator
Now that you know what you’re getting into, let’s finally reveal the entire process. Just follow the steps and do as you see here.
Step1 Open the program and start a new project.
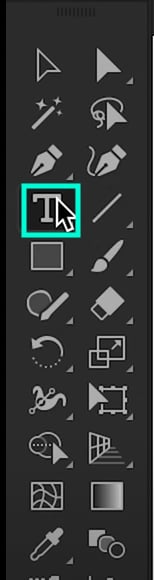
Step2 Click on the Type tool and click anywhere on your blank canvas. Then, type in your text—type in anything you want.
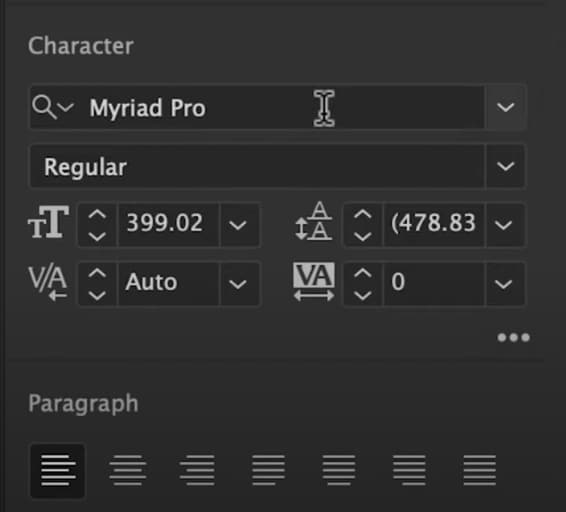
Step3 Now, look at the bottom-right corner of the program. Find the Font settings and change your font type and size to anything you want.

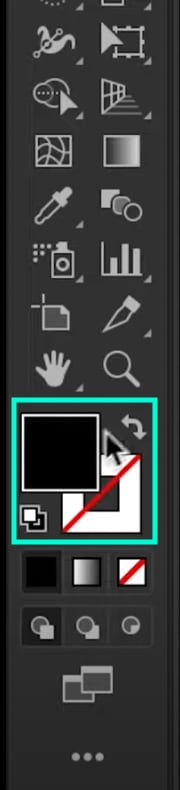
Step4 Next, choose any color you want for your text from the panel on the screen’s left side. Just remember to click on your text first before you start changing colors.

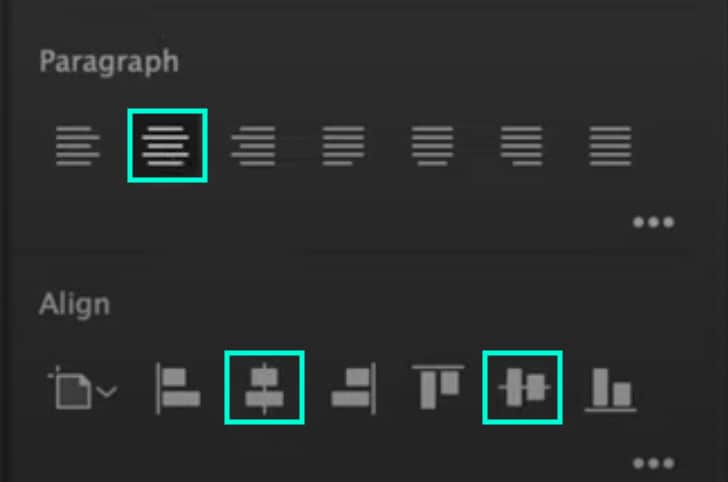
Step5 Align the text to make it easier to edit and move around the canvas later. Just click on it and then click on the three buttons in the image below. This section is located at the bottom-right corner of the screen.

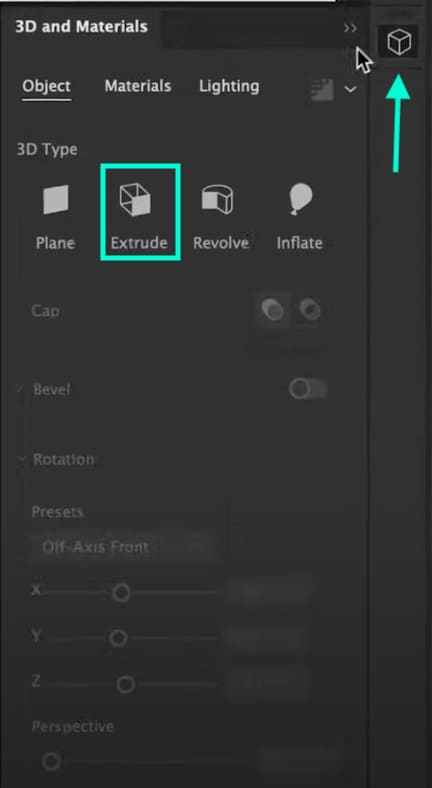
Step6 Up next, you need to turn on your 3D Effects panel if it still needs to be activated. To do this, click on Window → 3D and Materials. Then, look at the right side of the screen, and you will see the panel pop up.
Step7 Click on the box icon on the right side of the screen and select “Extrude” This will instantly transform your text into a 3D model.
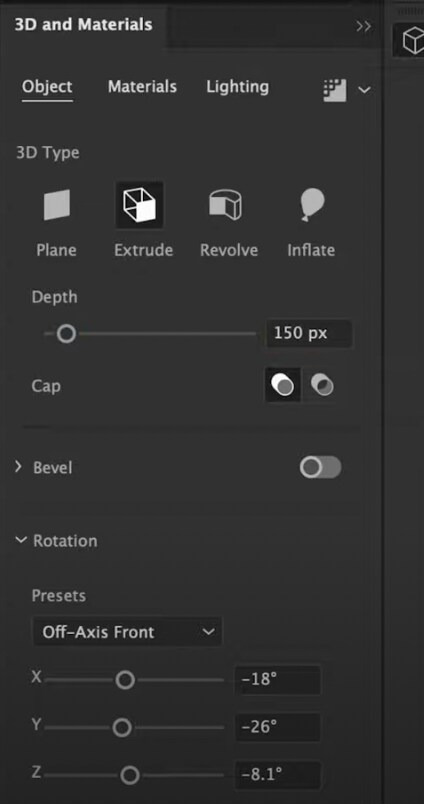
Step8 Now, all left to do is experiment with the settings in this panel and adjust how you want your 3D text to look. You can adjust its width, rotation, presets, angle, perspective, and so on. Just play around with the settings until you find your ideal result.

Step9 Finally, it’s time to export the image, and you’re all done.
Best Alternative Way to Create 3D Text Animation
You might not believe it, but there’s an even more accessible and less expensive way to create 3D text effects. You can use Filmora . Compared to Illustrator, Filmora is much better for beginners and more affordable.
Free Download For Win 7 or later(64-bit)
Free Download For macOS 10.14 or later
If you’re just a beginner at video or photo editing, you want to use a more straightforward tool. Illustrator can get very challenging for complete beginners. But Filmora offers a more straightforward interface that still delivers the same professional results. Please read further and see how to realize it.
How to Create a 3D Text Effect In Filmora?
The steps are simple. Just follow them precisely as you see here, and you won’t have any problems.
Step1 Download Filmora and run the program. Once it opens, click on New Project.
Step2 Head to the Titles tab and search for the “3D Illustration” title. Then, drag it into the Timeline. You can also find several other 3D titles. If you like another one better, drag that one instead of the one we mentioned here.

Step3 Double-click on the 3D title layer you dragged into the Timeline. When the settings panel opens, use all the boxes and slide bars to customize your 3D text any way you want. When you’re done customizing it, click on OK.

Key features:
• Import from any devices and cams, including GoPro and drones. All formats supported. Сurrently the only free video editor that allows users to export in a new H265/HEVC codec, something essential for those working with 4K and HD.
• Everything for hassle-free basic editing: cut, crop and merge files, add titles and favorite music
• Visual effects, advanced color correction and trendy Instagram-like filters
• All multimedia processing done from one app: video editing capabilities reinforced by a video converter, a screen capture, a video capture, a disc burner and a YouTube uploader
• Non-linear editing: edit several files with simultaneously
• Easy export to social networks: special profiles for YouTube, Facebook, Vimeo, Twitter and Instagram
• High quality export – no conversion quality loss, double export speed even of HD files due to hardware acceleration
• Stabilization tool will turn shaky or jittery footage into a more stable video automatically.
• Essential toolset for professional video editing: blending modes, Mask tool, advanced multiple-color Chroma Key
![]()
Step4 Finally, import a video in Filmora and drag it under the text into the Timeline. Choose any video or image you want to display underneath your 3D text. That’s it! Hit Export, and you’re all done. Congratulations on creating a 3D text effect in Filmora.
If you want to learn more about Filmora’s fantastic features, please watch the video below to see what the latest version of Filmora 12 brings to you!
Conclusion
Both programs will get the job done if you use Adobe Illustrator or Filmora for your 3D text effect. The main difference is that it will be easier with Filmora. The choice is yours. Have fun!
Free Download For macOS 10.14 or later
If you’re just a beginner at video or photo editing, you want to use a more straightforward tool. Illustrator can get very challenging for complete beginners. But Filmora offers a more straightforward interface that still delivers the same professional results. Please read further and see how to realize it.
How to Create a 3D Text Effect In Filmora?
The steps are simple. Just follow them precisely as you see here, and you won’t have any problems.
Step1 Download Filmora and run the program. Once it opens, click on New Project.
Step2 Head to the Titles tab and search for the “3D Illustration” title. Then, drag it into the Timeline. You can also find several other 3D titles. If you like another one better, drag that one instead of the one we mentioned here.
Step3 Double-click on the 3D title layer you dragged into the Timeline. When the settings panel opens, use all the boxes and slide bars to customize your 3D text any way you want. When you’re done customizing it, click on OK.
![]()
Step4 Finally, import a video in Filmora and drag it under the text into the Timeline. Choose any video or image you want to display underneath your 3D text. That’s it! Hit Export, and you’re all done. Congratulations on creating a 3D text effect in Filmora.
If you want to learn more about Filmora’s fantastic features, please watch the video below to see what the latest version of Filmora 12 brings to you!
Conclusion
Both programs will get the job done if you use Adobe Illustrator or Filmora for your 3D text effect. The main difference is that it will be easier with Filmora. The choice is yours. Have fun!
- Title: [Updated] Adobe Tactics for Dynamic 3D Text Design
- Author: Paul
- Created at : 2024-07-27 01:39:03
- Updated at : 2024-07-28 01:39:03
- Link: https://extra-information.techidaily.com/updated-adobe-tactics-for-dynamic-3d-text-design/
- License: This work is licensed under CC BY-NC-SA 4.0.