![[Updated] Crafting Compelling Movies Implementing Fade Techniques](https://thmb.techidaily.com/e238ad00eb0e97c8dd57c3ad56e056f669853f2127f27582290858df483758e7.jpg)
"[Updated] Crafting Compelling Movies Implementing Fade Techniques"
Crafting Compelling Movies: Implementing Fade Techniques
Versatile Video Editor - Wondershare Filmora
An easy yet powerful editor
Numerous effects to choose from
Detailed tutorials provided by the official channel
Today’s topic is to add fades in Premiere Pro. Do you want to fade in or out your video to black or white? Then, we have got you. Adobe Premiere Pro is one popular video editing software. Fading is every editor’s trump card, making it enjoyable to viewers by seamless scene transitions and some elements pop onto the screen. Fading is an effortless and beautiful effect that hep the clips to merge into the color of another clip smoothly. It is a way of telling viewers there is a visual change without explicitly telling them. The fade effect is in two forms fade in and fade out. Moreover, Fade-in appears at the beginning of the video and fade-out at the end of the video. And in this blog, we will discuss how to fade in Premiere Pro.
A fade-in refers to the technique that allows video/image to emerge from the black, white, or any color background. In contrast, fade-out relates to the methods which will enable videos/images to blend naturally into the black, white, or color background. We will also learn how to fade in video Premiere Pro.
In this article
01 [Fade Video Transition Premiere Pro](#Part 1)
02 [Fade In/Out sound on Premiere Pro](#Part 2)
03 [Add Video fade in Premiere Pro](#Part 3)
Part 1 Fade Video Transition Premiere Pro
Premiere Pro to add fade transition can be between clips to link and move from one shot to another shot smoothly. Premiere Pro offers many transition effects to edit the videos: Audio, Video, and VR.
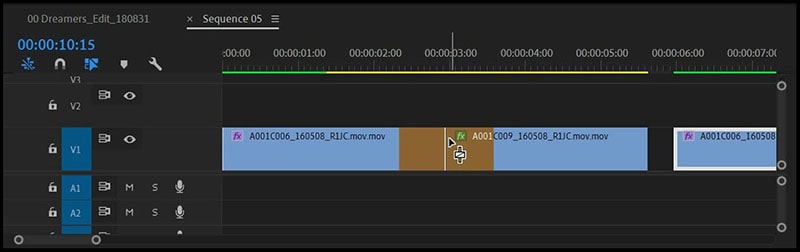
Transitions are generally of two types; single-sided or double-sided transitions. Single-sided is when you have only a single clip. This image shows how the transition fades look. The double-sided transition will have a diagonal line, and the single-sided transition will have one-half light and the other half dark.
Step1 Apply Transition between the clips
Initially, you need to apply the transition to add fading effects. First, choose Window > Effects. Expand the video or audio transitions, expand the bin containing the transition, and drag and drop the required transition between the two clips.
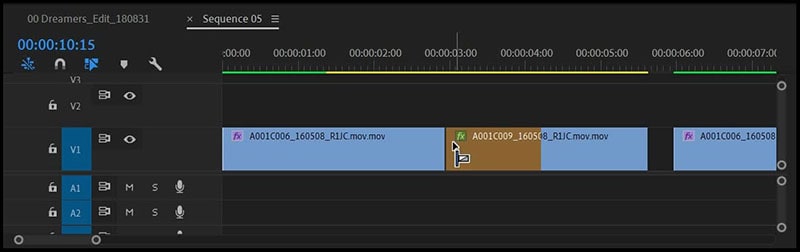
Step2 Single-Sided Transitions
When you place the transition on a single cut, click on Ctrl + drag on the transition to the timeline. Release the mouse when the “End at Cut” or “Start at Cut” icon appears.
End At Cut: Adjust the end transition at the end of the first clip
Start At Cut: Adjust the start of the transition at the beginning of the first clip. This is another method to add fade in the Premiere.
Part 2 Fade In/Out sound on Premiere Pro
Are you in doubt about how to fade background music in Premiere Pro? A crossfade is an essential tool for smooth video effects where viewers cannot notice any cuts between the videos, which can be valuable for both video and audio. There are two types of crossfading, either by using keyframes manually or using transitions pre-built in Premiere Pro.
Let’s learn how to add crossfade in Premiere. There are three types of crossfade available in the Premiere: constant gain, constant power, and exponential power to fade music. Lets us discuss how to add music fade in Premiere Pro.
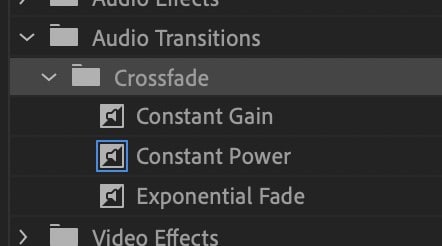
You can find these options in Effects > Audio Transitions > Crossfade available in the project panel. This is how to add a crossfade in Premiere with just three simple steps. There are three types of crossfade available in Premiere Pro, and below is a brief description of them.
Constant Gain
The constant gain crossfades are employed to vary the audio at a constant rate as it fades in and fades out at the transition between the clips. But sometimes, it is often abrupt. These are usually done manually using keyframes.
But this constant gain generally seems to be noise and not smooth compared to continuous power. Let us discuss this next.
Constant Power
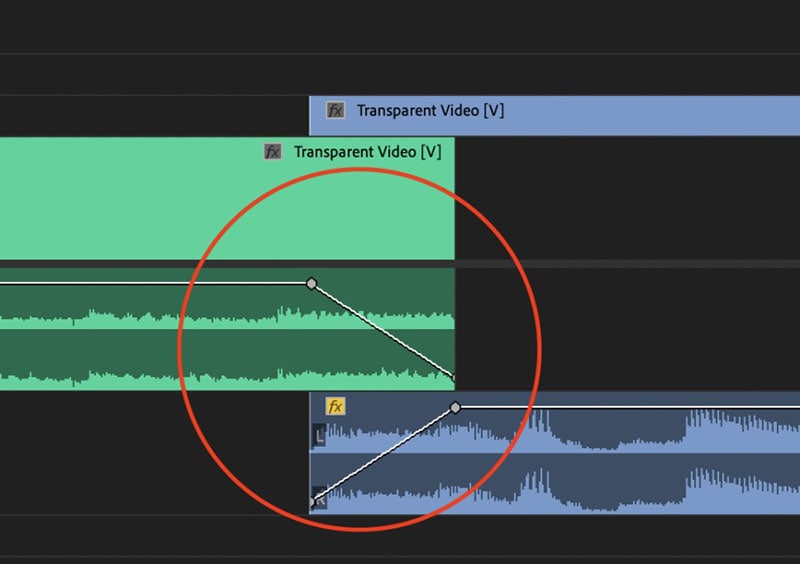
Constant Power crossfade creates a smooth, gradual transition effect analogous to dissolve to the following clip compared to constant gain. Constant power fades in the audio effect initially and then fades out at the end of the clip. In the image, you can notice the keyframes have gradually decreased in the first clip and steadily increased at the end of the second clip.
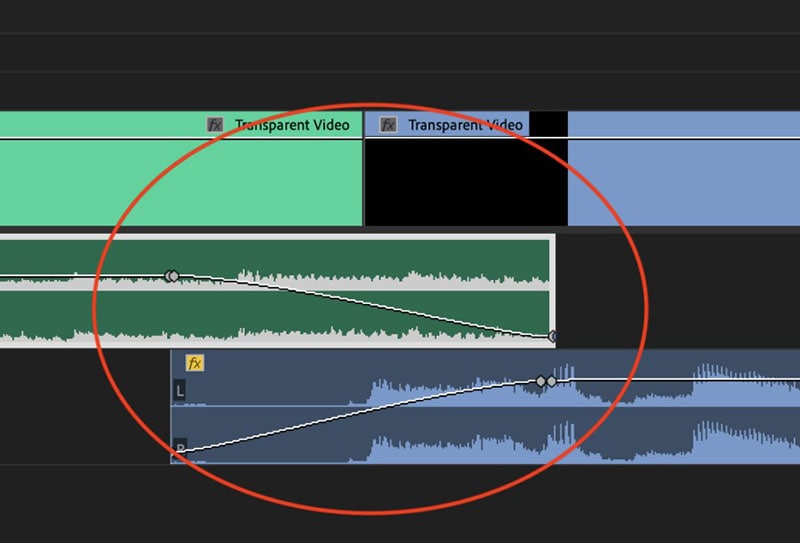
Compared to all other crossfades, constant power is the best audio crossfade. This will be giving a more smoothing effect and gradual shift in gain between the clips, nothing more apparent changes during the transition. This is how to fade in sound on Premiere Pro using constant power crossfade.
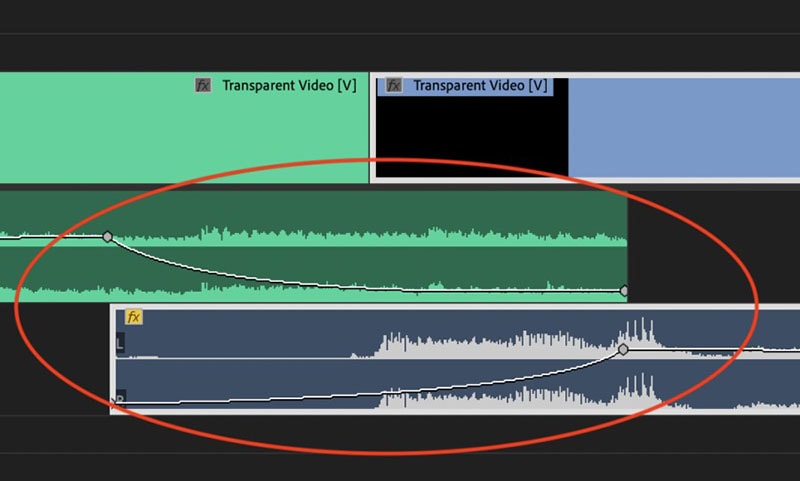
Exponential Fade
Exponential Fade is opposite to constant power. It fades out the first clip and disappears in the second clip, which brings a smooth logarithmic curve. This is how to add exponential Fade in Premiere Pro to the video.
Thus, now you know how to add crossfade in Premiere Pro smoothly.
Part 3 Add Video fade in Premiere Pro
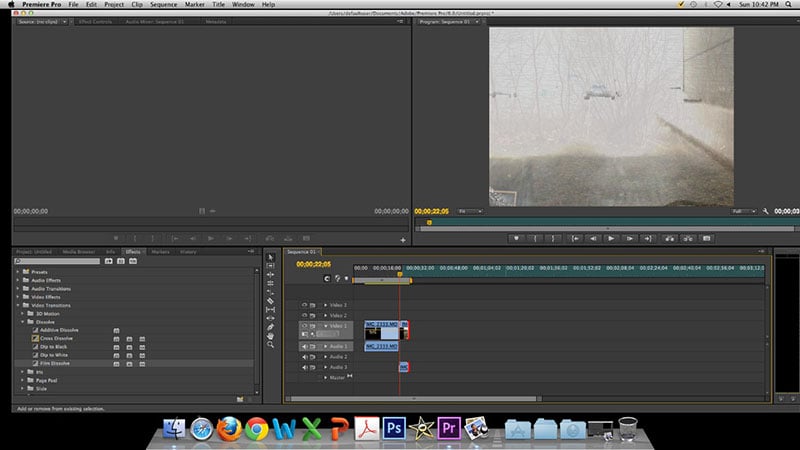
When we want to add a black color between two videos for smooth movements, the best idea is to fade-in and fade-out. In Premiere Pro, you will not find a fade option directly. It will appear as Film Dissolve in the settings of the Premiere Pro dashboard. Below is an example clip of how the video will look if you add black color fading effects. Let us discuss how to add video fade in Premiere Pro.
Step 1 Choose the effect
To add fade in Premiere Pro, navigate Effects > Video Transitions > Dissolve > Film Dissolve.
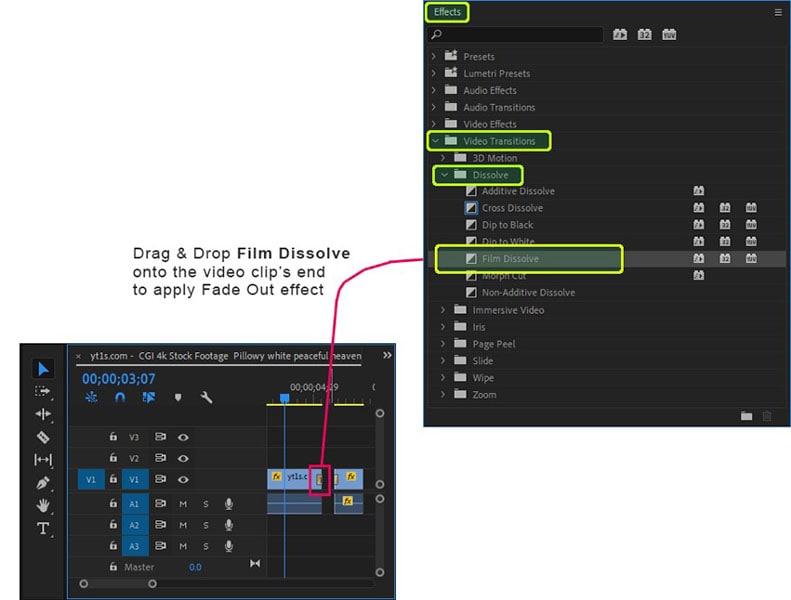
Fade in and out can be done using Film Dissolve found in the Video transitions folder.
Step 2 Appling Fade in/out
In Adobe Premiere, add Fade in or out, click and hold on Film Dissolve effect. Drag the Effect onto the video portion in the Timeline to create a fade-in effect drop at the beginning of the clip. To create a fade-out effect, drop at the end of the clip. After everything is automatic, you can clip on the Play button to see its action.
Step 3 Change length of the Fade in and out effects
It is possible to change the length of the Fade in and out effects after the film dissolve is applied. You can notice that the Fade gets added between the clip. Inside the video, there is a small box. You can click on it drag their edges to increase the duration of the fade-in/out in the video.
Short video transitions are the best between the clips for most transitions. No one would like to wait between two scenes, but there are situations you might want to extend. This is how to add fade in the premiere.
Tip: Fade In/Out Effects with Filmora
There is many other professional editing software like Adobe Premiere Pro for Fade in/out, but Wondershare Filmora offers the easiest and simple way. Same as premiere pro, Filmora fading effects is called Dissolve transition sometimes, lap dissolve transitions are a gradual smooth transition to move from one image to another. Filmora offers many transitions under ripple or dissolves categories like Dispersion blur, evaporate, ripple, wind, swirl, or wave. You can edit the duration of the transitions to get better results. A unique feature in Filmora is that just simple fading effects, you can use motion fade effect to make your footage more vivid. Filmora gives multiple colors to choose from for transitions.
A new feature in the latest versions of Filmora is the keyframing animation feature. This feature is ideal for adding fade-in and fade-out transitions, and you can have more control over the Opacity and duration in fading using Filmora.
Wondershare Filmora
Get started easily with Filmora’s powerful performance, intuitive interface, and countless effects!
Try It Free Try It Free Try It Free Learn More about Filmora>

Conclusion
Thus, in this guide, you learned how to add fade-in Premiere and proper edits to add fade-in Premiere. While sharing any video content, the flow of the video is all it matters. Nowadays, we all share any information or entertainment through videos only. The most demanded software in the market is video editing software, but the point is which is best. We have learned how to add Fade in Adobe Premiere and other fade effects like fade in title Premiere Pro on this journey.
Today’s topic is to add fades in Premiere Pro. Do you want to fade in or out your video to black or white? Then, we have got you. Adobe Premiere Pro is one popular video editing software. Fading is every editor’s trump card, making it enjoyable to viewers by seamless scene transitions and some elements pop onto the screen. Fading is an effortless and beautiful effect that hep the clips to merge into the color of another clip smoothly. It is a way of telling viewers there is a visual change without explicitly telling them. The fade effect is in two forms fade in and fade out. Moreover, Fade-in appears at the beginning of the video and fade-out at the end of the video. And in this blog, we will discuss how to fade in Premiere Pro.
A fade-in refers to the technique that allows video/image to emerge from the black, white, or any color background. In contrast, fade-out relates to the methods which will enable videos/images to blend naturally into the black, white, or color background. We will also learn how to fade in video Premiere Pro.
In this article
01 [Fade Video Transition Premiere Pro](#Part 1)
02 [Fade In/Out sound on Premiere Pro](#Part 2)
03 [Add Video fade in Premiere Pro](#Part 3)
Part 1 Fade Video Transition Premiere Pro
Premiere Pro to add fade transition can be between clips to link and move from one shot to another shot smoothly. Premiere Pro offers many transition effects to edit the videos: Audio, Video, and VR.
Transitions are generally of two types; single-sided or double-sided transitions. Single-sided is when you have only a single clip. This image shows how the transition fades look. The double-sided transition will have a diagonal line, and the single-sided transition will have one-half light and the other half dark.
Step1 Apply Transition between the clips
Initially, you need to apply the transition to add fading effects. First, choose Window > Effects. Expand the video or audio transitions, expand the bin containing the transition, and drag and drop the required transition between the two clips.
Step2 Single-Sided Transitions
When you place the transition on a single cut, click on Ctrl + drag on the transition to the timeline. Release the mouse when the “End at Cut” or “Start at Cut” icon appears.
End At Cut: Adjust the end transition at the end of the first clip
Start At Cut: Adjust the start of the transition at the beginning of the first clip. This is another method to add fade in the Premiere.
Part 2 Fade In/Out sound on Premiere Pro
Are you in doubt about how to fade background music in Premiere Pro? A crossfade is an essential tool for smooth video effects where viewers cannot notice any cuts between the videos, which can be valuable for both video and audio. There are two types of crossfading, either by using keyframes manually or using transitions pre-built in Premiere Pro.
Let’s learn how to add crossfade in Premiere. There are three types of crossfade available in the Premiere: constant gain, constant power, and exponential power to fade music. Lets us discuss how to add music fade in Premiere Pro.
You can find these options in Effects > Audio Transitions > Crossfade available in the project panel. This is how to add a crossfade in Premiere with just three simple steps. There are three types of crossfade available in Premiere Pro, and below is a brief description of them.
Constant Gain
The constant gain crossfades are employed to vary the audio at a constant rate as it fades in and fades out at the transition between the clips. But sometimes, it is often abrupt. These are usually done manually using keyframes.
But this constant gain generally seems to be noise and not smooth compared to continuous power. Let us discuss this next.
Constant Power
Constant Power crossfade creates a smooth, gradual transition effect analogous to dissolve to the following clip compared to constant gain. Constant power fades in the audio effect initially and then fades out at the end of the clip. In the image, you can notice the keyframes have gradually decreased in the first clip and steadily increased at the end of the second clip.
Compared to all other crossfades, constant power is the best audio crossfade. This will be giving a more smoothing effect and gradual shift in gain between the clips, nothing more apparent changes during the transition. This is how to fade in sound on Premiere Pro using constant power crossfade.
Exponential Fade
Exponential Fade is opposite to constant power. It fades out the first clip and disappears in the second clip, which brings a smooth logarithmic curve. This is how to add exponential Fade in Premiere Pro to the video.
Thus, now you know how to add crossfade in Premiere Pro smoothly.
Part 3 Add Video fade in Premiere Pro
When we want to add a black color between two videos for smooth movements, the best idea is to fade-in and fade-out. In Premiere Pro, you will not find a fade option directly. It will appear as Film Dissolve in the settings of the Premiere Pro dashboard. Below is an example clip of how the video will look if you add black color fading effects. Let us discuss how to add video fade in Premiere Pro.
Step 1 Choose the effect
To add fade in Premiere Pro, navigate Effects > Video Transitions > Dissolve > Film Dissolve.
Fade in and out can be done using Film Dissolve found in the Video transitions folder.
Step 2 Appling Fade in/out
In Adobe Premiere, add Fade in or out, click and hold on Film Dissolve effect. Drag the Effect onto the video portion in the Timeline to create a fade-in effect drop at the beginning of the clip. To create a fade-out effect, drop at the end of the clip. After everything is automatic, you can clip on the Play button to see its action.
Step 3 Change length of the Fade in and out effects
It is possible to change the length of the Fade in and out effects after the film dissolve is applied. You can notice that the Fade gets added between the clip. Inside the video, there is a small box. You can click on it drag their edges to increase the duration of the fade-in/out in the video.
Short video transitions are the best between the clips for most transitions. No one would like to wait between two scenes, but there are situations you might want to extend. This is how to add fade in the premiere.
Tip: Fade In/Out Effects with Filmora
There is many other professional editing software like Adobe Premiere Pro for Fade in/out, but Wondershare Filmora offers the easiest and simple way. Same as premiere pro, Filmora fading effects is called Dissolve transition sometimes, lap dissolve transitions are a gradual smooth transition to move from one image to another. Filmora offers many transitions under ripple or dissolves categories like Dispersion blur, evaporate, ripple, wind, swirl, or wave. You can edit the duration of the transitions to get better results. A unique feature in Filmora is that just simple fading effects, you can use motion fade effect to make your footage more vivid. Filmora gives multiple colors to choose from for transitions.
A new feature in the latest versions of Filmora is the keyframing animation feature. This feature is ideal for adding fade-in and fade-out transitions, and you can have more control over the Opacity and duration in fading using Filmora.
Wondershare Filmora
Get started easily with Filmora’s powerful performance, intuitive interface, and countless effects!
Try It Free Try It Free Try It Free Learn More about Filmora>
Conclusion
Thus, in this guide, you learned how to add fade-in Premiere and proper edits to add fade-in Premiere. While sharing any video content, the flow of the video is all it matters. Nowadays, we all share any information or entertainment through videos only. The most demanded software in the market is video editing software, but the point is which is best. We have learned how to add Fade in Adobe Premiere and other fade effects like fade in title Premiere Pro on this journey.
Also read:
- [New] Engaging Generations on Social Media with TikTok Campaigns
- [New] The Digital Dividend Understanding the Calculus of Converting Viewership Into Revenue for 2024
- [Updated] Android's Path to Virtual Reality Tips and Tricks
- [Updated] Bypassing Watermarks for Photographic Needs
- [Updated] Comparing the Best of GoPro Cameras
- [Updated] Complete Overview Harnessing the Power of Google's Text Conversion
- [Updated] In 2024, In-Game Capturing Titans
- 9 Best Phone Monitoring Apps for Xiaomi Redmi A2 | Dr.fone
- A Deeper Look at Viva's Video Capabilities for 2024
- Audience-Friendly Audio Fades Practices in Audacity
- Breaking Down Key Steps to Tackle Windows Blue Screen
- Business-Grade Movavi Video Editing & Screen Recording Tool - Comprehensive Media Production Suite
- Effortless Pathways to Scour for Mass Video Downloads on TikTok
- Flash-Free Visual Experience Now
- In 2024, A Comprehensible Guide to Integrating Zoom with Win10
- Title: [Updated] Crafting Compelling Movies Implementing Fade Techniques
- Author: Paul
- Created at : 2024-12-09 18:28:51
- Updated at : 2024-12-14 17:10:36
- Link: https://extra-information.techidaily.com/updated-crafting-compelling-movies-implementing-fade-techniques/
- License: This work is licensed under CC BY-NC-SA 4.0.